
Bubbling Stucco: 7 Powerful Ways to Prevent Costly Damage 2025
Understanding Bubbling Stucco: Why It Happens and What It Means
You’ve noticed something strange on your home’s exterior—small bumps or blisters forming on your stucco walls. That unsettling findy might be more than just a cosmetic issue. As a homeowner, understanding bubbling stucco can save you from potentially extensive damage and costly repairs down the road.
Bubbling stucco occurs when the exterior surface develops raised areas, blisters, or bulges. These imperfections happen when moisture or air becomes trapped beneath the surface, creating pressure that pushes outward. Think of it like a blister on skin—it’s your home’s way of telling you something isn’t right underneath.
In my 20+ years as a certified stucco inspector, I’ve seen how these seemingly minor imperfections can signal major problems. At Stucco Safe, we’ve examined hundreds of homes where what started as small bubbles eventually led to significant structural damage.
Here’s what you really need to know about bubbling stucco:
| Aspect | Details |
|---|---|
| What it is | Surface deformities in stucco where the material separates from the underlying layer |
| Main causes | Moisture intrusion (90% of cases), improper installation, poor application techniques |
| Warning signs | White hazy streaks, dark blotches, blistering, hollow sound when tapped |
| Risk level | Can progress from cosmetic issue to structural damage if left untreated |
| Required action | Minor cases: DIY repair; Extensive cases: Professional remediation |
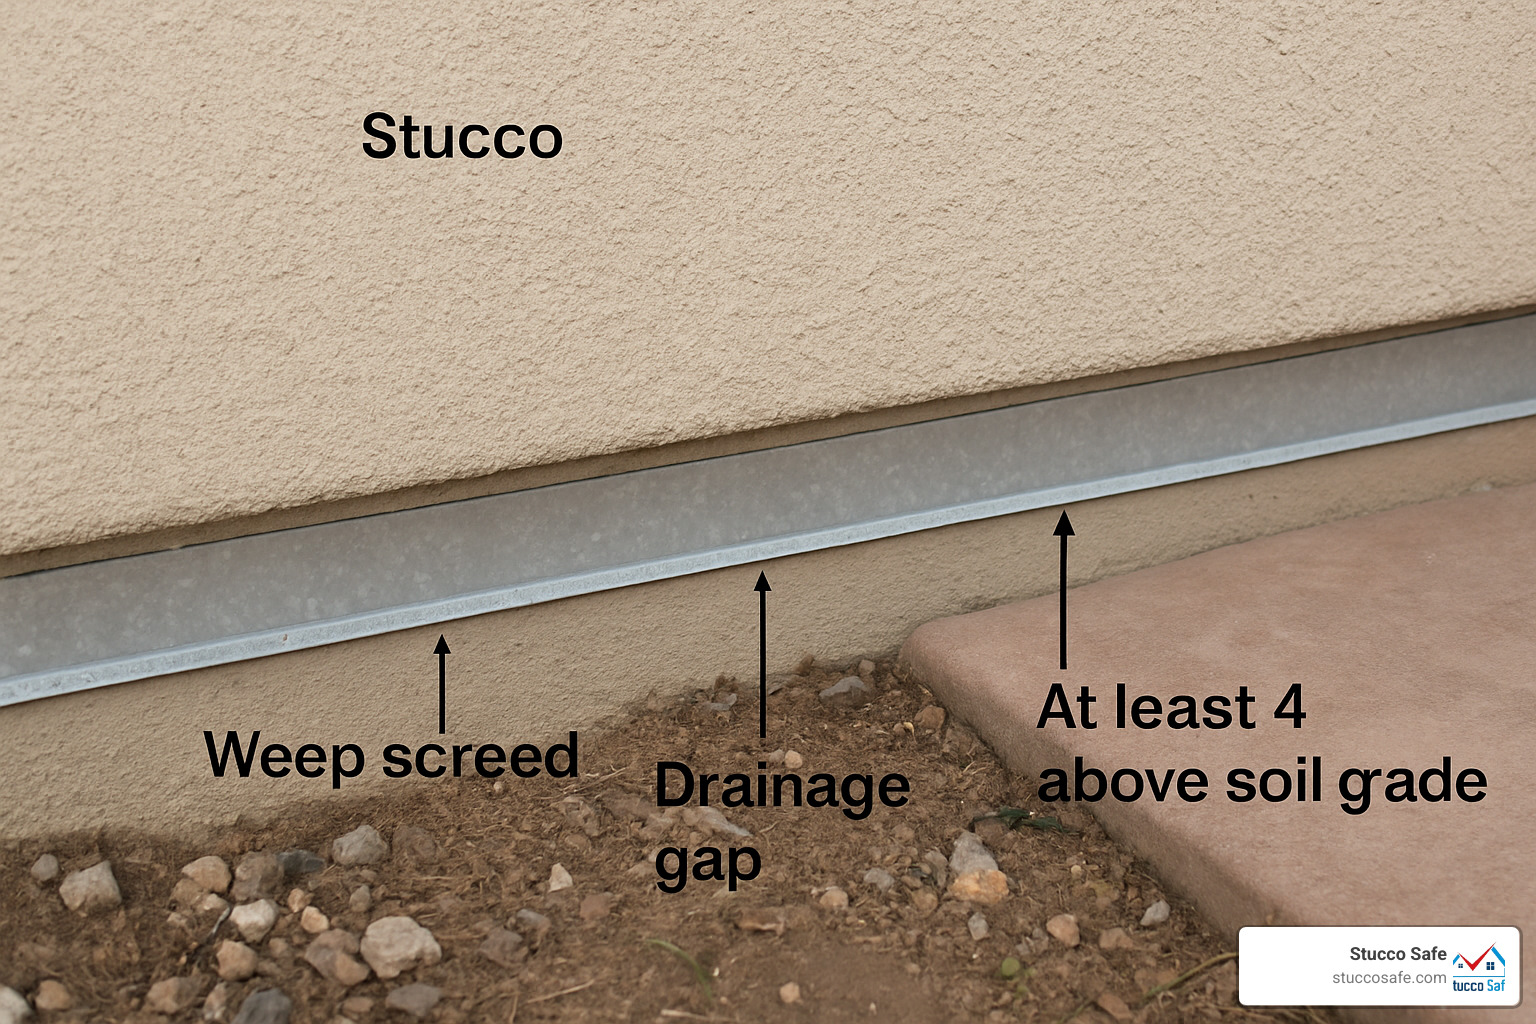
Most homeowners are surprised to learn that those innocent-looking bubbles often indicate a more serious moisture problem lurking behind your walls. Water typically becomes trapped when it finds its way through tiny cracks, improperly sealed windows and doors, or because of missing components like weep screed—that metal strip at the bottom of stucco walls designed to let moisture escape.
When water gets trapped, it doesn’t just sit there. It begins a slow assault on your home’s structure, potentially causing wood rot, mold growth, and deterioration of structural elements. The longer it goes unaddressed, the more expensive and extensive the damage becomes.

I’m Gabe Kesslick, founder of Stucco Safe, and I’ve dedicated my career to helping homeowners identify and address these issues before they become catastrophic. Our team has developed specialized techniques to detect moisture intrusion early, when repairs are simpler and less costly.
The good news? Catching bubbling stucco early often means the difference between a simple repair and a complete wall system replacement. In the following sections, we’ll explore how to identify the early warning signs, understand the root causes, and determine whether you can handle repairs yourself or need professional help.
Identifying Bubbling Stucco (Signs & Early Warnings)
Spotting bubbling stucco in its early stages can be a real money-saver. Our forensic inspection data shows something pretty remarkable: homeowners who catch and fix these issues within the first six months typically spend 70% less on repairs compared to those who wait longer. That’s the difference between a manageable repair bill and one that might keep you up at night!
Visual Indicators
Your stucco walls actually “talk” to you when there’s a problem brewing—you just need to know what to look for.
Those white hazy streaks you might notice? That’s efflorescence—essentially the wall’s cry for help. It happens when water dissolves mineral salts inside the stucco and brings them to the surface. After the water evaporates, you’re left with that distinctive white, powdery residue that says “moisture has been here.”
Keep an eye out for dark blotches too. These discolored patches appear darker than surrounding areas because they’re saturated with moisture. They often show up after a good rain and stay damp longer than the rest of your wall.
If your stucco is painted, blistering paint is a telltale sign. When moisture pushes outward from behind the stucco, it lifts the paint, causing it to bubble, peel, or flake away. Think of it as your wall’s way of showing what’s happening underneath.
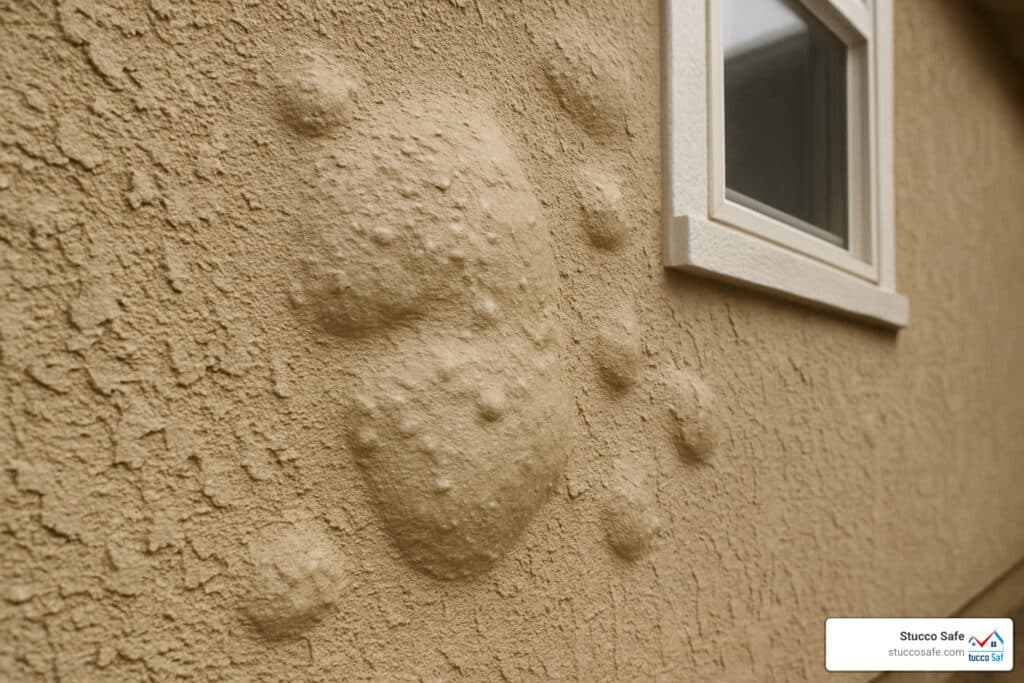
And of course, the most obvious sign: actual visible bubbles or bulges on the surface. These can range from tiny pea-sized blisters to concerning bulges several inches across.

As our senior inspector often points out, “Efflorescence shows up in over 60% of homes with visible stucco bubbling. It’s essentially your wall sending you a text message that water is moving through it.”
Physical Testing
Beyond what your eyes can tell you, there are some simple hands-on tests you can do:
The tap test is surprisingly effective—just gently tap suspicious areas with a rubber mallet or screwdriver handle. Properly adhered stucco produces a solid sound, while bubbling stucco responds with a hollow or drum-like sound that screams “there’s space where there shouldn’t be!”
For more precise detection, we use specialized moisture meters during our inspections. When readings climb above 20%, that’s typically when we start getting concerned about the conditions behind your stucco.
We also employ thermal imaging with infrared cameras that can spot temperature differences indicating moisture behind walls—often before any visible bubbling occurs. It’s like having X-ray vision for your home’s exterior.
Cosmetic vs Structural Clues
Not all bubbling stucco problems are created equal. Some issues are relatively minor, while others suggest more serious trouble brewing.
On the less serious side, you might find hairline blisters smaller than 1/16″ or thin-shell peeling limited to just the finish coat. Isolated bubbles that don’t grow larger or multiply are typically less concerning, as is efflorescence without accompanying moisture stains.
The red flags that should prompt immediate action include bubbles larger than 1/8″ that continue to expand, areas that sound hollow when tapped (suggesting lath delamination), and soft spots in the stucco or underlying sheathing. Persistent dampness or moisture readings above 20% are serious concerns, as is any visible mold on interior walls that correspond with exterior bubbling.
I remember a homeowner in Cherry Hill who learned this lesson the hard way. “What started as a few small bubbles on our south-facing wall quickly spread after a rainy season,” they told me. “By the time we called Stucco Safe, the damage had reached our sheathing. If we’d addressed it six months earlier, we would have saved over $12,000 in repairs.”
Don’t let that be your story. If you’re seeing any of these warning signs, a professional inspection (starting at $495) could save you thousands down the road.
More info about stucco water stains
What Causes Bubbling Stucco?
Ever noticed those troubling bubbles on your stucco walls and wondered what’s happening beneath the surface? You’re not alone. Understanding why bubbling stucco occurs is the first step toward fixing it properly and preventing future damage.
Improper Installation
The truth might be hard to swallow, but installation errors account for over 70% of serious stucco bubbling cases we investigate. When your home’s “skin” isn’t put on correctly, problems are almost inevitable.
Missing or improperly installed weep screed is one of the biggest culprits we see. This humble metal strip at the bottom of your stucco wall might not look important, but it’s actually crucial for letting water escape. Homes lacking proper weep screed are up to 5 times more likely to develop bubbling stucco problems.

Other common installation mistakes include poorly attached lath (the mesh that gives stucco its grip), rushed curing times between coats, and incorrect mix ratios. I’ve seen contractors add too much water to stucco mix for easier application, not realizing they’re creating a sponge-like material that will absorb moisture rather than repel it.
The Role of Moisture Behind the System
Water is stucco’s greatest enemy, responsible for about 90% of all failures including bubbling. As I often tell homeowners, “Where there’s a bubble, there’s usually trouble—and that trouble is almost always moisture.”
Water finds its way behind your stucco through bulk water leaks around windows and doors, wind-driven rain that forces moisture through tiny cracks, and even through capillary action that draws water into microscopic pores in the material.
“What many homeowners don’t realize,” explains our lead moisture analyst, “is that stucco isn’t waterproof—it’s water-resistant. Traditional stucco can absorb up to 5% of its weight in water during heavy rain. If that moisture can’t escape, bubbling is inevitable.”
Even the tiniest tears in your house wrap can lead to significant problems. I’ve seen quarter-inch holes in water-resistive barriers lead to thousands in repair costs because they allowed water to reach the sheathing.
The real challenge is that moisture problems can hide for months or years before showing visible symptoms. By the time you spot bubbling stucco, water may have been doing damage for quite some time.
More info about stucco moisture problems
Environmental & Climate Stressors
Your home’s location and climate play huge roles in stucco performance. Here in the Pennsylvania, New Jersey, and Delaware region, we face some particularly challenging conditions.
Temperature swings are especially hard on stucco. When materials expand and contract at different rates, they create tiny separations where moisture can gather. In areas with significant temperature variations, we see about 30% more bubbling incidents than in more stable climates.
The freeze-thaw cycles we experience in winter are particularly destructive. Water sneaks in, freezes and expands, forcing the stucco layers apart. Then it melts, penetrates deeper, and repeats the cycle. It’s like having thousands of tiny ice wedges working to split your stucco apart from the inside.

For our Delaware coastal clients, salt exposure presents another challenge. Salt-laden air accelerates the deterioration of stucco components, making them more vulnerable to water intrusion. Meanwhile, intense UV exposure on south-facing walls breaks down sealants around windows and penetrations, creating entry points for water.
Even minor seismic movement can create hairline cracks that might seem insignificant but allow water to penetrate over time.
As building science expert Dr. Joseph Lstiburek famously noted: “How can you take a system with thousands of years of history and screw it up? Easy. Keep improving it until it does not work.” His research highlights how modern modifications to traditional stucco—particularly adding polymers that reduce permeability—have compromised stucco’s natural ability to dry after getting wet.
In our testing lab, we’ve confirmed that many modern stucco systems trap moisture rather than allowing it to escape, creating perfect conditions for bubbling stucco to develop.
Latest research on stucco moisture failures
Assessing & Fixing Bubbling Stucco: Repair vs Remediation
When you find bubbling stucco on your home, you’re faced with an important decision: should you simply patch the surface (repair) or address the underlying causes (remediation)? This isn’t just about aesthetics—it’s about protecting your home’s structural integrity.
Diagnostic Assessment
Before reaching for that trowel or calling a contractor, you need to understand what’s really happening behind your walls:
- Moisture Testing: At Stucco Safe, we use specialized moisture meters to measure exactly how wet things are getting behind your stucco. When readings climb above 20%, it’s a red flag that simple patching won’t solve the problem.
- Core Sampling: Think of this as a tiny “test hole” that lets us peek behind the curtain. By removing small sections of stucco, we can examine the condition of what lies beneath—your house wrap, sheathing, and even structural framing.
- Forensic Inspection: Our certified inspectors combine several techniques—visual assessment, moisture mapping, and thermal imaging—to create a comprehensive picture of what’s happening in your walls.
I remember one particular inspection in West Chester where a homeowner called us about what looked like minor bubbling. “It’s probably just a small patch job,” he told me confidently. When our moisture meter showed readings of 35% and we pulled a core sample revealing black mold and deteriorated sheathing, his expression changed completely. What he thought was a $500 repair turned out to be a $15,000 remediation project—but catching it then saved him tens of thousands in potential structural repairs down the road.
Comparing Repair vs. Remediation
| Aspect | Repair | Remediation |
|---|---|---|
| Scope | Addresses surface symptoms | Fixes underlying causes |
| Cost Range | $500-$3,000 | $10,000-$50,000+ |
| Timeline | 1-3 days | 2-6 weeks |
| When Appropriate | Isolated bubbling, low moisture readings, intact sheathing | Widespread bubbling, high moisture readings, damaged sheathing |
| Long-term Result | May require repeated repairs if underlying issues persist | Resolves root causes for lasting protection |
| Warranty | Typically 1-2 years | Often 5-10 years |

Step-by-Step Minor Repair (DIY Friendly)
For isolated bubbling with no evidence of significant moisture intrusion, you might be able to handle the repair yourself. Here’s how:
Start by scraping and removing the bubbled area with a putty knife or stucco scraper. Work carefully until you reach solid, well-adhered stucco. Create a slight undercut at the edges—this helps the new material bond better to the existing stucco.
Next, clean the surface thoroughly, removing all dust and debris. If you notice white powdery efflorescence, clean it with a mild acid solution (always follow manufacturer guidelines) and rinse well.
When preparing your patch mix, aim for “peanut butter” consistency. Pre-mixed stucco repair materials that match your existing finish will give you the best results.
Apply the patch using a trowel, slightly overfilling the area. Let it set for a few minutes, then use a damp sponge or brush to feather the edges and match the surrounding texture. This takes a bit of practice, so don’t be discouraged if your first attempt isn’t perfect.
Don’t forget to seal small cracks with acrylic caulk designed specifically for stucco. This prevents future water intrusion.
Finally, once your patch has cured (typically 24-48 hours), prime and paint with a primer specifically designed for stucco, followed by elastomeric paint that matches your existing color.
A homeowner from Phoenixville shared his success story with me: “I repaired several small bubbles on my south-facing wall using this method. The key was making sure the area was completely dry before patching and using a quality elastomeric paint afterward. Two years later, those patches still look great.”
When to Call a Professional
While DIY repairs might be tempting, certain situations demand professional expertise:
Widespread bubbling across multiple areas of your home signals a systemic moisture problem that needs comprehensive assessment. This isn’t something you can patch away.
High moisture readings above 20% in your wall assembly require professional remediation to prevent structural damage and mold growth. Moisture at these levels won’t resolve itself.
The presence of visible rot or mold means you’ve already got damage beyond the stucco itself. At this point, professional remediation isn’t optional—it’s essential.
If you notice recurring bubbling after attempting repairs, it’s a clear sign that underlying moisture issues haven’t been addressed. Like a leaky roof, these problems don’t fix themselves.
Consider your warranty situation too. DIY repairs may void warranties on newer homes, while professional remediation often includes new warranties on the work performed.
At Stucco Safe, our certified stucco inspections start at $495 for average-sized homes, with larger properties ranging up to $1595. When you consider that this investment can prevent tens of thousands in structural repairs by catching problems early, it’s one of the wisest decisions you can make as a homeowner.
More info about stucco inspection checklist
Prevention & Maintenance for Long-Term Protection
Preventing bubbling stucco is far more cost-effective than repairing it. Our forensic testing has shown that homes with proper preventative measures experience 85% fewer stucco failures over a 20-year period. Think of it like dental care—regular checkups and good habits prevent costly root canals later!
Proper Installation Practices
If you’re building new or replacing stucco, insist on these best practices:
The foundation of stucco longevity starts with proper installation. Traditional three-coat application (scratch, brown, and finish coats) provides superior performance compared to newer one-coat systems. Each layer needs proper mixing and adequate curing time—rushing this process is like trying to bake a cake in half the recommended time.
Behind the scenes, a two-layer Water-Resistive Barrier (WRB) is essential—think of it as your home’s raincoat and umbrella working together. The outer layer acts as a bond-break while the inner layer provides moisture protection.
For homes in Pennsylvania, New Jersey, and Delaware, where we receive well over 20 inches of annual rainfall, a drainage gap of at least 3/8-inch behind the stucco is non-negotiable. This small space makes a huge difference, allowing water to flow down and out rather than lingering against your home’s structure.
Perhaps the most overlooked component is proper weep screed installation. This metal flashing should be installed at least 4 inches above grade (or 2 inches above paved surfaces). I often tell homeowners to think of weep screed as your stucco’s escape hatch for unwanted moisture.
Regular Maintenance
Even perfectly installed stucco needs ongoing care to prevent bubbling stucco issues. Your home is a living, breathing entity that responds to its environment.
Make annual inspections part of your spring routine. After winter’s harsh conditions, take a slow walk around your home looking for cracks, bubbling, or discoloration. I recommend taking photos each year to compare and spot subtle changes.
When you find small cracks, address them immediately with elastomeric caulk designed specifically for stucco. These tiny fissures might seem harmless, but they’re like open invitations for moisture to enter your wall system.
Your gutters play a surprising role in stucco health. Clogged gutters overflow, sending cascades of water down your stucco walls. Clean them regularly and check that downspouts direct water at least 5 feet away from your foundation.
Pay attention to your landscaping too. Keep soil and mulch at least 6 inches below the bottom of your stucco walls, and adjust sprinklers so they don’t spray directly onto stucco surfaces. I’ve seen beautiful gardens unknowingly destroy stucco walls through constant moisture exposure.
Finally, repainting with quality elastomeric paint every 7-10 years maintains your home’s moisture barrier. This isn’t just about aesthetics—it’s preventative medicine for your stucco.

“One of our clients in King of Prussia implemented our recommended maintenance program after a minor stucco repair,” shares our maintenance specialist. “Five years later, while neighbors were spending $30,000+ on stucco remediation, his home remained problem-free. Prevention truly is the best investment.”
Modern Materials that Reduce Bubbling Stucco
The stucco world has evolved significantly in recent decades, with new materials designed specifically to combat moisture issues.
Acrylic finish coats have revolutionized stucco performance. Unlike traditional cement-based finishes, these modern alternatives offer better flexibility and water resistance while maintaining that classic stucco appearance. They’re particularly valuable in our Mid-Atlantic region where freeze-thaw cycles put extra stress on building materials.
For existing homes, breathable elastomeric coatings provide impressive protection. These specialized paints can stretch up to 600% to bridge minor cracks while still allowing water vapor to escape—imagine a raincoat that keeps you dry but doesn’t make you sweat.
Behind the scenes, drainage mats create a dedicated pathway for water to exit your wall system. These dimpled plastic sheets might not be visible once installed, but they’re working 24/7 to keep your walls dry.
For new construction or major renovations, integrated insulation systems allow you to improve energy efficiency without compromising moisture management. The building science has advanced to create systems that insulate while maintaining proper drainage and drying potential.
I’m particularly excited about newer vapor-open sealers that represent the best of both worlds—they repel liquid water while allowing water vapor to escape, preventing the trapped moisture that leads to bubbling stucco.
“The building science behind stucco has evolved significantly,” explains our technical director. “Traditional lime-based stucco had a permeance greater than 20 perms, allowing excellent drying. Modern polymer-modified stucco can have permeance below 1 perm, trapping moisture. The key is balancing water resistance with vapor permeability.”
Why Does Stucco Have Problems?
Frequently Asked Questions about Bubbling Stucco
What are the very first signs I should watch for?
When it comes to bubbling stucco, catching problems early can save you thousands. Most homeowners miss the subtle warning signs that appear weeks or even months before visible bubbles form.
The earliest red flags to keep an eye out for include a white, powdery substance (called efflorescence) that appears on your stucco after rainfall. This powdery residue is actually mineral deposits left behind when water evaporates from your stucco—essentially a visual confirmation that water is moving through your walls.
You might also notice certain areas of your stucco taking longer to dry after rain. These persistently damp spots often appear slightly darker than surrounding areas, which is moisture trapped within the stucco system. Another early indicator is paint that looks shinier or has a different sheen in certain sections—this happens when moisture pushes against the paint from behind.
“I wish I’d known what those white streaks meant,” shared one of our Main Line clients. “I thought it was just normal weathering until small bubbles started appearing six months later.”
For best results, grab a flashlight and inspect your exterior walls at dusk after a heavy rain, when subtle moisture patterns are most visible. The low-angle lighting will help reveal irregularities that aren’t obvious in direct sunlight.
Does every bubble mean water is behind my walls?
While moisture is behind about 85% of the bubbling stucco cases we investigate across Pennsylvania, New Jersey, and Delaware, not every bubble indicates a serious water problem.
Sometimes bubbles form because of air pockets trapped during the stucco application process. This is particularly common in newer homes where contractors might have rushed the application or worked in less-than-ideal weather conditions. Improper mixing of stucco materials can also create bubbles, as can thermal expansion when incompatible materials meet.
However—and this is important—even bubbles that didn’t initially form because of moisture often become pathways for water to enter later. That innocent-looking air pocket can become a moisture trap during the next heavy rain.
The only way to know for sure is through professional moisture testing. Our inspectors use specialized meters that can detect liftd moisture levels behind your walls without damaging your stucco. Readings above 20% generally confirm that water intrusion is occurring and needs to be addressed.
“What surprises many homeowners,” our chief inspector often tells clients, “is that the biggest bubbles aren’t always where the worst moisture problems are. Sometimes the most severe water damage is happening behind areas with minimal visible symptoms.”
How long can I wait before fixing bubbling stucco?
I’ve seen the consequences of delayed repairs firsthand, and the timeline for addressing bubbling stucco depends on the severity of your situation:
For small, isolated bubbles with low moisture readings (under 15%), you typically have a 1-3 month window to make repairs before risking structural damage. These minor issues can often be addressed with the DIY methods we outlined earlier.
If you’re seeing moderate bubbling across multiple areas or moisture readings between 15-20%, that window shrinks to about 30 days. Beyond this point, water can begin deteriorating your sheathing and creating conditions favorable for mold growth.
For widespread bubbling or any moisture readings above 20%, consider it an emergency requiring attention within 1-2 weeks. At this stage, water has likely already reached your structural components.
One Philadelphia homeowner’s experience serves as a cautionary tale: “I first noticed bubbling around my windows in spring but decided to wait until fall when my schedule was less busy. That decision cost me an additional $21,000 when what would have been a simple repair turned into a major remediation project involving structural repairs and mold remediation.”
Even during our busiest seasons (typically spring and fall), we prioritize inspections for homes showing active bubbling. The $495-$1595 cost of a professional inspection is minimal compared to the thousands you might spend if moisture continues damaging your home’s structure.
Remember: with bubbling stucco, time is quite literally money. The longer you wait, the more expensive the solution becomes.
More info about stucco moisture problems