
Stucco siding problems: 7 Critical Issues to Avoid in 2025
The Hidden Dangers Behind Your Stucco Walls
Stucco siding problems are more common than many homeowners realize, potentially leading to significant structural damage and costly repairs if left unaddressed. Here’s a quick overview of the most common issues:
| Problem | Warning Signs | Potential Consequences |
|---|---|---|
| Moisture Intrusion | Staining, dark blotches, efflorescence | Mold, rot, structural damage |
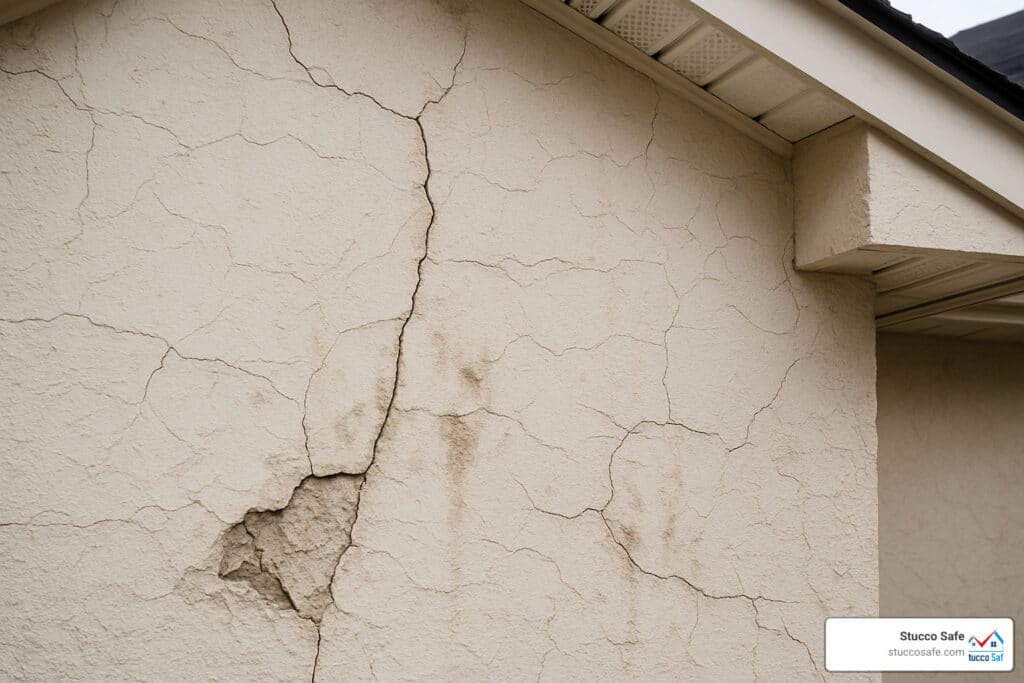
| Cracking | Hairline cracks, stair-step patterns | Water penetration, expanding damage |
| Improper Installation | Stucco below grade, missing flashing | Accelerated deterioration |
| Delamination | Bulging, hollow sounds when tapped | Sections falling off, safety hazard |
| Inadequate Drainage | Water stains, persistent dampness | Sheathing decay, termite attraction |
While stucco has been used for thousands of years as a durable exterior finish, modern building practices have created new challenges. Today’s tightly insulated homes don’t “breathe” the way older structures did, trapping moisture that penetrates through this porous material.
Did you know? Over 90% of stucco applications in the Northeastern United States within the past 15-20 years are estimated to be improperly installed, according to industry experts.
The most dangerous aspect of stucco siding problems is that serious damage often remains hidden for years. By the time visible symptoms appear—like staining or bulging—the underlying wood structure may already be compromised.
Stucco inspections vary in cost from $495 to $1595 or more for very large homes, but this investment pales in comparison to the potential remediation costs, which can easily reach tens of thousands of dollars.
I’m Gabe Kesslick, a certified stucco inspector with over 20 years of experience diagnosing stucco siding problems across Pennsylvania, New Jersey, and Delaware. I founded Stucco Safe in 2015 after witnessing countless homes suffering from preventable moisture damage.

Quick stucco siding problems definitions:
– home moisture testing
– moisture detection experts
1. Hairline Cracks vs. Structural Cracking
Is that crack in your stucco just a cosmetic nuisance or a warning sign of bigger problems? Let’s explain stucco cracks so you can tell the difference between normal aging and trouble ahead.
Normal Hairline Cracks
Those tiny lines measuring less than 1/16 of an inch? Take a deep breath – they’re usually just part of your stucco’s natural life cycle. These hairline cracks typically appear because:
- Your home expands and contracts with temperature changes (just like we all do!)
- Your foundation settles slightly over time
- The stucco itself continues to cure and adjust
“Cracks smaller than 1/16 of an inch in stucco are common and typically aren’t a cause for major concern,” explains building scientist Joseph Lstiburek, fondly known as “the building science god” among those of us who geek out about home exteriors.
These spider-web pattern cracks might not look pretty, but they’re generally cosmetic. That said, don’t ignore them completely – even small cracks should be sealed to prevent water from sneaking in and causing problems down the road.
Problematic Structural Cracks
When cracks grow beyond that 1/16-inch threshold or form specific patterns, it’s time to pay attention. These could signal serious stucco siding problems that need addressing:
Stair-step cracks follow mortar joints in a stair-like pattern and often whisper tales of foundation movement. Horizontal cracks appearing at regular intervals (especially about 2 feet apart) typically reveal improperly lapped paper-backed lath underneath. And those cracks framing your windows and doors? They’re likely telling you about missing flashing or inadequate reinforcement around these openings.

I remember a family in West Chester, PA who thought the small cracks around their window frames were just normal wear and tear. When we finally inspected their home, those “minor” cracks had allowed so much moisture behind the stucco that the underlying sheathing had rotted extensively. Their repair bill? Over $12,000 – far more than the inspection would have cost.
The tricky thing about stucco is that small problems can hide big consequences. That tiny crack might be the only visible sign of a much larger moisture issue developing behind your walls.
For a deeper dive into the particular challenges of traditional cement-based exteriors, check out our comprehensive guide on Hard Coat Stucco Problems.
Remember – when it comes to stucco, being proactive about those cracks can save you thousands in repairs down the road. Not sure if your cracks cross the concern threshold? That’s exactly what we’re here for.
2. Bulging & Delamination
When your stucco starts to pull away from the wall, it’s not just an eyesore—it’s a warning sign of potentially serious stucco siding problems that shouldn’t be ignored.
Causes of Bulging and Delamination
That bulge in your stucco tells a story, and it’s rarely a happy one. The metal lath (wire mesh) that holds your stucco in place can rust when moisture sneaks behind the surface. I remember visiting a home in Cherry Hill, NJ where the homeowner thought they had a “minor cosmetic issue.” When we removed the bulging section, we finded the metal lath had completely rusted away—leaving nothing to hold the stucco to the wall!
Poor initial installation can also cause stucco to lose its grip on your home. When contractors rush or cut corners, the bond between stucco and substrate might fail years later. And don’t underestimate Mother Nature—those beautiful trees around your property can become projectile launchers during storms, causing impact damage that weakens stucco adhesion.
How to Detect Delamination
Want to play house detective? Try the “hollow sound test”—it’s surprisingly effective and costs nothing. Simply tap on your stucco walls with your knuckles or a small rubber mallet. Well-attached stucco produces a solid, dull sound. If you hear a hollow, drum-like sound instead, that section has likely separated from the wall beneath.
A client in Phoenixville called us in a panic after noticing a small bulge behind their water softener. What seemed like a tiny problem turned out to be extensive damage—years of minor leakage had completely corroded the metal mesh and staples. The damage had silently spread far beyond the visible bulge, leading to a much more extensive repair than they’d anticipated.
The real danger with delamination is what you can’t see. Behind that bulging stucco often lurks sheathing rot, which compromises your home’s structural integrity. Water that penetrates deeply enough to cause bulging has typically been at work for months or even years, quietly damaging the wooden framework of your home.
For a deeper dive into these and other common issues affecting stucco homes, visit our comprehensive guide to Stucco House Issues. The sooner you address these warning signs, the more you’ll save in the long run.
3. Stucco Siding Problems With Moisture Traps
The most dangerous stucco siding problems often lurk completely out of sight. Moisture becomes trapped within your wall system, silently causing damage for years before you notice any visible signs.
Critical Moisture Trap Points
Your home’s stucco is particularly vulnerable at several key locations. At my inspection company, we find the same trouble spots over and over again.
Missing kick-out flashing is perhaps the most common culprit. This small but crucial piece of metal should direct water from your roof into your gutters. Without it, rainwater simply cascades down your wall and finds its way behind the stucco. As Reuben Saltzman, a respected home inspector who’s documented countless stucco failures, points out: “Kick-out flashing became a code requirement in Minnesota in 2007, and for good reason. It’s one of the most common points of water intrusion we find.”
Your weep screed—that perforated strip at the bottom of stucco walls—is another critical component. When clogged with paint, dirt, or landscaping materials (or worse, completely missing), moisture has no escape route. I’ve seen basements with mysterious water problems that were actually caused by clogged weep screeds trapping moisture in the walls above.
Window and door openings represent the third major vulnerability. Proper flashing around these penetrations is absolutely essential, yet we frequently find corners cut during installation.
Finally, don’t underestimate stucco’s natural properties as a reservoir cladding. Unlike vinyl siding, stucco acts like a sponge, absorbing water during rainy or humid conditions. Without proper drainage pathways, this absorbed moisture becomes trapped against your home’s wooden structure.

The Wetting vs. Drying Balance
Here’s where modern construction has inadvertently created the perfect storm. Older homes had a natural drying cycle—walls dried from outside in summer and inside out in winter. But as building scientist Joe Lstiburek explains: “Advances in insulation over the last 20–30 years have reduced the wall system’s drying potential, increasing the risk of moisture problems in stucco.”
Today’s energy-efficient homes need both effective drainage and drying capabilities, but many lack both. The combination of tighter building wraps, more insulation, and traditional stucco application creates a moisture sandwich with nowhere for water to escape.

Just last month, I inspected a 2003-built home in Berwyn for a potential buyer. Despite no visible red flags—no staining, no cracks—our moisture meter readings around the windows were off the charts. The home looked perfect to the naked eye, but our testing revealed moisture levels that would eventually lead to serious structural damage. The buyer used our findings to negotiate a $45,000 remediation allowance. Without proper testing, they would have inherited a ticking time bomb of hidden moisture damage.
The scary part? This isn’t unusual. Many homeowners have no idea their walls are slowly deteriorating until major damage has already occurred. For a deeper dive into these moisture issues and how to detect them, visit our detailed guide on Moisture Behind Stucco.
4. Staining, Efflorescence & “Stucco Tears”
Those mysterious white streaks and dark blotches on your stucco aren’t just cosmetic concerns – they’re actually your home trying to tell you something important about what’s happening beneath the surface.
Types of Stucco Staining
When I inspect homes with stucco siding problems, I often find homeowners have been noticing stains for months or even years without realizing they signal deeper issues.
Efflorescence is that chalky, white substance that appears on stucco surfaces. It happens when water dissolves minerals inside the stucco and carries them to the surface as it evaporates. While a small amount might be normal, extensive efflorescence is your wall practically screaming that excessive moisture is moving through your stucco.
I remember visiting a lovely Villanova home where the owners were puzzled by white powdery deposits forming around their windows after every rainstorm. Upon inspection, we finded failed window flashing that was allowing water to sneak behind the stucco, dissolving minerals and depositing them on the surface during evaporation.
“Stucco tears” might sound poetic, but there’s nothing beautiful about these vertical stain patterns that look like drip marks below windows, door frames, or horizontal surfaces. They’re clear evidence that water is entering at those points and trickling downward, potentially causing damage along the way.
Dark blotches that linger on your stucco, especially after rain, are another red flag. When some sections of your wall dry quickly while others remain visibly damp for days, it suggests that moisture is being trapped within the wall system.
The green or black discoloration many homeowners mistake for dirt? That’s usually mold or algae thriving in persistently damp conditions – definitely not something you want growing on (or in) your walls.
Common Causes of Staining
Window and door leaks are frequent culprits behind stucco staining. Without proper flashing and sealing, these openings become highways for water to enter your wall system.
Gutter problems can be surprisingly destructive too. When gutters overflow or are improperly installed, they splash water against stucco surfaces repeatedly, saturating the material.
Even your sprinkler system might be contributing to the problem. I’ve seen countless cases where irrigation systems regularly spray water directly onto stucco walls, creating perfect conditions for moisture intrusion.
Roof runoff is particularly problematic at roof-wall intersections without proper kick-out flashing. One homeowner in Media was shocked when we showed her how water was pouring behind her stucco at these junctions during rainstorms.
As my colleague Pete Ciliberto, another certified stucco inspector, often warns: “Visible ‘stucco tears’—drip-like stains under windows and gutters—are a sign of advanced hidden damage. They’re essentially the exterior symptoms of water pathways that have formed behind the stucco.”
The good news? Catching these visual clues early can save you thousands in repair costs. For more comprehensive information about these and other moisture-related stucco siding problems, visit our detailed page on Stucco Moisture Problems.
5. Mold, Rot & Hidden Termite Damage
The most destructive stucco siding problems often remain completely hidden from view until significant damage has occurred. This section covers the serious consequences of prolonged moisture intrusion.
The Hidden Damage Progression
When moisture becomes trapped behind stucco, it creates perfect conditions for a cascade of problems that can silently wreak havoc on your home.
That beautiful stucco exterior might be hiding a secret – and not a good one. Modern homes typically use oriented strand board (OSB) sheathing behind stucco, which is particularly vulnerable to moisture damage. Unlike the old-growth plywood used in homes built decades ago, OSB can swell and lose structural integrity relatively quickly when wet. I’ve seen cases where OSB has turned to mush in less than a year of moisture exposure.
As building scientist Joe Lstiburek explains, “The downside to energy-efficiency improvements is that walls can’t dry as easily as they used to.” This trapped moisture creates ideal conditions for mold growth, which can begin in as little as 48 hours after moisture exposure. What starts as microscopic spores can quickly develop into colonies that not only damage your home but potentially affect your family’s health.
Over time, persistent moisture causes wood framing members to rot, potentially compromising the structural integrity of the wall. Think of it as your home slowly dissolving from the inside out – not a comforting thought!
Perhaps most concerning is how moisture-damaged wood becomes a guide for termites and other wood-destroying organisms. These pests are naturally drawn to damp, rotting wood, creating a double-whammy of damage that can be extraordinarily expensive to repair.

The Limitations of Non-Invasive Inspection
Many homeowners mistakenly believe that infrared cameras can detect moisture behind stucco. I hear this misconception frequently during initial client consultations. While thermal imaging can identify temperature differences that might suggest moisture, it has significant limitations.
“Infrared cameras detect temperature, not trapped moisture, so they miss non-evaporating water,” explains Reuben Saltzman. “Would you ever rely on infrared scanning? No. Intrusive moisture testing is the only reliable diagnostic.”
This is why professional stucco inspectors use probe testing – we need to get actual moisture readings from behind the stucco surface to truly understand what’s happening inside your walls.
Real-World Example
A client in Paoli called us after noticing a small area of stucco that sounded hollow when tapped. Smart homeowner! Our invasive moisture testing revealed readings above 30% (anything over 19% is concerning). When the stucco was removed, we finded extensive termite damage to the framing. The termites had been attracted to the moisture-damaged wood and had established a colony that extended throughout the wall.
This situation isn’t uncommon. As noted in a PCO article on Stucco Remediation, Mold and Termites, “Even hair-thin cracks in stucco can allow moisture entry over long periods, leading to hidden termite damage.”
The indoor air quality impacts shouldn’t be overlooked either. When mold grows behind your walls, microscopic spores can find their way into your living space. For families with allergies or respiratory conditions, this hidden mold can trigger symptoms that seem mysterious until the source is finded.
What makes these stucco siding problems particularly troubling is that by the time you notice visible signs inside your home – like musty odors, water stains, or warping trim – the damage behind your walls is typically extensive and costly to repair.
6. EIFS (Synthetic Stucco) Failures
Exterior Insulation and Finish Systems (EIFS), commonly called synthetic stucco, come with their own unique set of stucco siding problems that differ significantly from traditional hard-coat stucco issues.
Understanding EIFS Systems
Unlike traditional stucco, EIFS is a multi-layered system featuring an acrylic finish layer over reinforcing mesh covering foam insulation board (typically expanded polystyrene or EPS). While EIFS offers excellent insulation and design flexibility, many installations from the 1980s and 1990s have become notorious for moisture problems.
“Homes with EIFS have been subject to class action lawsuits in entire developments due to widespread mold and moisture issues, particularly in humid climates like Florida,” explains building expert Steve Easley. The problems became so widespread that many homeowners found themselves caught in legal battles over repairs costing tens of thousands of dollars.
Common EIFS Failure Points
The most problematic aspect of early EIFS installations was their design as “barrier systems” that prevented water entry but provided no drainage plane for incidental moisture to escape. Once water found its way in (and it always does eventually), it became trapped with nowhere to go.
EIFS also relies heavily on caulking and sealants around penetrations and joints. When these inevitably fail, water enters the system with devastating consequences. The foam insulation core can also suffer impact damage, creating depressions that collect water and accelerate deterioration.
Just last month, we inspected a home in Franklin Township, NJ, where the owners had lived for years with no idea they had EIFS rather than traditional stucco. Years of water intrusion around windows had caused extensive mold growth and structural damage completely hidden from view. What they thought would be a simple repair turned into a $38,000 remediation project.
For more details about synthetic stucco issues, visit our comprehensive guide on Artificial Stucco Problems or check this external guide on common EIFS issues.
How to identify EIFS vs. hard-coat
Distinguishing between EIFS and traditional stucco is crucial for proper diagnosis and remediation. The tap test is the simplest method – knock on the surface and listen. EIFS produces a hollow sound and may feel slightly flexible under pressure, while traditional stucco sounds solid and remains rigid.
Joint examination provides another clue. EIFS typically has visible caulked joints where panels meet, while traditional stucco has fewer joints or different-looking control joints. When examining thickness and edges around electrical outlets or other penetrations, EIFS is typically thinner (about 1 inch total) with visible foam backing, while traditional stucco is usually thicker.
You can also look at corner details – EIFS corners are often perfectly straight and sharp, while traditional stucco corners may be slightly rounded. Sometimes, you might even spot mesh exposure in damaged areas, which can confirm the presence of EIFS.
“You can identify EIFS by knocking for a hollow sound or by pushing to see panel deflection,” explains home inspector Carson Dunlop. “Water intrusion damage in EIFS is often hidden until the siding detaches or mold appears inside.”
When we perform inspections, we often find homeowners are surprised to learn they have EIFS rather than traditional stucco. This misunderstanding can lead to improper maintenance and delayed repairs, making moisture problems worse over time. Knowing what type of system you have is the first step toward proper care and timely intervention.
7. Below-Grade & Poor Drainage Installations
One of the most common yet preventable stucco siding problems is improper termination of stucco at ground level. This seemingly minor installation error can lead to significant moisture issues that could cost you thousands in repairs down the road.
The Importance of Ground Clearance
Stucco should never extend below grade or make direct contact with the ground. While this might seem like a minor detail, it’s actually a critical factor in your home’s long-term health. When stucco touches soil, several serious problems begin:
First, through capillary action, stucco in contact with soil acts like a sponge, wicking moisture upward into your wall system. Think of it as placing the corner of a paper towel in water – soon the entire towel becomes wet. The same happens with your walls!
Second, proper stucco installation includes a weep screed at the bottom that allows water to drain out. When covered by soil, this drainage path becomes blocked, trapping moisture inside your walls where it can cause serious damage.
Third, and perhaps most concerning for many homeowners, direct ground contact creates an easy pathway for termites and other pests to enter your home undetected. These unwelcome guests can cause extensive structural damage before you even realize they’ve moved in.

“Stucco extending below grade traps moisture and accelerates mold, rot, and structural damage,” warns Pete Ciliberto. “Maintain at least a two-inch gap between stucco and ground for drainage.”
Common Landscaping Mistakes
Many below-grade issues actually occur after construction when well-meaning homeowners or landscapers make changes without understanding the consequences. I’ve seen countless cases where homeowners inadvertently created moisture problems by:
Adding mulch or soil that builds up against the stucco in an effort to create more attractive flower beds. Over time, each new layer of mulch creeps higher up the wall.
Installing planters that trap moisture against the wall, creating a constant source of dampness that eventually penetrates the stucco.
Creating irrigation zones that regularly wet the base of stucco walls. Those sprinkler heads that spray your foundation walls are doing more harm than you might realize!
Just last month in Woodbridge, NJ, we inspected a home where the owner had built up soil and mulch beds against the stucco to create a more level yard. The moisture readings at the base of the walls were literally off our meters’ scales, and when we excavated slightly, we found the bottom plate of the wall was severely rotted – soft enough to push a screwdriver through with just thumb pressure.
Proper Clearances
Building codes and industry standards are quite clear about minimum clearances for stucco:
– At least 4-6 inches above soil
– Minimum 2 inches above paved surfaces like driveways and patios
– Weep screed must remain visible and unobstructed
These aren’t arbitrary numbers – they’re based on decades of seeing what happens when these clearances aren’t maintained. A few inches can make the difference between a dry, healthy wall and extensive moisture damage.
For more information about how moisture interacts with stucco and why these clearances matter so much, visit our detailed explanation on Does Stucco Absorb Water?
How to Diagnose & Fix Issues Fast
When facing stucco siding problems, prompt and accurate diagnosis is essential to prevent further damage. Here’s how to address these issues efficiently:
Modern Solutions for Stucco Problems
The good news is that even serious stucco issues can be effectively addressed with modern remediation techniques. Today’s solutions focus on creating systems that both prevent water entry and allow for proper drying.
Rainscreen retrofits have become the gold standard for stucco remediation. These systems create a small gap between the water-resistive barrier and the stucco cladding, allowing for both drainage and airflow.
“A rainscreen creates both drainage and drying capabilities to handle moisture,” explains building scientist Joe Lstiburek. “It’s the single most effective upgrade for problematic stucco installations.”
Proper flashing upgrades at critical junctions can dramatically improve a stucco wall’s performance. This is especially true for kick-out flashing where roofs meet walls and around windows and doors – these are the areas where water most commonly enters the wall system.
Adding effective drainage planes allows incidental moisture to escape rather than becoming trapped. When combined with vapor-permeable materials that allow walls to dry in both directions, these upgrades can transform a problematic stucco installation into a reliable, long-lasting exterior.
Professional Diagnosis Methods
At Stucco Safe, our certified inspectors use several forensic testing methods to accurately identify problems:
We begin with a thorough visual inspection, identifying visible signs of moisture intrusion, cracking, and other defects. But we don’t stop there – the most dangerous damage is often hidden from view.
That’s why we perform invasive probe testing, where small holes are drilled through the stucco to measure moisture content in the sheathing using specialized moisture meters. This direct measurement is the only reliable way to determine if water has penetrated the wall system.
We also employ infrared thermography to help identify areas for further investigation, though we never rely on this method alone. And our substrate firmness testing uses specialized tools to test the integrity of the sheathing behind the stucco.
For more information about our testing methods, visit our Stucco Leak Detection page.
Repair vs. Remediation: Cost Comparison
Understanding the difference between repair and remediation is crucial:
| Approach | Typical Cost Range | Best For | Limitations |
|---|---|---|---|
| Repair (patching, sealing) | $500-$5,000 | Minor, localized issues | Doesn’t address underlying causes |
| Partial Remediation | $10,000-$30,000 | Damage limited to specific elevations | May miss hidden damage in untreated areas |
| Full Remediation | $30,000-$100,000+ | Widespread moisture intrusion | Most expensive but most comprehensive |
| Siding Replacement | $25,000-$75,000 | Converting from stucco to another material | Requires removal of all stucco |
“Repairing stucco is like patching a tire,” explains a remediation expert, “while remediation is compared to replacing tires, checking brakes, and topping fluids. One is a temporary fix; the other addresses the whole system.”
DIY check for stucco siding problems
While professional inspection is recommended for comprehensive assessment, there are several checks homeowners can perform themselves:
Take time for a careful visual walk-around after a heavy rain. Look for staining, cracks, bulges, and other visible defects when the walls are drying. Pay special attention to areas below windows and roof intersections.
Consider investing in a basic moisture meter for preliminary readings. While consumer-grade meters aren’t as accurate as professional equipment, they can help identify potential problem areas for further investigation.
Don’t overlook the importance of caulk inspection and renewal. Check all sealants around windows, doors, and penetrations at least annually. Replace any that are cracked, missing, or deteriorated – this simple maintenance can prevent significant damage.
Proper gutter and downspout maintenance is also essential. Ensure your gutters are clean and downspouts direct water well away from stucco surfaces. Water management is your first line of defense.
When to call a pro for stucco siding problems
Certain situations warrant immediate professional attention. Don’t delay calling an expert if you notice:
Visible moisture staining that persists days after rain is a serious red flag. This indicates water is trapped in the wall system and isn’t drying properly.
Cracks larger than 1/16 inch or in patterns suggesting structural movement require professional evaluation. These aren’t typical hairline cracks and may indicate deeper issues.
Hollow sounds when tapping on stucco surfaces suggest delamination and require immediate assessment to prevent potential safety hazards.
Always get a professional inspection when preparing to buy or sell a stucco-clad home. The modest cost of inspection (ranging from $495 to $1595 depending on home size) can prevent massive unexpected expenses later.
Professional documentation is essential before filing insurance claims for potential coverage, and you should never ignore interior symptoms such as musty odors or drywall staining.
“It can take 7-8 years or more for stucco moisture issues to show themselves,” warns building expert Steve Easley, “though some issues can be seen as soon as 2 years depending on severity.”
This is why proactive testing is so important – by the time visible symptoms appear, significant damage may have already occurred. At Stucco Safe, we’ve helped countless homeowners identify and address problems before they became catastrophic repairs.
Frequently Asked Questions about Stucco Exteriors
What is the difference between stucco repair and stucco remediation?
When facing stucco siding problems, understanding whether you need a repair or full remediation can save you thousands of dollars—or prevent costly mistakes.
Stucco repair addresses surface-level issues without removing the existing stucco. Think of it as treating the symptoms rather than the disease. Repairs typically include patching cracks, replacing small damaged sections, applying sealants, and making cosmetic improvements.
“Simple crack repairs are just temporary fixes that ignore deeper moisture issues,” notes a remediation specialist I work with regularly. “Remediation is like replacing tires rather than merely patching a flat—more expensive upfront but better long term.”
Stucco remediation, on the other hand, is comprehensive treatment that addresses underlying causes. This process involves removing some or all of the existing stucco, repairing any moisture damage to sheathing and framing, installing proper moisture management systems (like flashing and drainage planes), and applying new stucco or alternative siding.
Many homeowners initially balk at remediation costs, but having seen hundreds of homes where repairs simply masked growing problems, I can tell you that addressing the root cause is almost always the wisest financial decision in the long run.
How does climate affect the risk of stucco siding problems?
Your home’s location plays a surprisingly significant role in how stucco performs over time. I’ve seen identical homes in different climates experience dramatically different outcomes.
In high rainfall regions like our service area in the Northeast, stucco faces constant moisture challenges. The greater volume of rain creates more opportunities for water intrusion, particularly if drainage details and flashing aren’t perfect. These climates benefit tremendously from rainscreen installations that create drainage and drying pathways.
“Most stucco problems are moisture-related and are more prevalent in areas with moderate to high annual rainfall,” explains building scientist Joe Lstiburek. This is precisely why we see so many issues in Southeastern Pennsylvania, New Jersey, and Delaware, where annual rainfall averages 40-45 inches.
Arid climates like the Southwest generally experience fewer moisture-related stucco siding problems. However, they’re not immune to issues—especially at roof-wall intersections and around windows. The extreme temperature swings in desert regions can also cause more extensive cracking as materials expand and contract.
Humid coastal areas face a double threat: abundant moisture and salt exposure. The salt can accelerate metal lath corrosion, while the humidity creates perfect conditions for mold growth. These regions typically require more frequent maintenance and inspection.
Just last month, I inspected nearly identical homes in Delaware and Arizona (the homeowner owned both properties). The Delaware home showed significant moisture intrusion behind the stucco, while the Arizona property had only minor cracking issues despite being older.
Will homeowners insurance cover moisture damage behind stucco?
This question comes up in nearly every inspection I conduct, and unfortunately, the answer isn’t straightforward. Insurance coverage for stucco siding problems varies significantly between policies and circumstances.
Most standard homeowners policies draw a clear distinction between sudden, accidental damage (which is typically covered) and long-term issues like moisture intrusion (which are usually excluded). Construction defects—even if they weren’t apparent when you bought the home—fall into a particularly troublesome gray area.
“Stucco damage claims are among the most denied homeowners insurance claims,” explains insurance specialist Frank Thompson, “especially when the stucco was installed by an unlicensed professional or the damage was found prior to purchasing a policy.”
I’ve worked with hundreds of homeowners navigating insurance claims, and I’ve noticed several factors that influence coverage decisions:
Documentation matters. Homeowners who maintain records of professional installation and regular inspections have better success with claims. Those who can prove the damage occurred after they purchased their policy also fare better.
Policy language is crucial. Some policies explicitly exclude water damage related to construction defects, while others might cover consequential damage (like interior drywall damage) even if they won’t cover the stucco repair itself.
When buying a stucco home, I strongly recommend reviewing your insurance policy carefully and considering specialized riders for older stucco properties. Some of my more savvy clients have successfully negotiated with sellers to establish escrow accounts for potential stucco remediation when purchasing homes with unknown stucco conditions—a practice I highly encourage.
A professional inspection documenting your home’s current condition provides valuable evidence should you ever need to file a claim. Our detailed reports have helped many homeowners successfully steer the claims process.
Conclusion
Stucco siding problems might seem overwhelming, but don’t worry—with the right knowledge and a proactive approach, you can protect your home from serious damage. After inspecting thousands of homes across the region, I’ve seen how simple awareness can save homeowners from costly nightmares.
Think of stucco like your home’s skin—it needs regular check-ups to stay healthy. The most important lessons I’ve learned in my 20+ years as a stucco inspector are:
Early detection truly is your best friend. Most stucco damage lurks silently behind walls for years before showing visible signs. By the time you see staining or bulging, the damage is often extensive. That’s why I recommend professional inspections every 2-3 years—it’s preventive medicine for your home.
Water is stucco’s arch-nemesis. Almost every serious stucco problem I’ve diagnosed ultimately traces back to moisture intrusion. Proper flashing, drainage, and regular maintenance are your home’s best defense against the relentless effects of water.
When it comes to cracks, context matters. Those hairline spider cracks are usually just cosmetic aging, but when I see stair-step patterns or cracks wider than 1/16 inch, I immediately look deeper for structural issues or moisture pathways.
Modern homes need modern solutions. Today’s energy-efficient construction has changed how walls manage moisture. The tightly-sealed homes we build today need carefully designed systems that allow both drainage and drying—something many builders are still catching up on.
Professional testing provides real peace of mind. I can’t count how many times I’ve had homeowners tell me, “But the house looks fine!” only to find significant moisture damage with our specialized testing equipment. Visible symptoms are just the tip of the iceberg.
At Stucco Safe, we’re proud to serve homeowners throughout Southeastern Pennsylvania, New Jersey, and Delaware. From Philadelphia’s historic homes to new construction in Cherry Hill, West Chester, Trenton and surrounding communities, our certified inspectors use forensic testing methods to identify moisture intrusion before it causes catastrophic damage.
A stucco inspection costing between $495 and $1595 (depending on home size) is a tiny investment compared to remediation projects that routinely run $30,000 to $100,000. It’s the difference between a small maintenance bill and a second mortgage.
For more information about our moisture detection expertise and how we can help protect your investment, visit our More info about moisture detection experts page.
Don’t wait until your walls start talking to you through stains and bulges—by then, they’ve been screaming silently for years. Give us a call today to schedule your professional stucco inspection and sleep better knowing your home’s exterior is in good hands.