
Patching a Hole in Stucco: 7 Proven Steps for Flawless Results
Why Quick Stucco Hole Repairs Save You Thousands
Patching a hole in stucco is a critical home maintenance task that prevents water damage, mold growth, and structural issues. Here’s what you need to know:
Quick Repair Guide:
- Small holes (≤¾”): Clean debris → Seal with polyurethane caulk → Apply pre-mixed stucco patch → Texture match → Paint after 7-10 days
- Large holes (>¾”): Remove loose material → Install wire mesh → Apply scratch coat → Brown coat (48h cure) → Finish coat → Texture and paint
- Materials needed: Wire brush, rubber float, pre-mixed stucco patch, mesh reinforcement, elastomeric caulk
- Drying time: 24-72 hours depending on thickness and weather conditions
When to call a professional: Holes larger than 6 inches, signs of moisture damage behind stucco, or structural cracks around windows and doors.
Stucco might look tough, but it’s surprisingly vulnerable. As one expert noted, “Stucco is one of the most durable wall surfaces available, but because of its rigid nature, it can develop cracks and holes over time due to settling and impact damage.”
Small holes from nails or screws seem harmless. But they’re direct pathways for water to reach your home’s wood framing and insulation. Once moisture gets behind stucco, it can cause thousands of dollars in hidden damage – rotting wood, mold growth, and interior wall problems.
The good news? Most stucco holes are totally fixable with basic tools and materials. Ready-mix patches cost under $10 and can handle holes up to palm-size. Larger repairs need more skill but are still manageable for experienced DIYers.
The key is acting fast. Every day you wait gives water more time to cause expensive damage behind your walls.
I’m Gabe Kesslick, and I’ve been detecting and repairing stucco issues since 2001 as an EDI Level 2 Certified Stucco Inspector. Through my work with Stucco Safe, I’ve seen how proper techniques for patching a hole in stucco can prevent costly moisture damage that often goes undetected until it’s too late.

Why Stucco Gets Damaged – And Why You Should Fix It Fast
Your home’s stucco isn’t just sitting there looking pretty – it’s constantly battling the elements and the natural movement of your house. Understanding why stucco develops holes and cracks helps you catch problems before they turn into wallet-draining disasters.
Settling cracks are probably the most common villain in the stucco damage story. As your home’s foundation naturally settles over the years, it creates stress on the rigid stucco surface. Think of stucco like a hard candy coating – it doesn’t bend, so when your house shifts even slightly, the stucco develops hairline cracks that gradually widen into holes.
Impact damage is the more dramatic culprit. A rogue baseball, hail storm, or that unfortunate encounter with your lawn mower can create instant holes that need immediate attention. Each hole, no matter how small, is like leaving a window open for moisture to sneak in.
Freeze-thaw cycles are working overtime to destroy your stucco in cold climates. Water seeps into tiny cracks, freezes and expands, then thaws and contracts. This cycle repeats hundreds of times each winter, gradually turning hairline cracks into holes.
Here’s the thing about water intrusion – it’s sneaky. Once moisture gets behind your stucco, it saturates the wood sheathing and framing, creating perfect conditions for mold growth and wood rot. This is why patching a hole in stucco quickly is so crucial – you’re not just fixing a cosmetic issue, you’re protecting your home’s structural integrity.
Energy loss through damaged stucco hits you in the wallet every month. Those holes and cracks let your expensive conditioned air escape, forcing your HVAC system to work harder. We’re talking about 10-15% higher heating and cooling costs just because you didn’t patch a few holes.
Hidden Costs of Neglect
The real nightmare begins when moisture reaches your home’s interior systems. What starts as a simple $50 patch job can explode into thousands of dollars in hidden damage if you ignore those holes.
Rot repair often means removing and replacing entire sections of wall sheathing and framing. We’re talking about $5,000-15,000 in structural repairs for damage that could have been prevented with basic maintenance.
Interior drywall damage shows up as water stains, bubbling paint, and soft spots months or years after the initial stucco failure. By then, mold may have established itself inside wall cavities, requiring professional remediation that costs $2,000-8,000.
Pest entry through stucco holes is like rolling out the welcome mat for unwanted guests. Insects, rodents, and birds love to set up house in your wall cavities through these convenient openings.
The bottom line? Every day you wait to fix stucco damage gives water more time to cause expensive problems behind your walls.
Gear Up: Tools, Materials & Safety Essentials
Getting the right tools and materials before you start patching a hole in stucco makes all the difference between a repair that lasts decades and one that fails in the first winter.
Your stiff-bristle brush becomes your best friend for cleaning debris from holes and cracks. You’ll need both a putty knife (4-6 inches wide) and a rubber float for applying and smoothing patch material. For larger repairs, a hawk and trowel become necessary tools.
Wire mesh or metal lath provides the backbone for any hole larger than ¾ inch. This reinforcement prevents your new stucco from cracking and falling out. Don’t skip the bonding agent – it’s the secret sauce that ensures your new stucco actually sticks to the old surface.
Ready-mix stucco patches come in quart containers and handle most small repairs for around $10. For larger holes, traditional Portland cement, sand, and lime give you complete control over texture and color matching.
Elastomeric caulk protects your repair from moisture intrusion better than regular caulk. Polyurethane caulk works best for sealing small holes before patching.
Safety isn’t optional when working with stucco materials. Safety glasses protect your eyes from flying debris. Work gloves prevent cuts from sharp edges and skin irritation from cement products. A dust mask is essential when grinding or sanding existing stucco.
A mist sprayer keeps larger repairs damp during curing, which is crucial for proper strength development. A moisture meter helps verify your substrate is dry before you begin work.
| Material Type | Ready-Mix Patch | Traditional Mix |
|---|---|---|
| Cost | $10-15 per quart | $30-50 for materials |
| Skill Level | Beginner-friendly | Intermediate-advanced |
| Working Time | 15-20 minutes | 30-45 minutes |
| Color Options | Limited | Unlimited with pigments |
| Best For | Small holes ≤ palm size | Large repairs, color matching |
Scientific research on stucco mix ratios shows that proper proportions are critical for long-lasting repairs. The standard mix ratio is 12 parts sand, 3 parts Portland cement, and 2 parts lime by volume.
Inspect & Prep the Damage
Think of damage assessment like a doctor’s examination – you need to understand what you’re dealing with before you start treatment. The difference between a repair that lasts 20 years and one that fails in six months often comes down to how well you prepare the damaged area.
Damage sizing is your first critical decision point. Anything ¾ inch or smaller falls into the “easy fix” category – these are perfect candidates for simple patching a hole in stucco with ready-mix compounds. But once you cross that ¾-inch threshold, you’re entering territory that requires mesh reinforcement and multiple coats.
Hairline versus structural cracks tell completely different stories about your home. Hairline cracks thinner than a credit card are usually just surface issues from normal settling. But structural cracks that you can stick your finger into? Those are your home’s way of saying “we have a bigger problem.”
Moisture barrier check might be the most important step you’ll take. The substrate should read below 15-20% moisture content. Anything wetter than that means you’ve got active moisture problems that will sabotage your repair.
V-groove widening sounds fancy, but it’s really just giving your patch material something to grab onto. Take a cold chisel and hammer to widen hairline cracks to at least ¼ inch. Cut the edges at a slight angle so the crack looks like an upside-down V.
Cleaning debris is where patience pays off. Use that stiff-bristle brush to scrub away every bit of loose stucco, old paint, and accumulated dirt. Any loose material you leave behind becomes a weak point where your patch can fail.
Wetting surface before applying your patch prevents the existing stucco from sucking all the moisture out of your new patch material too quickly. Mist the repair area with clean water until it’s damp but not dripping.
Lath inspection becomes critical when your hole goes all the way through to the mesh underneath. If that wire mesh is damaged, rusted, or missing, you’ll need to cut a new piece slightly larger than the hole and secure it with galvanized fasteners.
More info about stucco problems can help you determine whether what you’re seeing is just surface damage or a sign of deeper moisture issues that need professional evaluation.
Patching a Hole in Stucco: The Core Techniques
Getting patching a hole in stucco right comes down to understanding a few fundamental principles. Whether you’re dealing with a tiny nail hole or a basketball-sized impact, these core techniques will guide you to a repair that lasts.
Small holes measuring ¾ inch or less can typically be sealed and patched in a single afternoon. Medium holes between ¾ inch and 3 inches need mesh reinforcement. Large holes over 3 inches require multiple coats applied over several days.
Here’s something many DIYers get wrong: layer thickness. Never apply stucco patch thicker than ¼ inch per coat. Thick applications cure unevenly, creating internal stress that shows up as cracks weeks or months later.
Curing schedules aren’t just suggestions – they’re critical for long-term success. Thin patches under ⅛ inch typically cure in 24-48 hours. Thicker repairs need 48-72 hours between coats.
Step-by-Step: Patching a Hole in Stucco (Small Repairs)
Small holes ≤¾ inch represent most of the stucco repairs homeowners face. The repair process is straightforward.
Start by cleaning the hole thoroughly with a small wire brush. Remove all loose material, dust, and debris. Blow out remaining particles.
Next, apply polyurethane sealant to prevent moisture from sneaking behind the stucco. Cut the caulk tube tip to match your hole size and inject sealant until it’s completely filled.
Allow the sealant to cure for the time specified on the tube – typically 1-24 hours depending on conditions.
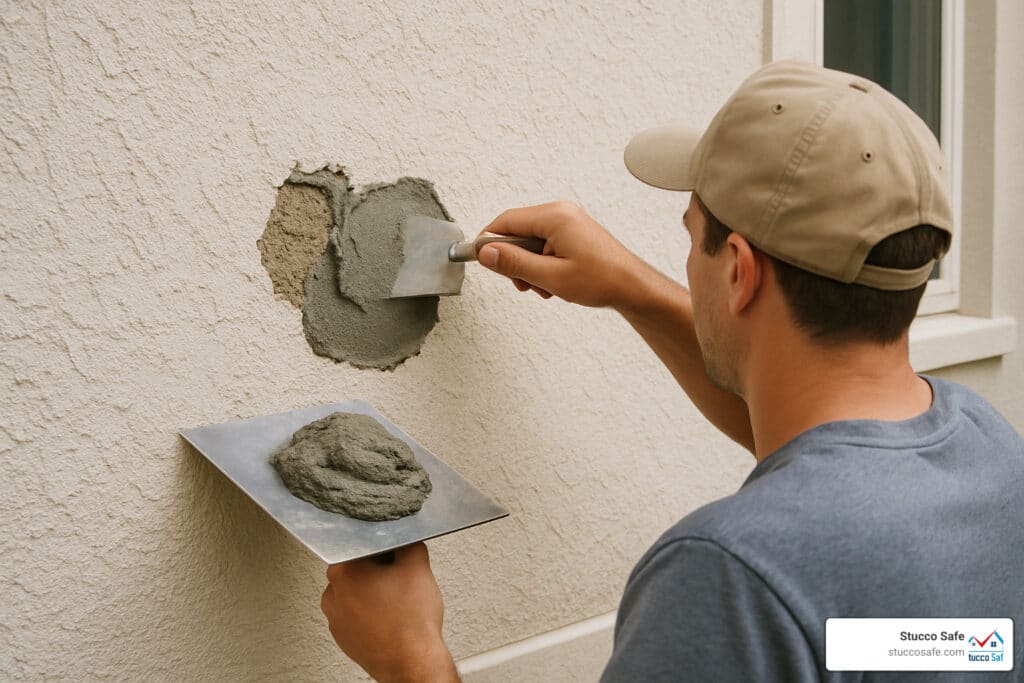
Now apply your one-coat acrylic patch using a putty knife or small trowel. Press the material firmly into the recessed area, building it up flush with the surrounding stucco surface.
Texture matching happens while the patch is still workable. Use a damp sponge, brush, or float to replicate the existing stucco texture.
Finally, allow 24-hour dry time before handling or painting the repair. How to Repair Stucco provides additional guidance for more complex situations.
Step-by-Step: Patching a Hole in Stucco (Large Repairs)
Holes larger than ¾ inch require mesh reinforcement and multiple coats to achieve a repair that’s as strong as the original stucco.
Start by removing all damaged material around the hole. Chisel away anything loose, cracked, or soft until you reach solid, well-adhered stucco.
Install wire lath cut slightly larger than your hole opening. For holes in existing mesh, overlap new lath by at least 2 inches on all sides. Secure with galvanized roofing nails or staples.

Apply the scratch coat mixed to a thick, mortar-like consistency. Press the material through and around the mesh, filling the hole to within ¼ inch of the final surface. Score the surface with crossing diagonal lines.
Cure for 48 hours while keeping the scratch coat damp. Mist with water 2-3 times daily in hot weather.
Apply the brown coat to within ⅛ inch of the final surface. Float this coat smooth and level with the surrounding stucco.
Cure the brown coat for 48 hours with the same misting routine.
Apply the finish coat flush with the existing stucco surface. This final coat should match the thickness and texture of the surrounding wall.
Final cure for 4-7 days before painting. Large patches need extended curing time to reach full strength.
Matching Existing Texture & Color
Dash finish gets created by flicking wet stucco onto the surface using a brush. Sand float finish uses a rubber float loaded with sand to create a consistent, fine-grained texture. Knockdown texture starts with a dash application, then lightly flattens the high spots with a trowel.
Pigment-in-mix provides the most durable color matching for large repairs. Add dry pigments to your stucco mix before adding water. Repaint after 7-10 days once the stucco has fully cured.

Seal, Cure, Paint – Making the Repair Weather-Proof
Your patching a hole in stucco work isn’t finished once the new material sets. The final protective steps determine whether your repair withstands decades of weather or starts failing within months.
Elastomeric sealer acts like a flexible shield over your repair. Unlike rigid paints that crack under stress, elastomeric coatings stretch and contract with temperature changes. Apply the sealer generously over the entire patched area, extending at least 6 inches beyond the repair on all sides.
Primer selection makes or breaks your paint job. Fresh stucco contains lime and cement that create highly alkaline conditions. Alkali-resistant primers are specifically formulated to bond with fresh stucco and neutralize these harsh conditions.
The breathable paint you choose is just as important. Stucco needs to “breathe” – allowing water vapor to escape while keeping liquid water out. High-quality acrylic latex paints provide the ideal balance of protection and permeability.
Curing climate affects everything from patch strength to paint adhesion. The sweet spot is 50-90°F with moderate humidity. Avoid painting during temperature extremes, in direct sunlight, or when rain threatens.
Moisture readings tell you when it’s safe to proceed with coatings. Use a moisture meter to verify both your patch and the surrounding stucco read below 15% moisture content.
Don’t forget to caulk around penetrations like light fixtures and trim boards. Use high-quality polyurethane or silicone caulk that stays flexible over time.

Patience during this final phase pays dividends for years to come. A repair that’s properly sealed, cured, and painted becomes virtually indistinguishable from the original stucco.
Frequently Asked Questions about Patching Stucco
How long does a stucco patch take to dry?
The drying time for patching a hole in stucco varies significantly based on your specific conditions. Small patches under ⅛ inch thick usually dry completely within 24-48 hours when temperatures stay between 50-90°F with moderate humidity.
Thicker patches tell a different story. If you’re tackling a larger repair that required multiple coats, plan on 48-72 hours between each application. The final curing process continues for up to a week.
Weather plays a huge role in drying times. Hot, dry conditions can actually work against you – rapid moisture loss often causes cracking. Cold weather below 40°F essentially stops the curing process.
Most ready-mix stucco patches dry within 72 hours under normal conditions.
Can I paint immediately after patching a hole in stucco?
Patience pays off when it comes to painting stucco repairs. You should wait at least 7-10 days before applying any paint to your patch. This waiting period isn’t just about drying – it’s about chemical stability.
Fresh stucco continues its curing process for weeks after application, releasing alkaline compounds that can wreak havoc on paint. The patch must also be completely dry throughout, not just on the surface.
When you’re ready to paint, apply an alkali-resistant primer designed for fresh masonry first.
When should I call a professional instead of DIY?
Some stucco repairs are perfect weekend projects, while others require professional expertise. Holes larger than 6 inches often signal underlying structural issues that need proper diagnosis.
Signs of moisture damage behind the stucco should always trigger a professional inspection. If you notice soft or discolored sheathing, water stains, or musty odors, you’re dealing with more than a simple hole repair.
Structural cracks around windows, doors, or corners may indicate foundation movement or framing issues that simple patching won’t solve. Recurring cracks that reopen after repair suggest ongoing movement that needs engineering evaluation.
At Stucco Safe, we provide comprehensive stucco inspections for $495 to $1,595 depending on home size. Our EDI-certified inspectors use forensic testing methods to identify hidden moisture and structural issues that aren’t visible from the surface.
Conclusion
Patching a hole in stucco successfully comes down to understanding your limits and knowing when to act. The small nail holes and minor cracks you can handle yourself with a weekend afternoon and basic tools. But the bigger picture? That’s where things get interesting.
Here’s the truth we’ve learned after decades in this business: what you see isn’t always what you get with stucco problems. That innocent-looking hole might be the tip of an iceberg. Behind your walls, moisture could be quietly destroying wood framing, growing mold, or creating structural issues that won’t show up until it’s too late.
That’s exactly why we developed our forensic testing approach at Stucco Safe. We use the same scientific methods that solve crimes to solve stucco mysteries. Our EDI-certified inspectors don’t just look at your walls – we peer inside them with specialized equipment that detects moisture, measures structural movement, and identifies installation defects that visual inspections miss entirely.
Think of it as an insurance policy for your repair investment. Our comprehensive inspections range from $495 to $1,595 depending on your home’s size, and they often save homeowners thousands in misdirected repairs.
We serve homeowners throughout Southeastern Pennsylvania, New Jersey, and Delaware because we’ve seen too many well-intentioned DIY repairs fail when the underlying problem wasn’t addressed. It’s not about discouraging you from fixing things yourself – it’s about making sure you’re fixing the right things.
The clock is ticking on every stucco hole. Whether you patch it yourself or call in professionals, the important thing is taking action now. Water doesn’t take weekends off, and it certainly doesn’t wait for convenient timing.
More info about stucco repair contractors can connect you with qualified professionals when your repair needs exceed the DIY comfort zone.
Remember this simple truth: a $50 patch today beats a $5,000 surprise tomorrow. Don’t let small holes become big headaches. Your home – and your wallet – will thank you for acting quickly.