
how to fix stucco exterior walls: Easy Guide 2025
Why Fixing Stucco Damage Quickly Protects Your Home
How to fix stucco exterior walls depends on the damage, but the process is straightforward for minor issues. Small cracks under 1/4-inch can be filled with elastomeric caulk, while larger holes require removing loose material and rebuilding the layers. However, if you see extensive damage, soft spots, or signs of moisture, it’s crucial to call a professional.
Stucco is a highly durable finish, but cracks and stains are more than cosmetic flaws—they are warnings that moisture could be damaging your home’s hidden structure. The good news is that many small repairs are manageable DIY projects. The challenge isn’t just patching the stucco; it’s knowing if the visible damage is the whole story or just the tip of the iceberg.
Homes built between 1993 and 2006 have a high stucco failure rate due to outdated building codes. If your home is from this era, even minor issues warrant a closer look.
I’m Gabe Kesslick, an EDI Level 2 Certified Stucco Inspector and founder of Stucco Safe. Since 2001, I’ve helped homeowners understand how to fix stucco exterior walls and identify when a simple patch isn’t enough to address hidden moisture damage.
This guide will walk you through identifying and repairing minor stucco damage. You’ll also learn the critical signs that indicate you need a professional inspection, because the worst repairs are those that cover up bigger problems.

Understanding Stucco Damage: Causes and Early Warning Signs
Stucco is tough, but not invincible. Understanding the different types of damage is the first step in knowing how to fix stucco exterior walls correctly, as what you see on the surface can hide more serious issues underneath.
- Hairline Cracks (under 1/4-inch): Often from normal house settling or temperature changes, these small cracks are invitations for moisture.
- Large Cracks (over 1/4-inch): These suggest more significant stress, like foundation movement or structural problems.
- Stains and Discoloration: Dark streaks, green algae patches, or a white powdery residue (efflorescence) are all signs of moisture intrusion.
- Bulging or Blistering: This is a red flag that water is trapped behind the stucco, causing it to detach from the wall.
- Crumbling Stucco: Soft, flaky areas indicate material failure, usually from prolonged moisture exposure.
What causes this? The main culprits are foundation settling, which stresses the rigid stucco, and improper installation, which can leave a home vulnerable for decades. But the number one villain is water intrusion. Poor flashing, clogged gutters, and misdirected sprinklers create pathways for water to get behind the stucco, leading to rot and mold. For more details, see our articles on Why Does Stucco Have Problems? and Stucco Siding Problems.
How to Identify Stucco Damage Early
Catching problems early is your best defense. Twice a year (spring and fall), walk around your house and look for cracks, stains, or bulging areas. Pay close attention to spots around windows, doors, and where the roof meets the walls. Use a rubber mallet to gently tap the stucco; a hollow sound indicates the stucco has separated from the wall, a condition called delamination that is often caused by trapped moisture. Checking for issues like Stucco Window Leaks can prevent serious damage.
Common Mistakes That Lead to Stucco Problems
Avoid these common mistakes that can turn minor issues into major headaches:
- Ignoring Small Cracks: A tiny crack is an open door for water, which can freeze and expand, making the crack much larger.
- High-Pressure Washing: This can force water behind the stucco and damage the finish. Use a garden hose and mild detergent instead.
- Improper Sealing: Using a non-breathable sealant can trap moisture inside the wall system, preventing it from drying out.
- Poor Drainage: Ensure gutters are clean and downspouts direct water away from your foundation. The ground should slope away from the house.
- Missing Kick-Out Flashing: This small piece of metal is vital for directing roof runoff into the gutter instead of behind your stucco, which can cause expensive Stucco Wood Rot.
Essential Tools and Materials for DIY Stucco Repair
Having the right tools and materials is half the battle when learning how to fix stucco exterior walls. Most items are available at your local hardware store.

Essential Tools & Safety Gear:
- Hammer and cold chisel (for removing damaged stucco)
- Wire brush (for cleaning)
- Margin, finishing, and pointed trowels
- Hawk (to hold stucco mix)
- Bucket and mixer (or hoe)
- Putty knife and spray bottle
- Safety: Gloves, safety goggles, and a dust mask are non-negotiable.
Essential Materials:
- Stucco patch compound
- Bonding agent
- Metal lath and builder’s paper (for larger repairs)
- Exterior acrylic caulk (for small cracks)
- Plastic sheeting and painter’s tape
For cracks in areas that experience movement, consider an Elastomeric Patching Compound for Stucco. Its flexibility helps prevent re-cracking.
What is the Best Type of Stucco Patch to Use?
Choosing the right patch depends on the repair and your existing stucco.
- Pre-mixed Stucco Patch: The easiest option for small, cosmetic repairs. It’s ready to use right out of the container.
- Traditional Stucco Mix: A dry, bagged mix of Portland cement, sand, and lime. It’s more cost-effective and versatile for larger jobs.
- Acrylic Stucco Patch: Specifically designed for synthetic stucco (EIFS). Using a cement-based patch on EIFS will cause it to fail.
- Elastomeric Caulk: A flexible, paintable caulk perfect for filling hairline cracks up to 1/4-inch.
The golden rule is to match your existing stucco type. If you’re unsure, especially if your home was built between 1993 and 2006, consider a professional inspection before patching. What looks like a simple crack could be a symptom of a larger moisture problem.
How to Fix Stucco Exterior Walls: A Step-by-Step Guide
Ready to get to work? Different types of damage require different approaches. Before starting, put on your safety gear (goggles, gloves, mask) and check the weather—you need mild temperatures and no rain for several days. Patience is key, as rushing the curing process will cause the repair to fail.
How to Fix Small Stucco Exterior Walls Cracks (Under 1/4-Inch)
- Clean the Crack: Use a wire brush to remove all loose debris and dirt.
- Widen Hairline Cracks: For very fine cracks, gently use a chisel to create a small V-groove. This helps the patch material bond more securely.
- Fill the Crack: Use a high-quality elastomeric caulk or a pre-mixed stucco patch, pressing it firmly into the crack with a putty knife.
- Smooth and Feather: Smooth the patch flush with the wall and use a damp sponge or brush to blend the edges into the existing stucco for an invisible repair.
- Cure: Let the patch cure for 24-48 hours, misting it occasionally with water to prevent it from drying too quickly.
For more details, see our guide on How to Repair Exterior Stucco Cracks.
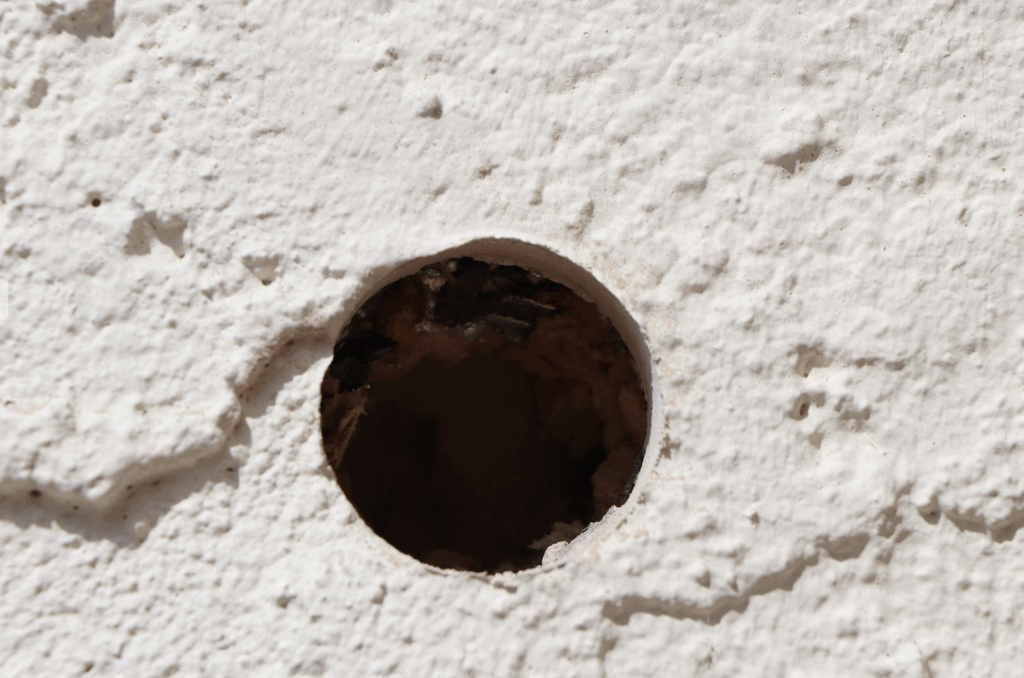
How to Fix Larger Cracks or Holes in Stucco
For damage wider than 1/4-inch, a more robust, multi-layer approach is needed.
- Remove Loose Stucco: Use a hammer and chisel to carefully chip away all crumbling material until you reach a solid, firmly attached base.
- Inspect the Underlayment: Check the exposed metal lath and builder’s paper. If they are rusted, torn, or wet, they must be cut out and replaced.
- Apply Bonding Agent: After cleaning the area, brush a stucco bonding agent onto the edges of the old stucco to ensure the new patch adheres properly.
- Apply Stucco in Layers: For deep repairs that expose the lath, you must use the traditional three-coat process.
Our guide on Patching a Hole in Stucco provides more comprehensive steps. Family Handyman also offers a useful resource on Stucco Repair: How To Fix Cracks and Blisters.
The Three-Coat Stucco Application Process Explained
This process is the gold standard for durable repairs.
- Scratch Coat: Apply a 1/4-inch layer of stucco mix, pressing it into the lath. Score horizontal grooves into the surface and let it cure for 24-48 hours, misting daily.
- Brown Coat: Apply a 3/8-inch layer to add strength and create a flat surface. This coat needs to cure for 5-7 days, with daily misting.
- Finish Coat: Apply a final, 1/8-inch layer. This is the visible coat that you will texture to match the surrounding wall. It needs another week to cure.
How to Match Stucco Texture and Color
Making your repair disappear is the final goal.
- Texture: Practice on a scrap board first. Use a damp sponge, trowel, or other tools to replicate your wall’s existing texture. Common techniques include swirling with a float or dashing stucco onto the surface.
- Color: Once the finish coat has cured for at least a week, prime the patch with a masonry primer. For a seamless look, paint the entire wall section, not just the patch, using a high-quality exterior acrylic latex paint.
When to Call a Professional: Signs Your Stucco Needs an Expert
Not every stucco problem is a DIY project. Patching over a crack can trap moisture and hide serious structural rot. Knowing when to call a professional is critical.
Call an expert if you see:
- Large damaged areas (over 10-15 square feet).
- Extensive or recurring cracking across walls.
- Signs of moisture intrusion, like persistent dark stains, water inside your home, or returning white, powdery efflorescence.
- Mold or mildew growth, or a musty smell indoors.
- Soft spots or widespread hollow sounds when you tap the wall.
- Structural issues, like foundation cracks or sticking doors and windows.
These are symptoms of water getting behind your stucco, which can lead to rot and mold. Our guide on Stucco Moisture Remediation explains these dangers in detail.
| Feature | DIY Repair (Small Cracks/Holes) | Professional Inspection & Repair (Extensive Damage) |
|---|---|---|
| Damage Size | Small cracks (up to 1/4-inch), holes (up to 2 inches) | Large areas (>10-15 sq ft), widespread cracking, structural damage |
| Underlying Issues | Surface-level cosmetic damage | Suspected moisture intrusion, mold, wood rot, lath damage |
| Tools/Skills | Basic masonry tools, patience, attention to detail | Specialized tools (moisture meters, hammer probes), certified expertise |
| Risk if Incorrect | Patch fails, minor aesthetic imperfection | Hidden structural damage, mold growth, costly future repairs |
| Cost | $50 – $200 (materials) | $200 – $800 (moderate repair), $1,000+ (extensive repair) |
| Outcome | Aesthetic improvement, prevents minor water entry | Long-term structural integrity, moisture remediation, lasting solution |
Professional repairs can range from a few hundred dollars to over $10,000 for extensive remediation. However, this cost is minimal compared to ignoring a problem that could lead to structural failure.
At Stucco Safe, we provide professional stucco inspections in Southeastern Pennsylvania, New Jersey, and Delaware. As a certified inspector, I use forensic testing—not guesswork—to diagnose what’s happening behind your walls. An inspection, typically costing $495 to $1,595, can save you tens of thousands by identifying the real problem before you waste money on a cosmetic fix. If you need a qualified expert, our network of Stucco Repair Contractors can help.
Maintaining Your Stucco to Prevent Future Damage
After repairing your stucco, preventative maintenance is key to ensuring it lasts. With proper care, a stucco finish can protect your home for a century.
- Regular Inspections: At least twice a year (spring and fall), walk around your home to spot new cracks or stains. Early detection is crucial.
- Gentle Cleaning: Avoid high-pressure washers. Instead, use a garden hose, mild detergent, and a soft-bristle brush to gently scrub away dirt.
- Painting and Sealing: A fresh coat of paint every 5-7 years provides a protective barrier. For unpainted stucco, consider a breathable, clear water-repellent sealant.
- Water Management: Keep gutters clean so they don’t overflow. Ensure downspouts and sprinklers direct water at least five feet away from your foundation walls.
- Prompt Minor Repairs: Don’t put off fixing a hairline crack. A 15-minute patch job can prevent water from getting in and causing a much bigger problem.
For a complete guide, see our article on Stucco Wall Maintenance. Understanding how to fix stucco exterior walls is good, but preventing damage is even better.
Frequently Asked Questions about How to Fix Stucco Exterior Walls
Here are answers to some of the most common questions about stucco repair.
How long does a stucco repair take to cure?
Patience is essential, as each layer has a specific curing time. Rushing this process will cause the repair to fail.
- Scratch Coat: 24 to 48 hours.
- Brown Coat: 5 to 7 days.
- Finish Coat: At least 7 days before painting.
For full strength, stucco can take up to 28 days to cure completely. Mist each layer with water daily to prevent it from drying too quickly.
Can I apply new stucco over old, painted stucco?
Yes, but only with careful preparation. You cannot simply apply new stucco over old paint. The surface must be clean, dry, and structurally sound. Any peeling or loose paint must be scraped or wire-brushed off. We strongly recommend applying a stucco bonding agent to the prepared surface to create a strong adhesive bridge between the old and new layers.
What is the biggest mistake to avoid in DIY stucco repair?
The single biggest mistake is covering up an underlying moisture problem. A cosmetic patch might look good temporarily, but if the crack was caused by a leak, you’ve just trapped moisture inside the wall. This leads to hidden mold, rot, and structural deterioration that is far more expensive to fix later.
If you see signs of water intrusion like persistent stains or soft spots, you must find and fix the source of the water first. If you’re unsure, a professional inspection is a wise investment. At Stucco Safe, our forensic testing can determine if you have a simple cosmetic issue or a deeper problem. An inspection, costing between $495 and $1,595, can save you from a five-figure disaster.
Conclusion
You now have a roadmap for how to fix stucco exterior walls for minor damage. Small cracks and surface issues are manageable DIY projects if you use the right materials and have patience during the curing process. These repairs can protect your home and keep it looking great.
However, the most important takeaway is that a visible crack might only be the tip of the iceberg. It could be a sign of a hidden moisture problem. When you see extensive cracking, persistent stains, or soft, hollow-sounding areas, it’s time to call a professional. A cosmetic patch in these situations only hides the problem, allowing rot and mold to spread unseen.
This is where a professional inspection is invaluable. At Stucco Safe, we serve homeowners in Southeastern Pennsylvania, New Jersey, and Delaware, using forensic testing to accurately diagnose what’s happening behind your walls. An inspection, typically costing between $495 and $1,595, provides a clear, actionable plan and can save you tens of thousands in future repairs by catching hidden damage early.
Don’t gamble with your home’s structural integrity. If you see warning signs that go beyond a simple crack, get a professional diagnosis first. For comprehensive solutions that address both the surface and what lies beneath, explore our services for Stucco Painting and Repair. Protect your investment with the expertise it deserves.