
How to fill screw holes in stucco: Perfect Patch 2025
Why Bother with Tiny Holes?
How to fill screw holes in stucco is a straightforward repair that protects your home from serious water damage. Here’s the quick method:
Quick Answer: Filling Stucco Screw Holes
- Clean – Use a wire brush to remove debris and blow out dust
- Seal – Apply polyurethane caulk deep into the hole
- Fill – After caulk dries, apply textured stucco patch in thin layers
- Blend – Match the existing texture using a damp sponge or brush
- Cure & Paint – Wait 24-72 hours, then prime and paint
Those small screw holes might look harmless, but they’re actually tiny doorways for water to sneak behind your stucco facade.
Once moisture gets past that outer layer, it can reach the water-resistive barrier and sheathing underneath. If that barrier is compromised, you’re looking at potential rot in your framing—the kind of hidden damage that turns a $10 patch job into a $10,000 remediation project.
The good news? Filling screw holes is one of the easiest stucco repairs you can tackle yourself. It takes minimal tools, basic materials, and about an hour of your time.
Stucco is durable, but its rigid nature means every hole is a vulnerability—an invitation for moisture, insects, and deterioration. The repair process is simple, but how you do it matters. Rushing or using the wrong materials can lead to a patch that fails in months, not years.
I’m Gabe Kesslick, founder of Stucco Safe and an EDI Level 2 Certified Stucco Inspector. Since 2001, I’ve seen countless moisture issues start with unsealed screw holes. I’ve refined this process to prevent those problems before they start.

Gearing Up: Tools and Materials for a Perfect Patch
How to fill screw holes in stucco starts with having all your tools and materials ready before you begin.

Safety first: Always wear safety glasses and gloves. Stucco dust can irritate your eyes, and caulk is difficult to remove from skin.
For patch materials, you’ll see pre-mixed stucco patch and powder mixes. For small screw holes, I recommend the pre-mixed route. It’s textured, ready to use, and requires no mixing. Products like Sika’s Ready-Mix Stucco Patch or QUIKRETE Pre-Mixed Stucco Patch are solid choices for these small, non-structural repairs.
Essential Tools
Here’s what you’ll need from your toolbox.
A small wire brush is perfect for scrubbing debris and loose stucco from the hole.
A flexible putty knife or trowel is essential for applying the patch and feathering the edges for a smooth transition.
A caulk gun is required to apply waterproof sealant deep into the hole.
Use a shop vacuum or compressed air to blast out dust and particles. Wear safety glasses if blowing out debris.
You’ll also need a bucket for water, sponges for blending textures, and paint brushes for texturing, priming, and painting.
Best Materials for the Job
The right materials make a repair that lasts for years.
High-quality polyurethane or elastomeric caulk is non-negotiable for your waterproofing layer. Polyurethane caulk stays flexible after it cures, handling temperature changes without cracking. It’s designed for sealing small stucco holes up to 3/4 inch.
Your textured stucco patch should be pre-mixed with sand to help match your wall’s texture. Look for products labeled for exterior stucco repair.
A stucco bonding agent is optional for tiny screw holes but improves adhesion and can prevent future failures.
Don’t forget exterior primer to create a uniform surface for your paint. You’ll also need exterior paint that matches your stucco color. Get a custom match at a paint store for a seamless finish unless you plan to repaint the entire wall. For more guidance on painting stucco, check out our Stucco House Painting Complete Guide.
The Step-by-Step Guide on How to Fill Screw Holes in Stucco
Now for the repair. From two decades of experience, I can tell you that patience is your best friend here. Rushed repairs fail. The secret to a lasting patch is working in layers and respecting drying times.
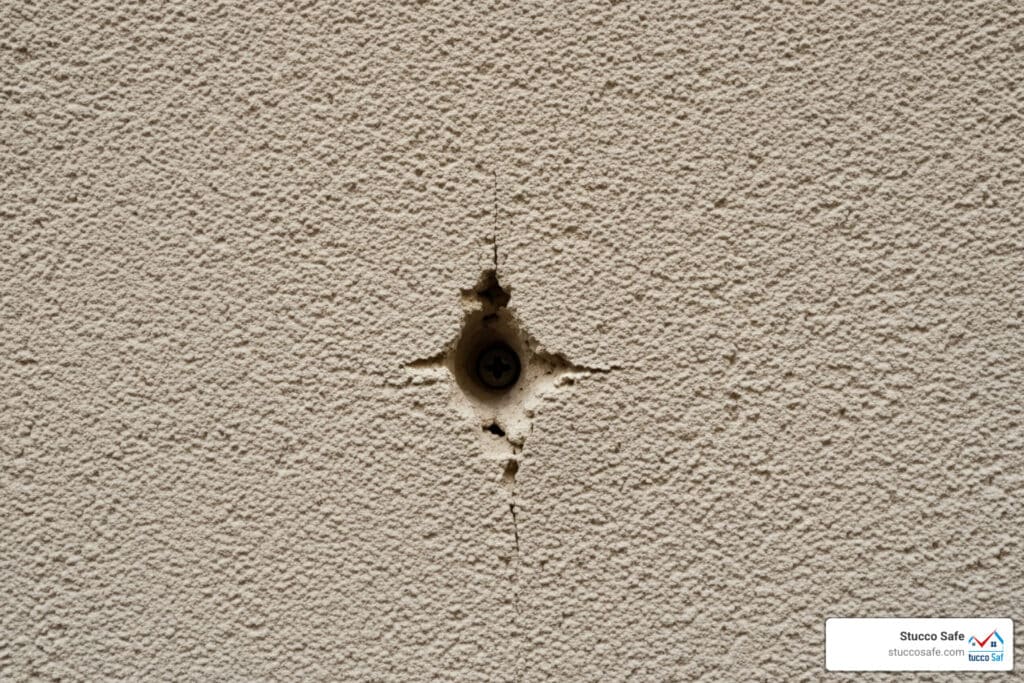
Step 1: Prepare the Hole for a Lasting Repair
Cleaning the hole properly is absolutely critical. Most failed patches I’ve inspected are due to poor preparation.
Start with your wire brush and thoroughly work it into the screw hole. You are removing loose stucco, old paint chips, and dirt. Scrub the inside and the area around it, brushing away any crumbly material until you hit solid stucco.
Next, use your shop vacuum or compressed air to blow out every last particle of dust. Dust creates a barrier that prevents your patch from bonding to the solid stucco. Your repair must bond directly to clean material. Please wear safety glasses if blowing out dust. More about stucco maintenance.
Step 2: How to Fill Screw Holes in Stucco for a Watertight Seal
This step is the heart of the repair, where we create a watertight seal to stop moisture. A screw hole is a direct path through your home’s protective barrier, so we must seal it completely.

Load your caulk gun with polyurethane caulk and inject it deep into the hole, filling the void completely. Aim for about an inch of depth, ensuring the caulk touches all sides. This flexible, waterproof layer is your insurance policy against water intrusion.
Now, let the caulk dry completely. This can take from an hour to a full day, depending on weather. Check the manufacturer’s instructions; waiting 24 hours is a safe bet.
Once the caulk is cured, use a putty knife to press textured stucco patch firmly into the remaining depth of the hole. Ensure good contact with the caulk below and the stucco around the edges.
Pro tip: For holes deeper than 1/4 inch, build up the patch in multiple thin layers (no more than 1/4 inch thick). Let each layer dry before adding the next to prevent sagging and ensure proper curing. This is worth the extra time. See a video tutorial on patching holes.
Step 3: Matching the Texture for a Seamless Finish
Matching the texture is the key to making your patch disappear. A perfect color match can’t hide a texture mismatch.

The key is to work while your final layer is still wet. Look closely at your existing stucco to identify the texture (smooth, sandy, swirled, etc.).
For a common sand finish, a damp sponge or damp brush works beautifully. Dip your tool in water, squeeze out the excess, and gently work the patch surface with circular sweeps or light dabbing to match the wall.
A dampened 3 or 4-inch paintbrush is great for feathering the edges. Lightly brush from the center of the repair outward to blend it into the surrounding texture and eliminate hard lines.
If you’re nervous, practice on a piece of cardboard or a hidden spot on your house first. Since you’re working while the patch is wet, you can smooth it out and try again if you don’t like the result. You have about 10-15 minutes of working time before it sets.
The Finishing Touches: Curing, Priming, and Painting
We’re in the home stretch now! Your patch is in place, the texture looks great, and you’re probably itching to slap on some paint and call it done. But hold on—this is where patience really pays off.
There’s an important difference between drying and curing that can make or break your repair. When the surface feels firm to the touch, that’s drying. But curing? That’s when the stucco patch actually achieves its full strength and waterproofing properties. Rush this step, and you might find your beautiful patch cracking or failing in a few months.
For most stucco patches, you’ll want to wait at least 24 hours before moving on to priming. But honestly? 48 to 72 hours is better, especially if your patch is deeper than 1/4 inch. Cool weather, high humidity, or a thick patch can all extend that timeline. Sika’s application guide on curing recommends a minimum of 24 hours, but we’ve seen too many DIYers paint too soon and regret it.
During this curing period, protect your patch from rain or heavy moisture. A light misting is usually fine, but a downpour can wash out your fresh repair. If rain is in the forecast, consider covering the area with plastic sheeting, making sure it doesn’t touch the wet patch directly.
Once your patch is fully cured, it’s time to prime. A high-quality exterior primer creates a uniform surface for your paint and ensures proper adhesion. This step is especially important because it prevents the patch from showing through your topcoat as a darker or lighter spot.
Finally, we get to paint! If you’re planning a full exterior refresh and you’re going to repaint your entire stucco house, you can simply paint over the patched area along with everything else. Easy peasy.
But if you’re just touching up that one spot? Color matching becomes critical. Even if you know the original paint color, stucco paint fades over time from sun exposure. What looked perfect five years ago might not match anymore.
Your best bet is to take a small chip of your existing stucco (from an inconspicuous spot) to your local paint store for a custom color match. Yes, it’s an extra step. But it’s the difference between a repair that disappears and one that sticks out like a sore thumb.
Apply your matched exterior paint in thin, even coats. You might need two coats to fully blend the repair with the surrounding surface. And there you have it—a seamless, watertight repair that protects your stucco house for years to come.
Common Pitfalls and When to Call for Backup
Learning how to fill screw holes in stucco is empowering, but it’s crucial to know your limits. Sometimes a simple patch job is a sign of a bigger problem.
Being proactive is smart, but understanding when to call a professional is even smarter. Here are common mistakes and the red flags that signal a need for expert help.
Mistakes to Avoid When You Fill Screw Holes in Stucco
Here are common mistakes that lead to failed repairs:
- Improper cleaning: Skipping the thorough cleaning step and leaving debris in the hole will cause the patch to fail.
- Using interior-grade fillers: Interior spackling or basic acrylic caulk can’t handle exterior conditions. They will crack and fail, allowing water in. Always use exterior-grade polyurethane or elastomeric caulk and a proper stucco patch.
- Applying patch too thickly: For holes deeper than 1/4 inch, applying one thick layer leads to sagging and cracking. Use multiple thin layers with proper drying time in between.
- Not matching the texture: A smooth patch on a textured wall is an obvious repair. Take a few minutes to blend the texture with a damp sponge or brush.
- Painting before the patch is fully cured: Painting too soon traps moisture, causing bubbling, peeling paint, and a compromised repair.
- Ignoring moisture signs: Patching over water stains or soft spots is like putting a band-aid on a serious wound.
Red Flags: When a Screw Hole Signals a Bigger Problem
Sometimes a screw hole is your house trying to warn you. Call a professional if you see:
- Water stains around the hole: This indicates moisture is already traveling behind your stucco.
- Soft or spongy stucco: If the area around the hole feels soft when pressed, the underlying material may be compromised by water, leading to rot.
- Bubbling stucco: Blisters or bubbles are pockets of trapped moisture, a major warning sign.
- Multiple cracks radiating from the area: This can signal underlying structural movement or widespread moisture damage.
If you notice any of these signs, the screw hole is likely a symptom of trapped moisture. This requires a professional forensic inspection from a certified specialist like Stucco Safe to diagnose the root cause before attempting a repair. We specialize in detecting moisture and structural issues in stucco for homeowners in Southeastern Pennsylvania, New Jersey, and Delaware, using forensic testing—not guesswork.
A professional inspection, typically costing $495 to $1595, is a small price compared to remediating extensive hidden damage. Understanding stucco siding problems and knowing when to call for help is the smartest way to protect your investment.
Frequently Asked Questions about Filling Stucco Holes
Here are answers to common questions about how to fill screw holes in stucco.
Can I just use regular acrylic caulk to fill the holes?
No, regular acrylic caulk is not suitable for exterior stucco repairs. It’s designed for interior use and lacks the flexibility and waterproofing needed to withstand the elements. It will harden, crack, and allow water into your wall system.
Always use polyurethane or elastomeric caulk. These sealants stay flexible, bond strongly to masonry, and create a durable, watertight seal. The slightly higher cost is worth it for a repair that lasts for years, not months.
How long does the repair take to dry before I can paint?
Patience is key. A patch may feel dry in hours, but it needs to be fully cured (reached its full strength and water resistance) before painting.
Curing time depends on temperature, humidity, and patch depth. As a general rule, wait 24 to 72 hours before priming and painting. For deeper patches or in cool, humid weather, wait longer. Sika’s application guide on curing recommends a minimum of 24 hours for ideal conditions. Painting too soon traps moisture and can ruin the repair.
Is the process different for larger anchor bolt holes?
Yes. Larger holes (1/2 inch or more) require more attention, especially regarding depth. You’ll still clean thoroughly and inject polyurethane caulk to create a waterproof barrier, but you may need to fill a deeper void.
The multi-layer application of the patch is critical. Apply stucco patch in thin layers (no more than 1/4 inch at a time), letting each layer dry completely before adding the next. This prevents sagging and ensures a proper cure.
For very large or deep holes, a backing material like foam backer rod or mesh may be needed to provide a base for the patch. If a large hole has compromised the underlying structure, a simple patch isn’t enough and professional inspection is needed before proceeding. For a detailed walkthrough, see our Guide to patching larger holes.
Conclusion
And there you have it—you now know how to fill screw holes in stucco, turning vulnerabilities into solid, weather-resistant repairs.
We’ve covered gathering the right materials, cleaning, sealing with waterproof caulk, applying textured patch in layers, matching the texture, and finishing with proper curing and painting. Each step builds on the last to create a repair that’s not just cosmetic but structurally sound and watertight.
This simple DIY repair can prevent serious moisture intrusion. Every screw hole you seal is one less entry point for water and hidden damage behind your walls.
However, it’s critical to know when a simple patch isn’t enough. If you spot water stains, soft stucco, or cracks, that’s your stucco house telling you something bigger is happening. In those cases, a forensic inspection can save you thousands by catching problems before they escalate.
At Stucco Safe, we’ve seen how proactive repairs extend the life of their stucco for decades. Our certified inspectors are always here if you need a comprehensive stucco inspection (typically ranging from $495 to $1595) or just peace of mind that your repairs are holding strong.
To learn how to hang items on your stucco correctly and avoid future holes, our guide on stucco screw anchors shows you how to do it right from the start.
Your stucco is tough, and with the right care, it will protect your home for generations.