
Don’t Get Damp: A Homeowner’s Guide to Moisture and Mold Inspections
Why House Moisture Testing Matters for Your Home
House moisture testing is the process of measuring the amount of water present in your home’s building materials and air to detect potential problems before they cause serious damage. Here’s what you need to know:
Quick Answer: What is House Moisture Testing?
- Purpose: Identifies hidden moisture that can lead to mold, rot, and structural damage
- Methods: Uses moisture meters (pin-type or pinless) and humidity sensors to detect water in walls, floors, and air
- Ideal Humidity: Keep your home between 30-50% relative humidity
- Normal Wood Moisture: 5-12% is normal; above 17% indicates a problem
- When to Test: Seasonally, after water events, or when you notice musty odors, stains, or condensation
Most people don’t think about moisture until they see a water stain or smell something musty, but by then, damage has often begun. Excess moisture is a serious threat to your property and health.
When indoor humidity climbs above 60%, it creates the perfect environment for mold and mildew, which can trigger respiratory issues. The moisture also attacks your home’s structure, causing wood to rot, paint to peel, and drywall to crumble.
On the flip side, air that’s too dry (below 30% humidity) brings its own problems: static electricity, itchy skin, nosebleeds, and damage to wood furniture and flooring.
The hidden danger? Moisture often lurks behind walls, under floors, or in attics where you can’t see it. By the time visible signs appear, you may be facing thousands of dollars in repairs. This is especially true for homes with stucco or EIFS exteriors, where moisture can penetrate the building envelope and go undetected for years.
That’s where proper moisture testing comes in. Whether you’re using a simple handheld meter or bringing in a professional for a comprehensive inspection, testing helps you catch problems early—when they’re small enough and cheap enough to fix.
I’m Gabe Kesslick, and I’ve been detecting and repairing moisture-related issues since 2001. As an EDI Level 2 Certified Stucco Inspector and BESI Level 2 Certified Building Envelope Forensic Inspector, I’ve seen how proper house moisture testing can save homeowners from catastrophic damage and costly repairs.
 and below 30% (static, dry skin, nosebleeds) - house moisture testing infographic mindmap-5-items")
House moisture testing terms made easy:
The “Why”: Dangers of Unchecked Moisture and Humidity Imbalances
When moisture levels go awry, the consequences can be detrimental to both your property’s integrity and your family’s health. This is why understanding the “why” behind house moisture testing is so crucial.
High Humidity Problems
When the air in your home feels heavy and damp, chances are your humidity levels are too high. Anything above 60% relative humidity creates a veritable playground for unwanted guests. This is where you’ll start to notice problems like mold, mildew, bacteria, and even dust mites making themselves at home. These microorganisms aren’t just unsightly; they’re notorious for triggering a host of health issues. People living in homes with mold and damp conditions are more likely to experience eye, nose, and throat irritation, coughing, phlegm build-up, wheezing, shortness of breath, and a worsening of asthma symptoms. For infants, children, seniors, pregnant people, and those with respiratory conditions, the risks are even greater. For more detailed information on the health implications, Health Canada provides excellent insights on the Health effects of dampness and mould exposure.
Beyond health concerns, high humidity quietly wreaks havoc on your home’s structure. Moisture is, in fact, the primary cause of structural deterioration. We’ve seen countless cases where extreme high humidity leads to wood rot, a silent destroyer that can compromise the very bones of your house. It also causes damage to furniture, paint, flooring, and wallpaper. That peeling paint on your ceiling or those warped hardwood floors might not just be age; they could be crying out for a house moisture testing intervention. For instance, wood starts to rot and is susceptible to mold when its moisture content reaches 35 to 50%. While wood can typically hold up to 25% moisture without showing signs of deterioration, exceeding this threshold is a clear indicator of trouble brewing.
Low Humidity Problems
While we often focus on the dangers of too much moisture, a lack of it can be equally problematic, though usually less destructive to the structure itself. When your home’s humidity dips below 30%, the air becomes excessively dry. This can lead to annoying static electricity shocks, uncomfortable itchy skin, and even frequent nosebleeds. For your home, low humidity can be particularly harsh on wood furniture and flooring, causing them to dry out, crack, or shrink, leading to costly repairs and a diminished aesthetic.

Understanding Ideal Humidity Levels
So, what’s the sweet spot? The consensus among experts, including the Environmental Protection Agency (EPA), is that the ideal indoor humidity level should range between 30 and 50 percent. This range is crucial for preventing the growth of microorganisms like mold and ensuring a comfortable, healthy living environment. You can easily monitor your home’s humidity using a simple tool called a hygrometer, which measures the amount of water vapor in the air.
However, this ideal range isn’t static; it shifts with the seasons. In the winter, when our furnaces are working overtime and drying out the air, we aim for a slightly lower humidity level, typically between 30 and 40 percent. This helps prevent condensation on windows and other cold surfaces, which can lead to moisture problems. Conversely, during the spring and summer months, when humid air from the outdoors inevitably finds its way inside, we strive to keep the indoor humidity level below 50 percent. This helps combat that clammy feeling and discourages mold growth. Maintaining these seasonal targets is a key aspect of proactive house moisture testing and management. For more insights on maintaining indoor air quality, you can refer to the EPA’s Care for Your Air: A Guide to Indoor Air Quality.
The “How”: A Guide to House Moisture Testing Methods
Now that we understand why house moisture testing is so important, let’s dive into the “how.” Detecting moisture isn’t always as simple as spotting a puddle. Often, moisture hides behind surfaces, silently causing damage. This is where specialized tools and techniques come into play.
Moisture meters are our go-to instruments. They work by measuring how electrical resistance or dielectric properties change based on the amount of moisture in a material. The more moisture present, the stronger the reading, allowing us to quantify the moisture content.
For homeowners, DIY house moisture testing can involve using basic visual checks coupled with an affordable handheld moisture meter. These can be great for initial checks or monitoring known problem areas. However, for a truly comprehensive assessment, especially when dealing with hidden issues or suspicious findings, a professional inspection is invaluable. Professionals often use advanced equipment and their expertise to diagnose the root cause of moisture problems. To learn more about these handy devices, check out our Moisture Detector Complete Guide.

Pin vs. Pinless Moisture Meters: Which is Right for You?
When it comes to moisture meters, you’ll primarily encounter two types: pin-type and pinless. Both have their strengths and ideal applications, and often, a comprehensive house moisture testing approach involves using both.
| Feature | Pin-Type Moisture Meters | Pinless Moisture Meters |
|---|---|---|
| Method | Uses two electrodes (pins) to penetrate the material | Uses non-invasive radio frequencies or electromagnetic fields |
| Measurement | Measures electrical resistance between pins | Measures the average moisture of a material within its depth |
| Invasiveness | Invasive; leaves small indentations or holes | Non-invasive; no damage to the surface |
| Reading Type | Provides actual moisture content (%MC) | Provides relative readings (often a scale of 0-100 or specific units) |
| Best For | Precise moisture content in wood, confirming presence of moisture after scanning | Quickly scanning large areas, delicate surfaces, initial assessment |
| Materials | Wood, drywall (with some limitations), plaster | Wood, drywall, concrete, tile, vinyl, plaster, and more |
| Speed | Slower, requires individual contact points | Faster, allows for quick scanning over surfaces |
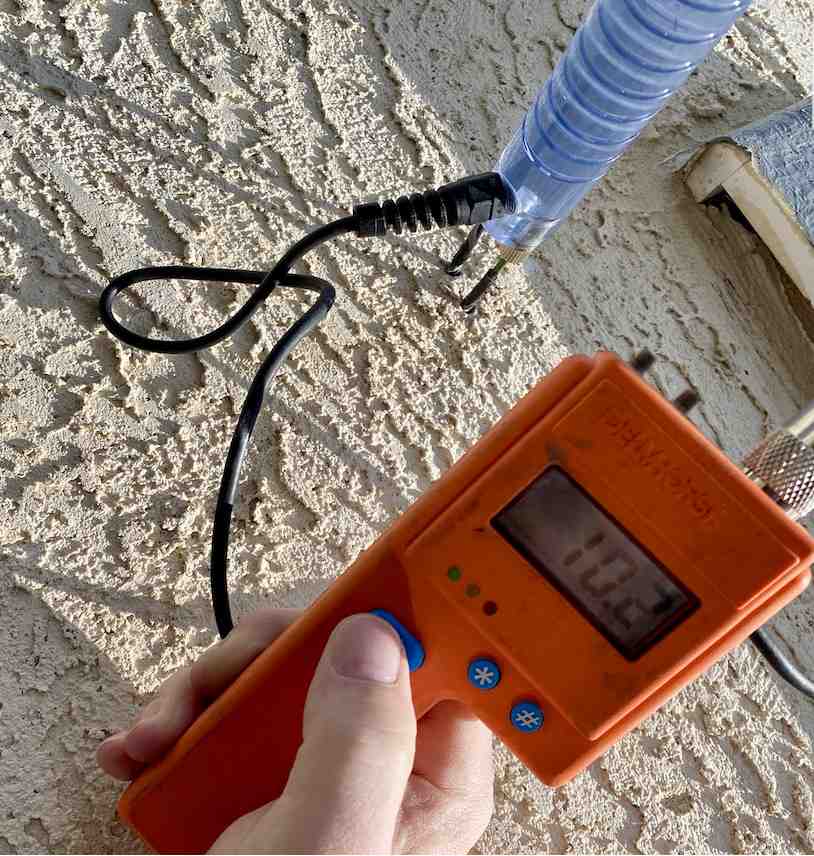
Pin-type meters are excellent for getting a precise percentage of moisture content, especially in wood. They work by inserting two sharp pins into the material, measuring the electrical resistance between them. The more moisture, the less resistance, and thus a higher reading. This method provides a direct measurement of actual moisture content (%MC) but does leave small indentations, making them less ideal for finished surfaces.
Pinless meters, on the other hand, are the non-invasive champions. They use radio frequencies or electromagnetic fields to scan a larger area quickly without damaging the surface. This makes them incredibly useful for initial surveys across various materials like drywall, concrete, tile, and even stucco. While they provide relative readings rather than an exact percentage, they are fantastic for quickly identifying areas of liftd moisture that warrant further investigation, perhaps with a pin-type meter or even an invasive test. Many professionals prefer pinless meters for their speed and non-damaging nature, often pairing them with pin-type meters for confirmation. You can dig deeper into the specifics of these tools in our article on Pin vs Pinless Moisture Meter.
Interpreting Your Moisture Meter Readings
Understanding what your moisture meter is telling you is just as important as knowing how to use it. The readings aren’t always a straightforward “wet or dry” answer.
For wood moisture content (MC), we have clear guidelines. Readings of 5 to 12% are generally considered normal for wood in a home. Up to 17% is often considered acceptable. However, once wood’s moisture content reaches 35 to 50%, it becomes highly susceptible to rot and mold growth. For instance, in our region of Southeastern Pennsylvania, New Jersey, and Delaware, the normal MC of wood can fluctuate seasonally, typically around 7% in winter and 12% in summer. These benchmarks are crucial for assessing the health of your home’s wooden components.
When it comes to materials like drywall and concrete, moisture meters provide a relative reading, not an exact percentage. This means the number on the screen indicates whether an area is wetter or drier compared to another, rather than a precise moisture percentage. To interpret these readings effectively, establish a “dry” baseline. Find an unaffected, visibly dry area of the same material and take a reading. Then, compare readings from suspect areas to this baseline. Any reading significantly higher than your baseline suggests a potential moisture problem that needs closer attention.
For reliable house moisture testing, accuracy and maintenance are vital. A meter’s accuracy isn’t affected by ambient humidity or low batteries (it will just stop working when power is insufficient). To ensure good readings, keep your meter clean, remove batteries when not in use, and check its calibration periodically.
The “Where”: Key Areas for a Home Moisture Inspection
Knowing where to look is half the battle in effective house moisture testing, as moisture is sneaky and often hides behind surfaces. A methodical approach is key, so start with your senses. Visual signs like water stains or peeling paint are red flags, and a persistent musty odor often indicates hidden mold. Trust your instincts—if something seems off, it probably is. For homes with stucco exteriors, be particularly vigilant for bubbling, stains, or cracks, which can point to significant moisture intrusion. Our article on Moisture Intrusion Stucco provides more specific details.
A Homeowner’s Moisture Checklist
To help you conduct your own initial house moisture testing, we’ve put together a checklist of key areas to inspect:
- Basements and Crawl Spaces: These subterranean areas are prime targets for moisture due to their proximity to the ground. Check for dampness, musty odors, visible mold, or water seepage. Concrete basement floors, despite appearing dry, can hold significant moisture due to their porous nature. Ensure proper home inspection basement moisture is part of your routine.
- Attics: Often forgotten, attics are susceptible to moisture from roof leaks, poor ventilation, or faulty seals around chimneys, vents, and roof penetrations. Look for damp insulation, water stains on rafters, or signs of mold.
- Bathrooms: With all the water in play, bathrooms are high-risk areas. Inspect around showers, tubs, toilets, and sinks for leaks, peeling caulk, or water damage on walls and floors. Run exhaust fans during and after showering to help manage humidity.
- Kitchens: Similar to bathrooms, kitchens have numerous plumbing fixtures. Check under sinks, around dishwashers, and near refrigerators for leaks or water damage.
- Laundry Rooms: Washing machines and dryers can be sources of significant moisture. Inspect hoses, connections, and ensure your dryer is properly vented to the outside.
- Around Windows and Doors: These are common entry points for water. Look for condensation, deteriorated caulk, or signs of water penetration around frames, which can indicate moisture within wall cavities.
- Exterior Walls: The first line of defense against the elements, exterior walls need careful attention. For stucco homes in Southeastern PA, New Jersey, and Delaware, this is especially critical. Over 90% of stucco applications in our region over the past 15-20 years are estimated to be improperly installed, making them highly vulnerable to moisture problems. Look for cracks, gaps, or signs of water leakage, especially around windows and doors, and ensure proper stucco ground clearance (ideally 6-8 inches above grade). For more insights, explore our resources on Moisture Problems With Stucco and Synthetic Stucco Moisture Problems. We also offer specialized services like Non-Invasive Stucco Inspection and Stucco Moisture Probe testing.
- Baseboards: Don’t overlook these humble trim pieces! Baseboards absorb and release moisture, making them excellent indicators of moisture in nearby walls or floors. If your baseboards feel soft, show discoloration, or have peeling paint, it merits further investigation.
Managing Home Humidity and Preventing Moisture Problems
Proactive management is the best defense against moisture-related issues. Once you’ve completed your house moisture testing and identified any potential problems, implementing strategies to control humidity and prevent future moisture intrusion is essential.
Good ventilation is one of the most effective tools for removing excess moisture. Use exhaust fans in bathrooms and kitchens, ensuring they vent outside. For laundry rooms, verify your dryer is properly vented outside and the lint trap is clean. Timer switches for exhaust fans are a smart investment for ensuring proper ventilation.
Dehumidifiers are fantastic for tackling high humidity, especially in damp areas like basements or crawl spaces. They are rated by the amount of water they can remove from the air per day (e.g., 30-pint, 70-pint). When choosing one, look for energy-efficient models with an Energy Star label to save on electricity. Remember to empty portable dehumidifiers often to prevent overflow.
On the flip side, if your home struggles with low humidity, particularly in winter, a humidifier can restore balance. Just be diligent about checking humidifiers daily to ensure they are working properly and are clean, as they can become breeding grounds for bacteria if not maintained.
Beyond air quality, addressing the physical structure of your home is paramount. Repairing leaks promptly—whether from plumbing, the roof, or windows—is non-negotiable. Even a small, slow leak can lead to significant damage over time. Furthermore, ensure proper drainage around your home’s exterior. This means checking and cleaning gutters and downspouts regularly so they direct water away from your foundation. Poor drainage is a common culprit for moisture seeping into basements and crawl spaces.
Seasonal Humidity Management
Managing your home’s humidity isn’t a one-size-fits-all approach; it changes with the seasons.
During the summer months, when the air outside is thick with humidity, our goal is to keep indoor levels below 50%. Your air conditioning system is your best friend here. Not only does it cool your home, but it also acts as a natural dehumidifier by condensing moisture out of the air. Supplementing with a dedicated dehumidifier in particularly damp areas can further improve comfort and prevent mold growth. Ensure your home is well-ventilated to allow for good air circulation, but be mindful of opening windows when outdoor humidity is very high.
As we transition into the colder winter months, the challenge often shifts to combating dry air, aiming for 30-40% humidity. This is when a humidifier can be beneficial. However, winter also brings the risk of condensation. To prevent moisture build-up on cold surfaces like windows, ensure good air circulation. Keep window coverings open to allow warm air to reach the glass, and avoid placing furniture directly against outside walls, especially near heating vents, to allow for proper airflow. Regularly drying window frames and sills can also prevent condensation-related issues.
When to Call the Pros for House Moisture Testing
While DIY house moisture testing is a great first step for homeowners, there are times when the expertise of a professional is simply indispensable. The limitations of DIY testing become apparent when you suspect hidden moisture, face widespread issues, or need a definitive diagnosis.
A challenge for homeowners is detecting hidden moisture. Mold and water damage often lurk behind walls, under flooring, or within ceiling cavities, unseen and unheard. Our forensic testing methods, employing sophisticated technology like thermal imaging and electronic surface moisture scanning, can reveal these invisible threats without tearing your home apart.
After a flood or major water event, a professional post-flood assessment is crucial. They can map water migration, determine what can be salvaged, and ensure thorough drying to prevent mold and decay. For a flooded basement, prioritize safety: turn off utilities and wait for a professional to confirm it’s safe to enter.
Real estate transactions are another key time to bring in the pros. Whether you’re buying or selling a home, a professional moisture inspection provides peace of mind and can protect you from costly surprises. For buyers, it’s an essential step before making one of life’s largest investments. For sellers, a pre-listing inspection can help you identify and address issues proactively, potentially increasing your home’s value and streamlining the sale process. This is particularly true for homes with stucco or EIFS exteriors, where specialized inspections are often a necessity. Our Certified Moisture Testing services ensure accuracy and peace of mind for all parties involved in a real estate transaction.
Choosing a Moisture Meter vs. Hiring an Inspector
For routine checks and small, visible issues, a personal moisture meter can be a valuable tool. A typical moisture meter can cost anywhere between $30 to $250, with professional-level meters usually starting around $60. When choosing one, look for key features like accuracy, material settings (especially if you need to test wood), and durability.
However, when you’re dealing with the complexities of your home’s building envelope, especially with stucco or EIFS, hiring a professional inspector is not just recommended, it’s often critical. A standard home inspection or visual inspection alone will not disclose the issues or damages associated with stucco moisture problems. Over 90% of all stucco applications in the Northeastern United States, within the past 15 to 20 years, are estimated to be improperly installed, making them highly susceptible to moisture intrusion.
Our professional Moisture Inspection Services go far beyond what a handheld meter can do. Our certified inspectors use forensic testing methods, including thermal imaging and electronic surface moisture scanning, to detect hidden moisture. We also conduct invasive moisture testing of the building framing behind the stucco cladding, substrate firmness testing, and general building leak detection. This comprehensive approach is designed to find problems that DIY methods simply can’t.
Our stucco inspections vary in cost from $495 to $1595 or more for very large homes, a small investment compared to the tens of thousands of dollars in repairs that undetected moisture damage can incur. We specialize in serving homeowners and real estate professionals across Southeastern Pennsylvania, New Jersey, and Delaware, including cities like Philadelphia, West Chester, Villanova, King of Prussia, Phoenixville, and many more.
Frequently Asked Questions about Home Moisture Testing
What do moisture meter readings mean for drywall?
When using a moisture meter on drywall, it provides a relative reading, not an exact moisture percentage. Unlike wood, for which meters can give a precise moisture content, drywall readings indicate whether an area is wetter or drier compared to another. To interpret these readings effectively, you should establish a “dry” baseline. Take a reading in an unaffected, visibly dry area of your drywall. Then, compare readings from suspect areas to this baseline. Any reading significantly higher than your baseline indicates a potential moisture problem that needs further investigation.
How often should I test my home for moisture?
We recommend a multi-pronged approach to house moisture testing. It’s wise to perform a visual inspection seasonally and after any major weather events (like heavy rain or snowmelt). If you notice any signs of moisture, such as stains, musty smells, peeling paint, or even unexplained condensation, that’s your cue to use a moisture meter. For proactive monitoring, an annual check of moisture-prone areas like basements, attics, and around windows and doors is a good practice. Humidity levels can change multiple times a day with temperature and weather, so regular checks, especially in susceptible areas, are beneficial.
Can I use bleach to clean up mold?
No, we strongly advise against using bleach to clean up mold. According to health authorities like Health Canada, bleach is not recommended for cleaning mold. While it might remove the surface stain, it often doesn’t penetrate porous materials to kill the underlying mold spores, and it can release harmful fumes, especially when mixed with other cleaners. The most crucial step is to fix the moisture source that allowed the mold to grow in the first place. Once the moisture source is addressed, physically remove the mold using an unscented soap and water solution, wearing appropriate personal protective equipment (PPE) like gloves and an N95 respirator. For larger mold issues (over 3 square meters), or if the mold returns, we always recommend calling a professional mold remediation service.
Conclusion: Protecting Your Home and Health
We’ve explored the importance of house moisture testing, from understanding humidity levels to the tools for detection. We’ve seen how improper humidity impacts your home and health, causing everything from mold and structural damage to dry skin and static electricity.
Proactive testing and diligent management are your home’s best defenses. By regularly monitoring humidity, performing visual inspections, and using moisture meters in key areas, you can catch problems early, when they are easier and less expensive to fix.
However, some moisture issues, especially those involving hidden damage or complex building envelopes like stucco and EIFS, require a professional touch. Our certified inspectors at Stucco Safe specialize in forensic testing methods, providing the expertise needed to uncover and diagnose even the most elusive moisture problems in homes across Southeastern Pennsylvania, New Jersey, and Delaware. We are dedicated to protecting your home’s structural integrity and your family’s well-being.
Don’t let hidden moisture become a costly nightmare. Take control of your home’s health today.