
Best drill bit for stucco: Ultimate Safe 2025
Finding the Best Drill Bit for Stucco
When tackling home improvement projects, finding the best drill bit for stucco is crucial for success and preventing damage to your home’s exterior. Stucco is a durable and popular wall material, but its hard, cement-like composition requires specialized tools and techniques for drilling.
For quick reference, here are the top recommendations for the best drill bits for stucco:
- Type: Masonry drill bits. These are specifically designed for hard materials like concrete, brick, and stucco.
- Tip Material: Look for carbide-tipped or diamond-tipped bits. These materials provide the necessary hardness and durability to penetrate stucco effectively.
- Drill Type: While a standard drill can manage very small, single holes, a hammer drill is highly recommended for most stucco drilling tasks. Its percussive action makes the job much easier and prevents undue wear on your drill bits.
- Shank Type: For hammer drills and rotary hammers, SDS-plus shanks are common, offering a secure connection and efficient power transfer. Hex shanks work with standard drills.
Drilling into stucco doesn’t have to be a daunting task. With the right knowledge and tools, you can confidently install fixtures and complete your projects without compromising your home’s integrity.
As Gabe Kesslick, with over 20 years in leak detection and building forensics, I’ve seen the importance of using the right tools to protect your home. My expertise as an EDI Level 2 Certified Stucco Inspector helps homeowners understand how to choose the best drill bit for stucco while maintaining their home’s integrity.
This guide will walk you through everything you need to know, ensuring you choose the perfect bit for your project.

Best drill bit for stucco vocabulary:
Choosing the Best Drill Bit for Stucco
Yes, you can drill into stucco, but it’s not like drilling into wood or drywall. Stucco is a hard, cement-like mixture of sand, water, and a binder. Its durability is great for protecting your home, but its abrasive nature requires a specialized approach.
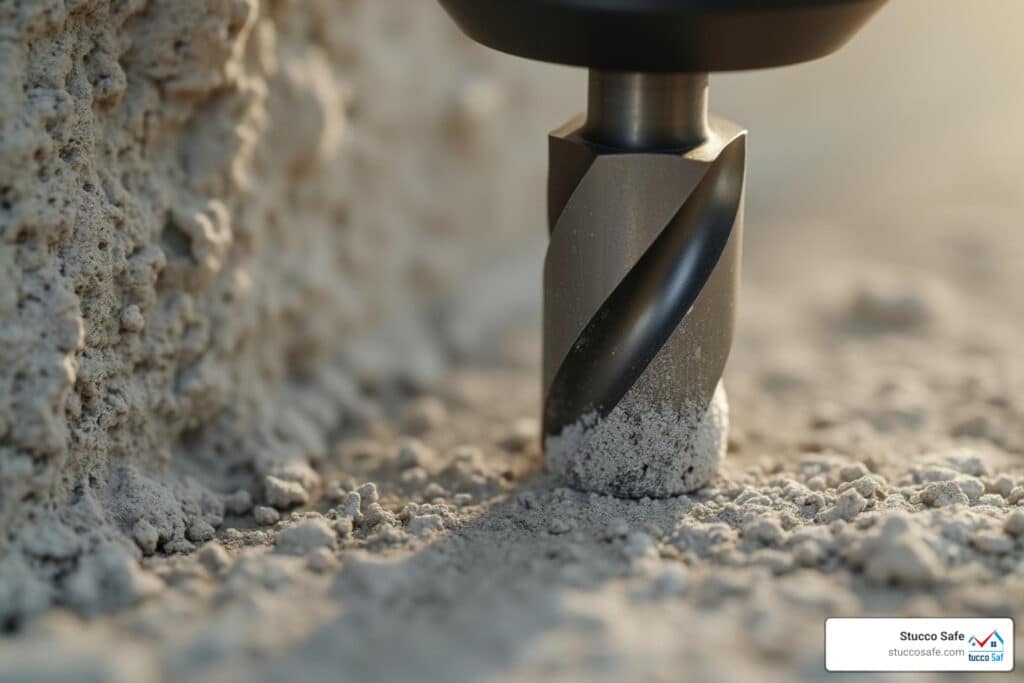
A standard wood or metal bit will quickly dull, overheat, and become useless on stucco, potentially damaging your drill. This is why you need a specialized bit. The best drill bit for stucco is a masonry drill bit, preferably one with a carbide or diamond tip.

Masonry Bits: The Undisputed Champion for Stucco
Masonry drill bits are engineered for tough materials like concrete, brick, and stucco. Their secret is a super-hard tip made of tungsten carbide or industrial diamond. This tip pulverizes the stucco as it rotates, rather than trying to scrape it away. Tungsten carbide provides the hardness and heat resistance needed to handle the friction of drilling into stucco, preventing the bit from dulling quickly. For frequent use or harder materials, diamond-coated bits offer even better performance.
Another key feature is the wide, spiral grooves (flutes) that efficiently clear dust and debris. This prevents clogging, reduces friction, and helps keep the bit cool. Pro tip: When drilling multiple or large holes, periodically applying a little water to the bit prevents overheating and extends its life.
What to Look for in the Best Drill Bit for Stucco
When shopping for the best drill bit for stucco, quality matters. Look for bits from trusted brands known for durability.
Beyond the tip material, consider these features:
- Tip Geometry: Masonry bits often have a spear-point or chisel-point design. This helps the bit bite into the stucco immediately and prevents it from “walking” across the surface.
- Flute Design: Wide, deep flutes are essential for clearing stucco dust from the hole. This prevents the bit from getting stuck and ensures consistent drilling speed.
- Shank Type: This is the end of the bit that fits into your drill’s chuck.
- Round shanks are common and fit most standard drills.
- Hex shanks offer a more secure grip and fit impact drivers and many standard drills.
- SDS-plus shanks are for hammer drills and rotary hammers. Their grooved design locks into the chuck, allowing the bit to move with the drill’s hammering action for maximum efficiency in masonry.
Highly-rated sets from brands like DEWALT, TITGGI, and WORKPRO consistently earn 4.3 to 4.7-star ratings from thousands of users, proving their effectiveness for all types of masonry drilling, including stucco.
Single Bit vs. Set: Finding the Best Drill Bit for Stucco for Your Needs
Should you buy a single bit or a whole set? It depends on your project needs. Buying a set is usually more cost-effective and provides versatility. A typical 10-12 piece set gives you a range of common sizes, saving you trips to the hardware store if your project needs change. Having a set with a storage case also keeps your bits organized and ready for any task.
Here’s a quick guide to common sizes:
- Small holes (up to 3/8 inch): For hanging light items like picture frames, decorations, or light-duty anchors.
- Larger holes (1/2 inch or more): For heavier items like hose reels, shelves, or running pipes through the wall.
- Pilot holes for stucco screws: Often require specific sizes like 3/16 inch or 5/16 inch. Always check the screw or anchor manufacturer’s recommendation for the correct bit size.
The Right Tools and Safety Gear for Drilling Stucco
With the best drill bit for stucco ready, you also need the right drill and safety gear. Drilling into stucco creates dust, so safety is paramount for a successful project.

Selecting the Right Power Drill
Your choice of drill makes a big difference. A standard drill struggles with stucco; it can make a tiny hole, but it’s slow, wears out bits quickly, and can burn out the motor. It’s not recommended for more than a single, small hole.
A hammer drill is the ideal tool. It doesn’t just spin; it also hammers forward, chipping away at the stucco as it rotates. This percussive action makes the job much faster, easier, and creates cleaner holes while preserving your drill bits.
For big projects with many large holes (1/2 inch or bigger) or very dense stucco, a rotary hammer is the ultimate power tool. These heavy-duty machines, often using SDS chucks, are built for serious masonry work.
Ensure your drill bit’s shank (the end that goes in the drill) matches your drill. Standard drills take round or hex shanks, while hammer drills and rotary hammers often use hex or the more robust SDS-plus shanks for a secure fit.
Essential Safety Precautions
Safety is the most important part of the job. Drilling stucco is dusty and noisy, so take these precautions:
- Eye Protection: Always wear safety glasses or full-coverage goggles to protect your eyes from flying debris.
- Dust Mask: A dust mask or respirator is a must. Stucco dust contains crystalline silica, which is hazardous to breathe and can cause serious lung damage.
- Hearing Protection: Hammer drills are loud. Use earplugs or earmuffs to protect your hearing.
- Check for Utilities: Before drilling, use a stud finder or utility detector to locate hidden electrical wires or plumbing pipes. Hitting one can cause serious injury and expensive home damage. If unsure, call a professional.
- Prevent Chipping: To prevent the stucco from chipping, place a piece of painter’s tape over the spot where you plan to drill. Start the drill slowly and apply steady, even pressure, letting the tool do the work.
How to Drill Into Stucco: A Step-by-Step Guide
Alright, you’ve got your best drill bit for stucco, your trusty hammer drill, and all your safety gear. Now comes the exciting part: actually drilling into that stucco! It might seem a little intimidating at first, but with a clear plan and these easy-to-follow steps, you’ll be mounting items securely in no time. We’ll walk you through how to create perfect pilot holes and install those wall anchors, ensuring a strong, lasting hold for whatever you’re hanging.

Step 1: Mark Your Location and Select Your Hardware
Think of this as your blueprint for success! Getting your marks right from the start saves a lot of headaches later.
First, grab a pencil or marker and precisely mark the spot where you want your hole. If you’re hanging something that needs more than one hole, like a shelf or a heavy picture, use a level and a tape measure. This ensures everything is perfectly aligned and looks great once installed. You only get one shot at drilling a straight, accurate hole!
Next, it’s time to choose your screws and wall anchors. These are crucial for holding your item securely. Make sure they’re appropriate for the weight of what you’re hanging. Stucco screws are specially designed with deep threads to really grip the material. Most importantly, you need to match the size of your drill bit to the size specified for your chosen wall anchor. The anchor should fit snugly into the hole you drill, so always check the anchor’s packaging for the recommended drill bit size.
Step 2: Prepare and Drill the Pilot Hole
This is where your preparation pays off! Creating a pilot hole correctly is key to preventing cracks and getting a clean result.
Before you start drilling, take a piece of painter’s tape (or even duct tape) and place it over your marked spot. You can even make an “X” with the tape right over your mark. This little trick helps to prevent chipping and cracking around the hole as your drill bit first bites into the stucco.
Now, position your masonry drill bit right on your mark, making sure it’s perpendicular (straight out) from the wall. Start your drill at a very slow speed. If your drill has a hammer function, don’t engage it just yet. This slow start allows the bit to gently create a small indentation, helping it “bite” into the stucco without slipping or causing initial damage.
Once you’ve got that small indentation, if you’re using a hammer drill, engage the hammer function. Now, apply steady, consistent pressure. Let the drill bit do the work – there’s no need to push too hard, as this can cause chipping or overheat your bit. Just a firm, constant pressure is perfect.
Keep drilling until you reach your desired depth. A good rule of thumb is to drill slightly deeper than the length of the anchor or screw you plan to insert. A neat trick is to wrap a piece of tape around your drill bit at the exact depth you need. This gives you a clear visual guide, so you know exactly when to stop. If you’re drilling multiple holes, or if your bit feels hot, little pro tip from earlier: a tiny bit of water can help keep the bit cool and improve performance.
Step 3: Clean the Hole and Install the Anchor
A clean hole is a happy hole, and it’s essential for a secure fit!
Once you’ve drilled to your desired depth, reverse your drill and slowly pull the bit out of the hole. Now, it’s absolutely crucial to remove all the dust and debris from inside that hole. Why? Because a clean hole allows your anchor to expand and grip the stucco properly. You can gently blow into the hole (but please, wear your eye protection!), use a vacuum, or even a small brush to clear it out.
With the hole clean, gently insert your wall anchor. It should slide in snugly. If it doesn’t go in easily, you can gently tap it with a hammer until it’s flush with the stucco surface. The key word here is “gently.” Don’t force it, as too much force can crack the stucco you’ve worked so hard to drill into.
Step 4: Fasten Your Item
You’re almost there! This is the final step to securing your item.
Now, carefully position your item over the anchor. Then, using a screwdriver or your drill, drive the screw into the anchor. As you tighten the screw, the anchor will expand inside the stucco, creating a wonderfully strong hold.
Here’s an important tip: do not overtighten the screw! Overtightening can strip the anchor, making it lose its grip, or worse, it could crack the stucco around your freshly drilled hole. Tighten just until the item is secure and feels firm.
Finally, for exterior applications, or if you’re concerned about moisture getting into your wall (and you always should be when drilling into stucco!), it’s a smart move to seal it up. Apply a bead of high-quality, exterior-grade silicone caulk or specialized stucco caulk around the perimeter of the installed screw or anchor. This is a critical step because it creates a waterproof barrier, preventing water from seeping into the wall cavity. Moisture intrusion can lead to significant damage over time, and that’s something we definitely want to avoid!
Frequently Asked Questions about Drilling Stucco
Drilling into stucco can bring up a few questions. Here are answers to some of the most common ones.
Can I drill into stucco without a hammer drill?
Technically, yes, but it is not recommended. A standard drill should only be used for a single, small hole in softer or thinner stucco. It relies purely on spinning, which is inefficient against the hard material. This requires more force, leads to chipping, and puts immense strain on both the bit and the drill’s motor, risking burnout.
For efficiency, cleaner holes, and to save your tools, a hammer drill is the right choice. Its percussive action makes a world of difference, making it an investment you won’t regret for any significant stucco drilling.
How do I repair a small hole drilled in my stucco?
Patching a small hole in stucco is manageable. First, clean the hole of any loose debris or dust. Then, apply an exterior-grade stucco patch or a specialized stucco caulk using a putty knife. Stucco caulk is often a great choice as it’s flexible, waterproof, and designed to blend with the stucco texture.
Smooth the patch so it’s flush with the wall. If needed, gently dab the patch to match the surrounding texture. Allow it to cure completely according to the manufacturer’s instructions. Once dry, you can paint over it to match your wall color.
Do I need to seal the screw hole after drilling into stucco?
YES! Sealing any screw hole in exterior stucco is absolutely critical. Stucco sheds water, but any hole creates a direct path for moisture to get into the wall cavity. Unsealed holes can lead to hidden moisture intrusion, causing wood rot, structural damage, and mold growth.
These issues can go unnoticed until they become severe and require expensive repairs, compromising your entire wall system. To protect your home, always apply a high-quality, exterior-grade silicone caulk or dedicated stucco caulk around the screw head or anchor after it’s installed. This simple step creates a waterproof seal and protects your home for years to come.
Conclusion: A Secure Finish for Your Stucco Walls
You’ve done it! Drilling into stucco might have seemed a bit daunting at first, but with the right know-how and tools, you can absolutely tackle those home improvement projects with confidence. We’ve walked through all the essential steps together: from choosing the best drill bit for stucco (remember those trusty masonry bits with carbide tips!), to understanding why a hammer drill is your best friend for this kind of work, and of course, putting safety first every single time.
By following our step-by-step guide, you’re not just drilling holes; you’re ensuring a secure, lasting finish for your stucco walls. Your new fixtures will be mounted soundly, and your home will look fantastic.
But here’s a crucial thought for homeowners in Southeastern Pennsylvania, New Jersey, or Delaware: before you even think about drilling, it’s incredibly wise to consider your stucco’s current condition. Why? Because a small drill hole, even when sealed perfectly, can sometimes make existing, hidden moisture damage much worse. If there’s already water lingering unseen behind your stucco, that little hole could open the door to bigger problems down the line.
That’s where Stucco Safe comes in. We’re experts in professional stucco inspection services. Our certified inspectors use advanced forensic testing methods to uncover any hidden moisture or structural issues that might be lurking beneath the surface. Think of it as a health check-up for your home’s exterior, giving you true peace of mind.
Our Stucco Inspections vary in cost from $495 to $1595 or more for very large homes – a small investment when you consider the potential cost of unseen damage. Protecting your home’s integrity is always worth it!
Learn more about how we can help protect your valuable investment and ensure your stucco is safe and sound for years to come: More info about professional stucco inspection services.
