
Best Screws for Stucco: Secure Walls 2025
Why Choosing the Right Screws for Stucco Matters
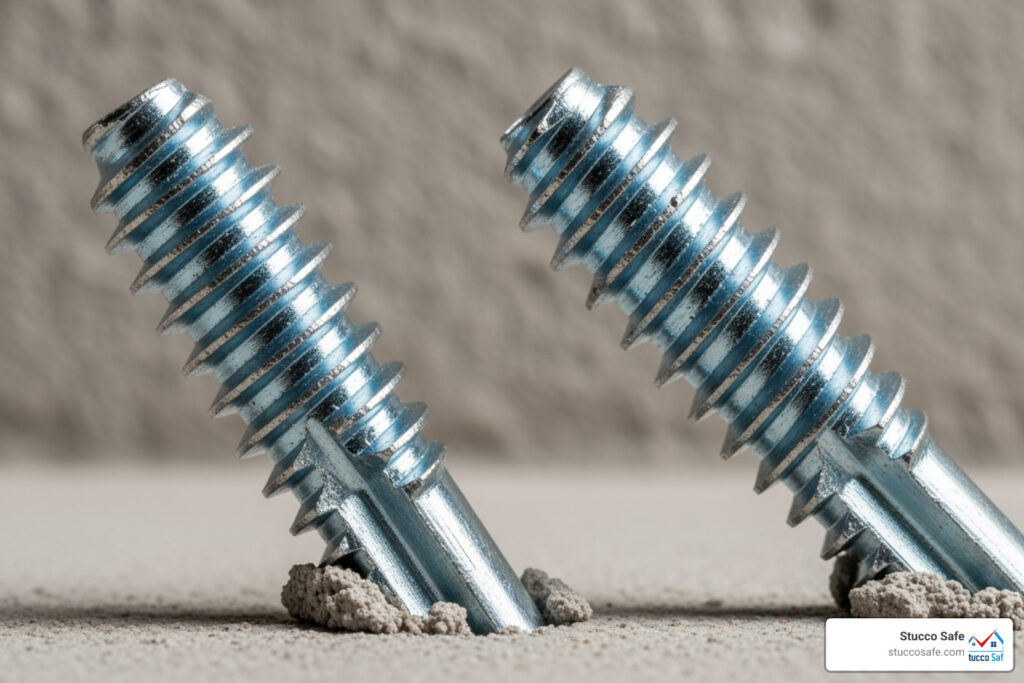
Best screws for stucco are masonry screws or specialized stucco anchors made from corrosion-resistant materials like stainless steel or zinc-coated carbon steel. These fasteners feature deep, aggressive threads and require pilot holes for proper installation.
Quick Answer – Best Screws for Stucco:
- Masonry Screws: Tapcon or Buildex stucco anchors
- Materials: Stainless steel or zinc-coated carbon steel
- Lengths: 1.5″ for 3-coat systems, 2.5″+ for 1-coat systems with foam
- Installation: Always drill pilot holes with masonry bits
- Load Capacity: Match screw rating to item weight
Stucco presents unique challenges that regular wood or drywall screws simply can’t handle. As one stucco expert puts it: “Stucco is a surprisingly hard surface and fastening anything to it can be a huge hassle if you are not properly prepared.”
This cement-based material is both hard like concrete and brittle like ceramic. When you use the wrong fasteners, you risk cracking the stucco, creating entry points for moisture, and potentially causing hidden water damage behind your walls.
The key is understanding that stucco’s hardness requires specialized screws with aggressive threading, while its brittleness demands careful installation techniques to prevent damage.
I’m Gabe Kesslick, an EDI Level 2 Certified Stucco Inspector who has been investigating stucco issues since 2001. Through countless inspections, I’ve seen how improper fastening can lead to moisture intrusion and costly repairs, making the selection of the best screws for stucco critical for long-term wall integrity.

Why Stucco Demands a Special Kind of Screw
Here’s what makes stucco so tricky to work with: it’s essentially a cement-based material made from cement, sand, and water that’s applied in layers over wire or metal lath. This creates a surface that’s hard as concrete but surprisingly brittle – imagine trying to screw into a thick ceramic tile.
This unique combination spells trouble for regular screws. Wood screws and drywall screws are designed for softer materials that give way gradually. When you try to drive them into stucco’s hard surface, they often strip out the hole or cause the material to crumble around the fastener. It’s like trying to use a butter knife as a chisel – you’re just not using the right tool for the job.
But here’s where things get really problematic: regular screw failure isn’t just about poor grip. When standard screws can’t get a solid hold, they create loose connections that wiggle over time, gradually enlarging the hole and compromising the attachment.
The corrosion risk is another major concern. Stucco naturally absorbs moisture, and when you combine that with non-corrosion-resistant screws, you’re setting yourself up for trouble. As these screws rust, they create those unsightly rust stains that bleed down your beautiful stucco walls. Even worse, corroded screws lose their structural integrity, creating weak points that can fail unexpectedly.
This is where the role of anchors becomes crucial. The best screws for stucco are designed for load distribution – they spread the holding force over a wider area rather than concentrating stress at a single point. This prevents the stucco from cracking around the fastener, which is essential for preventing cracks that can become entry points for water.
As I’ve seen in countless inspections across Southeastern Pennsylvania, New Jersey, and Delaware, what starts as a simple fastening mistake can lead to water intrusion behind the stucco. That hidden moisture damage can result in mold growth, structural rot, and repairs costing thousands of dollars – all because the wrong screw was used to hang a mailbox or decorative item.

The Best Screws for Stucco: Types and Key Features
When you’re looking for the best screws for stucco, forget everything you know about regular wood or drywall screws. Stucco demands its own special breed of fasteners, and there are two main types that actually work: masonry screws and stucco anchor systems.
Masonry screws are the workhorses of the stucco world. Made from hardened steel, these screws feature aggressive threads that are designed to bite directly into hard materials like concrete, brick, and yes, stucco. Some are self-tapping, which means they can create their own threads as you drive them in. But here’s the thing – even with self-tapping screws, you’ll almost always want to drill a pilot hole first when working with stucco. Trust me on this one; it prevents those heartbreaking cracks that make you want to start the whole project over.
Stucco anchor systems take a different approach entirely. These clever two-part systems use a plastic sleeve or nylon anchor that gets inserted into a pre-drilled hole, followed by a screw that expands the anchor from within the stucco. It’s like creating a little umbrella inside your wall that spreads the load around. For heavier items, metal anchors step up to the plate, providing even more holding power by expanding within the drilled hole to create an incredibly robust connection.
Key Features of the Best Screws for Stucco
Not all stucco screws are created equal, and the devil is definitely in the details. Here’s what separates the winners from the wannabes.
Material choice is absolutely critical, especially for outdoor applications. Stainless steel offers excellent corrosion resistance, making it the gold standard for exterior stucco work where moisture and weather are constant concerns. Carbon steel can also work well, but only when it’s properly protected with the right coatings.
Speaking of protection, corrosion resistance isn’t optional – it’s essential. Given stucco’s tendency to absorb water, superior corrosion protection is non-negotiable. Weather-resistant coatings like dacromet and zinc act as shields against moisture, preventing those ugly rust stains that can bleed down your beautiful stucco walls. Zinc plating offers solid protection, while dacromet takes things up a notch with even higher resistance to the elements.
The thread design is where stucco screws really show their specialization. Unlike the fine threads you’d find on wood screws, the best screws for stucco feature deep, aggressive threads that are designed to bore into dense material and create an excellent grip. These threads ensure the screw holds firmly without stripping out the hole – a common problem when people try to use regular screws in stucco.
Head styles matter for both function and looks. Flat heads sit flush with the surface, perfect when you want a smooth, clean finish. Hex heads provide maximum torque for driving, ideal when you need that extra oomph for a secure connection. Washer heads are particularly clever – they feature an integrated washer that distributes the load over a wider area, reducing the risk of cracking the stucco around the fastener while providing a professional-looking finish.
What are the Best Screws for Stucco Applications?
The “best” screw really depends on what you’re hanging and how much it weighs. It’s like choosing the right tool for the job – you wouldn’t use a sledgehammer to hang a picture frame.
For light-duty applications like house numbers, small decorative items, or lightweight signs, standard stucco anchor systems work beautifully. These are designed to provide adequate grip without requiring excessive length or complicated installation. I’ve seen countless homeowners successfully mount these lighter items with minimal fuss and great results.
When you move into heavy-duty applications – think shelving units, mailboxes, outdoor light fixtures, or even small trellises – you need fasteners with serious load-bearing capacity. This typically means longer screws, larger diameter anchors, or robust metal sleeve anchors. The key here is always checking the manufacturer’s weight capacity ratings for your specific screws or anchors. Overloading a fastener isn’t just asking for trouble; it’s practically guaranteeing damage to your stucco and potential safety issues.
The goal is always the same: create a secure, lasting connection that protects your stucco from damage while safely supporting whatever you’re mounting. Choosing the right type and features is your first crucial step toward success.
A Step-by-Step Guide to Installing Screws in Stucco
Installing screws into stucco doesn’t have to be intimidating. With the right approach and tools, you can securely fasten items to your stucco walls without causing damage. Think of it like performing minor surgery on your wall – precision and the right instruments make all the difference.

Before you start drilling, safety comes first. Those safety goggles aren’t optional – stucco dust has a way of finding your eyes when you least expect it. Gloves will protect your hands from sharp debris and rough surfaces. A power drill with hammer drill function will make your life much easier, turning what could be a frustrating task into a manageable one.
Here’s something many homeowners overlook: locating studs behind the stucco. While the best screws for stucco provide excellent grip within the material itself, hitting a wooden or metal stud gives you dramatically more holding power. Use a deep-scanning stud finder designed for masonry work. If you can’t locate a stud where you need it, don’t worry – a quality stucco anchor can still provide plenty of support for most applications.
Step 1: Measure Stucco Thickness and Select Screw Length
Getting the screw length right is crucial, and stucco thickness varies more than you might expect. Traditional 3-coat stucco systems are typically thinner, usually around 7/8″ to 1″ thick. For these walls, a 1 1/2″ screw often works well, especially if you’re anchoring into the stucco alone or hitting a stud just behind the wire lath.
Modern 1-coat systems with foam insulation are a different beast entirely. These can be significantly thicker, sometimes requiring screws ranging from 2″ to 3 1/4″ to reach through the foam and get proper penetration into the underlying structure. I’ve seen homeowners struggle with screws that are too short, wondering why their mailbox keeps coming loose.
The trick is measuring at an exposed edge, like around a weep screed or window frame, to gauge your wall’s total thickness. This simple step ensures your fastener will have enough length to create a secure connection. You want the screw to penetrate deep enough to engage properly with either the stucco material or the underlying substrate.
Step 2: Drill a Pilot Hole
This step separates successful installations from cracked disasters. Stucco’s brittle nature means that attempting to drive any screw directly into it without a pilot hole is asking for trouble. The material simply can’t handle that kind of sudden stress.
Start by marking your spot precisely with a pencil. Choose a masonry drill bit that’s slightly smaller than your screw diameter – this ensures a snug fit without making the hole too loose. For most stucco applications, a 3/16″ or 1/4″ masonry bit works well.
When drilling, use steady, firm pressure and let your drill do the work. Engage that hammer function if your drill has one – it makes a world of difference when working with cement-based materials. Keep the drill straight and avoid wiggling it around, which can create an uneven hole that won’t hold your fastener properly.
The pilot hole should be deep enough to accommodate your entire screw or anchor. Take your time with this step – rushing here often leads to problems later. For additional guidance on proper techniques, check out this helpful resource on hanging items on stucco walls.
Step 3: Insert the Anchor and Drive the Screw
Now comes the satisfying part – actually installing your fastener. If you’re using a stucco anchor system with a plastic sleeve, tap the anchor gently into your pre-drilled hole using a hammer. It should slide in smoothly and sit flush with the stucco surface. Don’t force it – if it’s not going in easily, your pilot hole might need to be slightly larger.
For the final step, attach the appropriate driver bit to your power drill and place the screw into the anchor. Here’s where patience pays off: drive the screw slowly with steady pressure. You’ll feel when the screw begins to tighten and seat properly.
The golden rule is knowing when to stop. Avoid overtightening at all costs – it’s one of the most common mistakes I see. Drive the screw until it feels firmly seated and your item is secure, then stop. Overtightening can strip the threads, crack the stucco around the fastener, or compromise the entire installation.

Following these steps creates a secure, long-lasting attachment that protects your stucco investment. It’s really about combining quality materials with careful technique – something that becomes second nature with a little practice.
Frequently Asked Questions about Fastening to Stucco
When it comes to attaching items to stucco, we hear the same questions over and over again from homeowners. Let me share the most common concerns and give you the straight answers you need.
Can I use nails instead of screws for hanging items on stucco?
Here’s the thing about nails and stucco – they definitely have their place, but it’s not for hanging your outdoor decorations or mailbox.
Nails play a crucial role during stucco installation itself. Masonry nails are essential for securing the wire lath to the underlying structure – think of them as the foundation that holds everything together. For three-coat systems, contractors typically use shorter nails for the lath, while thicker one-coat systems with foam backing require longer nails to reach the structural framing.
But when it comes to hanging items on your finished stucco wall, nails are simply the wrong tool for the job. Here’s why screws win every time:
Screws create their own threads as they go in, giving them a much stronger grip than nails, which just rely on friction. Think of it like the difference between a corkscrew and a nail in a cork – which one would you trust to hold?
More importantly, hammering a nail into brittle stucco is like playing Russian roulette with your wall. That impact force can easily cause chips or cracks around the nail, creating both an eyesore and a potential entry point for water. Regular nails also rust quickly when exposed to moisture, leaving those telltale orange streaks running down your beautiful stucco.
For anything you want to hang securely and safely, stick with the best screws for stucco and proper installation techniques.
Can I paint over screws after installation on stucco?
Absolutely! Painting over screws is one of the easiest ways to make them virtually disappear into your stucco wall. It’s a simple trick that makes a big difference in how clean and professional your installation looks.
The key is doing it right so the paint actually sticks and protects the screw long-term. Proper preparation makes all the difference – start by cleaning the screw head thoroughly to remove any dust or debris from installation.
For the best results, especially with carbon steel screws, apply a metal primer first. This extra step prevents rust from bleeding through your topcoat later and gives your paint something to grip onto. Once that’s dry, apply your exterior paint in thin, even coats.
You might need a couple of coats to fully blend the screw head with the surrounding texture, but the end result is worth it. When done properly, your screws will blend seamlessly with the wall while staying protected from the elements.
What are the risks of using the wrong screw in stucco?
Using regular wood or drywall screws in stucco is like trying to hammer a square peg into a round hole – it might seem to work at first, but you’re setting yourself up for problems down the road.
Cracking and chipping are usually the first signs of trouble. Stucco’s hard-but-brittle nature means it doesn’t forgive mistakes. Regular screws lack the aggressive threads needed to cleanly penetrate the material, so forcing them in often creates spider web cracks radiating from the screw or causes chunks of stucco to break away.
But the real danger is what you can’t see. Those cracks become water intrusion highways, allowing moisture to seep behind your stucco where it can cause serious hidden damage. In our inspections across Southeastern Pennsylvania, New Jersey, and Delaware, we’ve seen countless homes where a simple wrong screw choice led to mold growth, rotted framing, and compromised structural integrity.
Rust stains are another common consequence. Standard screws corrode quickly when exposed to the moisture that stucco naturally absorbs, creating unsightly orange streaks that are difficult or impossible to remove without professional cleaning.
Perhaps most frustrating is fastener failure – when the wrong screw eventually gives up, your carefully mounted item comes crashing down, potentially causing injury or damage. We’ve seen everything from fallen mailboxes to detached light fixtures, all because someone tried to save a few dollars on the wrong type of screw.
The bottom line? Compromised wall integrity from improper fastening can turn a simple mounting job into thousands of dollars in stucco repairs. Investing in the right screws and proper installation techniques isn’t just about doing the job right – it’s about protecting your home’s long-term health and your wallet.
Conclusion: Protect Your Stucco for the Long Term
Choosing the right fasteners for your stucco isn’t just about getting something to stick on the wall—it’s about protecting one of your home’s most important protective barriers. Throughout this guide, we’ve seen how the best screws for stucco are specifically engineered to work with this unique material’s hard yet brittle nature.
The key takeaways are straightforward but critical. Choose corrosion-resistant screws made from stainless steel or those with weather-resistant coatings like zinc or dacromet. These materials prevent the rust stains and structural failure that plague homeowners who try to save a few dollars on regular screws. Always drill pilot holes with masonry bits—this simple step prevents the cracking and chipping that can turn a quick hanging project into a costly repair job.
Match your screw to the load you’re hanging. A lightweight house number needs a different approach than a heavy mailbox or shelf. Check those manufacturer weight ratings and don’t push your luck. The importance of proper installation cannot be overstated—measure your stucco thickness, select appropriate screw lengths, and resist the urge to overtighten.
When you follow these practices, you’re actively preventing costly repairs down the road. We’ve seen too many homes where improper fastening led to water intrusion, hidden moisture damage, and structural issues that cost thousands to remediate. A $5 screw can prevent a $5,000 problem.
At Stucco Safe, we understand that stucco systems are complex, and even small mistakes can have big consequences. We provide professional inspections and moisture testing services across Southeastern Pennsylvania, New Jersey, and Delaware. Our forensic testing methods and certified inspectors can detect hidden issues before they become catastrophic problems. Stucco inspections vary in cost from $495 to $1595 or more for very large homes, depending on size and complexity.
If you’re concerned about existing fasteners in your stucco or want to ensure your home’s exterior is properly protected, don’t wait until problems become visible. The stucco itself is often the last component to show signs of failure, with extensive damage occurring behind the scenes first.
Learn more about securing your home’s exterior by exploring our guide on the best anchors for stucco.