
Drill and Install: Your Complete Guide to Stucco Anchors
Why Proper Anchor Installation Protects Your Stucco Home
Installing anchors in stucco requires the right approach to secure your fixtures while protecting your home’s exterior from cracks and moisture damage. Here’s what you need to do:
Quick Steps to Install Anchors in Stucco:
- Choose the right anchor – Plastic for items under 15 lbs, metal sleeve anchors for 15-50 lbs, wedge anchors for heavy loads
- Mark your spot – Use a level and apply painter’s tape to prevent chipping
- Drill slowly – Use a sharp masonry bit at slow speed, never the hammer drill setting
- Insert anchor flush – Tap gently until even with the wall surface
- Seal with caulk – Apply silicone around the screw head to prevent water intrusion
Stucco is a cement-based material applied over wire lath mesh. While it’s durable against weather, it’s brittle when drilling. The wire mesh underneath can make holes unpredictable, and the material doesn’t grip screw threads like wood or drywall. This is why anchors are essential—they distribute weight across a larger area and prevent the stucco from cracking under stress.
Many homeowners don’t realize that improper anchor installation creates tiny pathways for water to seep behind the stucco. Over time, this moisture can damage the sheathing and framing behind your walls. The good news? With the right technique, you can mount everything from house numbers to outdoor lighting without compromising your home’s integrity.
I’m Gabe Kesslick, and I’ve been detecting and repairing moisture issues in stucco systems since 2001. Through thousands of inspections across Southeastern Pennsylvania, New Jersey, and Delaware, I’ve seen how improper installations—including poorly executed anchor mounting—can compromise stucco integrity, which is why I’m passionate about teaching homeowners the correct methods for installing anchors in stucco.

Essential installing anchors in stucco terms:
Before You Drill: Choosing the Right Stucco Anchor and Tools
Before we even think about touching a drill, we need to understand the unique challenges of stucco and gather the right arsenal of tools and materials. Stucco isn’t like drywall or wood; it demands a specialized approach to ensure a secure hold without causing damage. Our goal is always to protect your home’s integrity, and that starts with careful planning.
Understanding Why Stucco Needs Special Anchors
Stucco, at its core, is a hard, cement-based material made of cement, sand, and water, applied in layers over a wire lath mesh. It’s incredibly durable against the elements, which is why it’s such a popular exterior finish for homes across Southeastern Pennsylvania, New Jersey, and Delaware. However, this durability comes with a trade-off: stucco is notoriously brittle when you try to drill into it.
Unlike wood, which is fibrous and holds screws well, or drywall, which is relatively soft and uniform, stucco is prone to cracking and chipping if not handled correctly. When you screw directly into stucco without an anchor, the stucco lacks the internal structure to grip the screw threads effectively. This often leads to a loose screw and a high risk of cracking the stucco because the weight isn’t distributed.
This is where stucco anchors become indispensable. They are engineered to spread the load across a larger surface area, creating a secure mounting point that protects the brittle stucco. Regular anchors, designed for other wall materials, often won’t cut it. Stucco anchors are specifically designed to expand within the drilled hole, gripping the stucco from the inside out, or to bridge the stucco layers to find a more solid backing.
stucco alone may not provide enough strength to hold heavy objects. The wire lath mesh embedded within the stucco can also complicate drilling, sometimes causing your drill bit to wander or enlarge the hole, which further compromises holding power. This inherent brittleness means that, no, stucco does not make a good anchor on its own. We rely on anchors to do the heavy lifting, literally!
Matching the Anchor to Your Project’s Weight
The golden rule for installing anchors in stucco is to match the anchor type to the weight of the item you’re hanging. Using an anchor too small will lead to failure and damage, while an oversized anchor is unnecessary and can also cause issues. Here’s a breakdown of common stucco anchor types and their ideal applications:
| Anchor Type | Typical Weight Limit | Best Use Cases |
|---|---|---|
| Plastic Ribbed Anchors | Under 15 lbs | House numbers, small decorative pieces, string lights, lightweight signs |
| Sleeve Anchors (Metal) | 15-50 lbs | Light fixtures, small shelves, mailboxes, medium-sized planters |
| Wedge Anchors (Metal) | 50-200+ lbs | Large mailboxes, substantial fixtures, handrails, heavy signage, trellises |
| Toggle Bolts | 25-100 lbs (hollow) | Heavy items where no stud is available behind hollow stucco (e.g., large wall art) |
Note: Always check the manufacturer’s specific weight ratings, as these are general guidelines.
For lightweight projects, under 10-15 pounds, plastic anchors are ideal. These typically expand as you drive a screw into them, providing a good grip in the stucco. We often recommend using regular pan head style sheet metal screws with plastic expansion anchors for the best results.
When you move to heavier items, such as light fixtures or small shelves, metal anchors become necessary. Sleeve anchors are a great choice here, as they expand as you tighten the bolt, creating a strong mechanical interlock. For very heavy items, like large mailboxes or substantial fixtures, wedge anchors offer the highest holding power, creating a robust connection. For a more comprehensive look at your options, explore our guide on Stucco Anchor Types.
Essential Tools and Materials Checklist
Having the right tools is half the battle when installing anchors in stucco. Don’t skimp on quality, especially when it comes to drill bits. A dull bit is an invitation for cracks!
Here’s what you’ll need for a successful installation:
Tools:
- Power drill: A standard rotary drill is often sufficient, but a hammer drill can be useful for very dense stucco or masonry behind it (used carefully, as we’ll explain).
- Sharp masonry drill bits: These are specifically designed to cut through hard materials like stucco. Ensure the bit size matches your chosen anchor exactly.
- Hammer: For gently tapping anchors flush with the surface.
- Level: To ensure your item is mounted straight.
- Measuring tape: For accurate placement.
- Pencil or marker: To mark your drilling spots.
- Caulking gun: For applying sealant.
- Stud finder: Essential for heavy-duty installations where you might need to locate framing.
- Safety goggles: Always protect your eyes from flying debris.
Materials:
- Appropriate stucco anchors: Selected based on the item’s weight and the type of stucco.
- Corrosion-resistant screws (stainless steel): Especially for outdoor use to prevent rust stains on your beautiful stucco.
- Exterior-grade silicone caulk: Crucial for preventing water intrusion.
- Painter’s tape: A simple but effective trick to prevent chipping.
Gathering these items before you start will make the process smoother and help you achieve a professional, damage-free finish.
The Step-by-Step Guide to Installing Anchors in Stucco
Now that we understand the “why” and have our tools ready, let’s dive into the “how.” This step-by-step process is designed to guide you through installing anchors in stucco with precision and patience, ensuring a strong, lasting hold without damaging your home. Haste makes waste, especially when working with brittle stucco!

Step 1: Mark and Prepare the Drilling Area
Proper preparation is what separates amateur attempts from professional results. This first step is all about precision.
- Measure and Mark: Use your measuring tape and level to determine the exact location where you want to install your item. For multiple anchors, double-check your spacing. Mark each spot clearly with your pencil or marker.
- Apply Painter’s Tape: Here’s a pro tip: place a strip of painter’s tape over each marked spot. This simple trick helps prevent the stucco from chipping and cracking around the hole’s edge as you drill, giving you a cleaner, more controlled entry point.
Step 2: How to Drill Pilot Holes Without Cracking Stucco
This is arguably the most critical step. Speed is your enemy here; let the bit do the work.
- Select the Correct Bit: Use a sharp masonry drill bit that matches the diameter of your chosen anchor exactly. A dull bit will only chip and shatter the stucco.
- Engage Regular Drill Setting: Avoid using the hammer drill setting at first. It can be too aggressive for the brittle stucco surface and cause immediate cracks. Instead, start with the regular rotary drill setting to penetrate the outer stucco layer.
- Drill Slowly and Steadily: The golden rule is to drill slowly and apply consistent, moderate pressure. Don’t push too hard. We want to cut cleanly, not force our way through. High speed creates heat and vibration, which can easily crack stucco.
- Clear Debris: Periodically pull the bit out of the hole to clear any dust and debris. This ensures efficient cutting and prevents the bit from getting bogged down, reducing the risk of overheating or binding.
- Switch to Hammer Drill (If Necessary): Once you’ve passed through the stucco and potentially hit a denser substrate (like concrete block or brick behind the stucco), you can then switch to the hammer drill setting if your drill has one. But for the stucco itself, slow and steady wins the race.
Step 3: Inserting and Securing the Anchor for a Strong Hold
Once your pilot hole is perfectly drilled, it’s time to get that anchor snug and secure.

- Insert the Anchor: Take your chosen stucco anchor and insert it into the pilot hole. It should fit snugly with slight resistance. If you have to force it, your hole may be too small, and trying to ram it in could crack the stucco. If it’s too loose, you might need a larger anchor (we’ll cover troubleshooting oversized holes later).
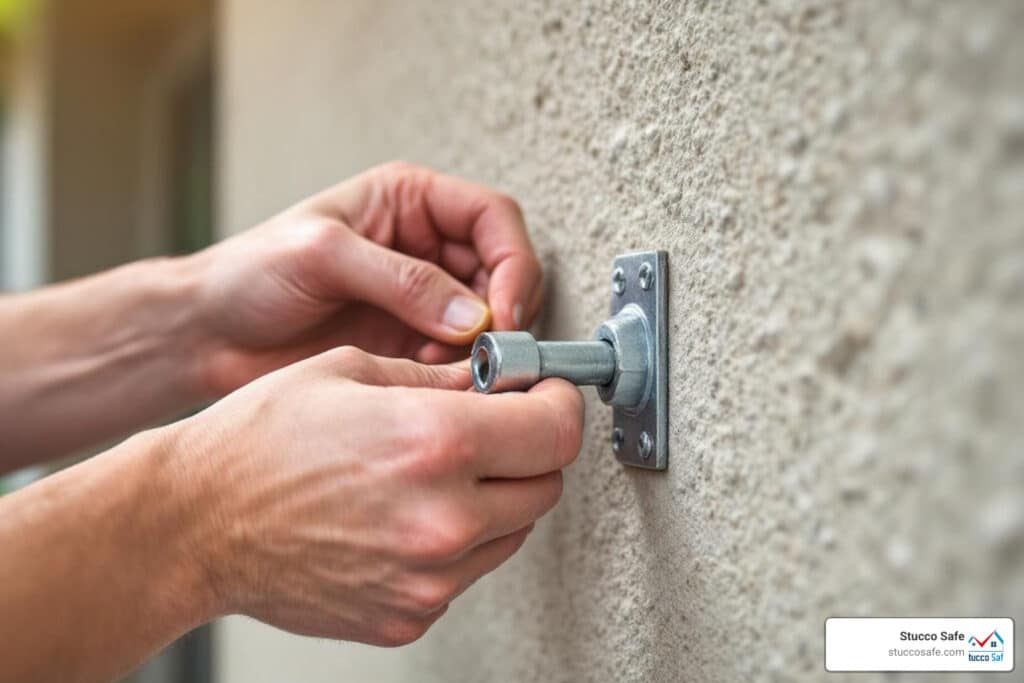
- Tap Gently Until Flush: Using your hammer, gently tap the anchor until it is flush with the stucco surface. The anchor should feel secure with no wiggling. This ensures that the anchor is fully seated and ready to provide maximum holding power.
Step 4: Driving the Screw and Preventing Water Intrusion
This final step secures your item and, crucially, protects your stucco from moisture.
- Drive the Screw: Insert your screw through the item you’re mounting and into the anchor. Using a screwdriver or a drill on a low setting, turn clockwise steadily. You’ll feel the anchor expand and grip the stucco.
- Do Not Overtighten: This is vital! Stop turning once the item is secure. Overtightening can crack the stucco or strip the anchor, compromising the hold and potentially causing damage. We’re aiming for firm, not crushing.
- Apply Silicone Caulk: This is a critical weatherproofing step that prevents moisture intrusion and gives your project a professional finish. Apply a generous bead of exterior-grade silicone caulk around the screw head and where the mounted item meets the wall. This creates a waterproof seal, preventing water from seeping into the hole you just created. Water intrusion is one of the most common problems with stucco houses, and sealing every penetration point is essential for long-term stucco health.
Pro Tips for Heavy-Duty and Drill-Free Installations
We’ve covered the basics, but here are a few more nuggets of wisdom from our years of experience that will help you achieve a truly professional, damage-free finish, whether you’re tackling something substantial or opting for a no-drill solution.
How Professionals Handle Heavy-Duty Items
When you’re dealing with something substantial like a large light fixture, a heavy mailbox, or a trellis, the game changes. This is where we focus on structural integrity and connections that will last. Professionals approach heavy items by connecting to the home’s framing, not just the stucco.
- Locate Studs for Direct Framing Connection: The best method for heavy items is to find studs using a stud finder and secure items directly to the framing with long, stainless steel screws. This provides the strongest connection possible. It’s like giving your heavy item a direct handshake with the bones of your house. For example, if you’re anchoring a ledger board on a stucco house, hitting those studs is non-negotiable.
- Toggle Bolts for Hollow Cavities: If no stud is available and there’s a hollow cavity behind the stucco (which is common in many stucco systems), toggle bolts are a great option. They require a larger pilot hole but expand behind the wall to distribute weight over a significant area, providing substantial holding power.
- Epoxy Anchors for Solid Masonry: For the most demanding jobs or when drilling into solid masonry behind the stucco, epoxy anchors are the professional standard. A high-strength resin is injected into the hole, creating a bond that is often stronger than the material itself. This method is incredibly robust and durable.
As a rule, avoid plastic anchors for any item over 15-20 pounds. For heavier loads, metal anchors or direct structural connections are required to prevent failure.
Drill-Free Alternatives for Lightweight Decorations
Sometimes, the best anchor is no anchor at all! For very lightweight items (think holiday wreaths or small signs), consider drill-free alternatives to preserve your stucco.
- Outdoor-Rated Adhesive Hooks and Strips: These are fantastic for temporary or very light decorations. They are designed to adhere strongly to exterior surfaces and can be removed without damage if applied correctly.
- Weight Limitations: Always adhere to the product’s weight rating to prevent failure. Exceeding the limit will lead to your decor (and potentially some stucco) falling off.
- Surface Preparation is Key: Success depends on proper preparation. Thoroughly clean the stucco with a stiff brush and a degreasing soap, then rinse. Wipe with rubbing alcohol to remove any residue. The surface must be clean and dry for the adhesive to bond effectively. Adhesives bond best in warm, dry conditions, so avoid applying them on cold or damp days.
- Suction Cups? Not So Much: We generally don’t recommend suction cups for stucco. The textured surface prevents a good, airtight seal, and they tend to lose their grip quickly, especially in changing weather conditions.
Troubleshooting: What to Do If the Pilot Hole is Too Big
Even with the utmost care, enlarged holes can happen. Often, this occurs from hitting the wire lath behind the stucco or simply misjudging the drill speed. Don’t panic; we have options!
- Slightly Too Big? Try the Next Size Up: If the hole is only slightly too big for your intended anchor, the next size up in anchor might provide a secure fit. Always test gently to ensure it’s snug.
- Significantly Oversized? Masonry Epoxy Filler: For holes that are noticeably too large, you can fill the hole with a masonry epoxy filler. This creates a solid, hard plug. Once it cures (check manufacturer’s instructions for drying time), you can then drill a new, correctly-sized pilot hole directly into the epoxy.
- Badly Damaged? Patch and Re-drill: If the hole is badly damaged, cracked, or simply too large to reliably fill, it may be best to patch it completely with stucco repair compound. Once the patch is dry and cured, you can then drill a new hole nearby, following all the best practices we’ve outlined.
Frequently Asked Questions about Installing Anchors in Stucco
Over our two decades of helping homeowners with stucco installations and repairs, we’ve heard the same questions come up time and again. Let us share the answers that will save you both time and potential headaches.
Can you screw directly into stucco without an anchor?
Absolutely not. We cannot stress this enough: screwing directly into stucco is a common mistake and a recipe for disaster. Stucco is brittle and lacks the holding power to grip screw threads effectively. Trying to force a screw into it will almost certainly lead to a loose screw and a high risk of cracking the stucco because the weight isn’t distributed.
Anchors are essential because they are engineered to spread the load across a larger surface area, creating a secure mounting point that protects the stucco. For a deeper dive, check out our article on anchor screws into stucco. Always use an appropriate anchor. Your stucco (and your peace of mind) will thank you.
How do you prevent water intrusion after installing anchors in stucco?
Preventing water intrusion is paramount when installing anchors in stucco. Any penetration of your stucco wall creates a potential pathway for moisture, which can lead to significant, costly damage behind the scenes.
- Use Exterior-Grade Silicone Caulk: As we mentioned in our step-by-step guide, applying a bead of exterior-grade silicone caulk is non-negotiable. This weatherproofing step seals the penetration point, specifically around the screw head and where the mounted fixture meets the stucco wall.
- Regular Inspection is Key: We recommend regular inspections of your stucco anchors every six months, especially after harsh weather events like heavy rain, snow, or high winds. Gently tug on mounted items to check for any loosening. Visually inspect the caulk seal around each anchor. If the caulk is cracked, pulling away, or shows any signs of deterioration, re-seal it immediately. This proactive maintenance prevents moisture from getting behind your stucco, a common issue we find during inspections in Southeastern Pennsylvania, New Jersey, and Delaware. For more tips on keeping your home in top shape, refer to our stucco exterior maintenance guide.
When should I call a professional for stucco work?
While many light to medium-duty anchor installations can be a successful DIY project, there are definite times when it’s advisable to call in the experts. Knowing your limits can save you from costly repairs down the line.
- Extremely Heavy Items: If you’re looking to mount something exceptionally heavy (think large awnings, substantial architectural features, or anything that could pose a safety risk if it falls), it’s always best to consult a professional. They have the expertise to assess the structural integrity of your wall, locate framing members, and use specialized anchoring techniques like epoxy anchors that might be beyond the scope of a typical DIYer.
- Signs of Existing Damage: If you notice any existing cracks, stains, bulging, or other signs of moisture damage on your stucco, do not proceed with drilling. Installing anchors in stucco that is already compromised can worsen the problem. In this scenario, you should definitely call a professional for a stucco inspection and potential repair. Our certified inspectors at Stucco Safe use forensic testing to assess stucco health and find hidden moisture problems, with inspections typically ranging from $495 to $1595 or more for very large homes.
- Uncertainty About Wall Structure: If you’re unsure what lies behind your stucco (e.g., solid masonry, wood framing, hollow cavity, or even where plumbing or electrical lines might be), a professional can provide guidance or handle the installation safely.
- Complex Installations: For any project that feels beyond your comfort level, or if you simply want the peace of mind that comes with a guaranteed professional job, don’t hesitate to reach out to stucco repair contractors. We’re here to help homeowners throughout Southeastern Pennsylvania, New Jersey, and Delaware ensure their stucco is safe and secure.
Conclusion: Protect Your Investment with a Perfect Installation
You now know how to install anchors in stucco safely and effectively. By choosing the right anchor for your project’s weight, drilling slowly and carefully with a sharp masonry bit, avoiding overtightening, and diligently sealing each penetration point with exterior-grade silicone caulk, you can protect your home’s integrity while securely mounting your fixtures.
Every anchor you install is a potential gateway for moisture if not done correctly. Our goal at Stucco Safe is to empower homeowners with the knowledge to maintain their stucco exteriors, preventing the hidden damage that can compromise your home’s structure and value.
While this guide covers most projects, always err on the side of caution. For extremely heavy items, or if you see signs of moisture damage or structural issues, don’t hesitate to call a professional. Our certified inspectors are experts in diagnosing stucco health and can help identify any underlying problems.
Protecting your stucco is protecting your investment. With these skills, you can confidently tackle your next project, knowing you’re doing it the right way.
Ready to get started? Learn more about the best anchors for your stucco project and begin with confidence.