
How to Detect Mold in Your Home: 7 Powerful Warning Signs 2025
The Hidden Danger: Spotting Mold Before It Spreads
How to detect mold in your home in 5 quick steps:
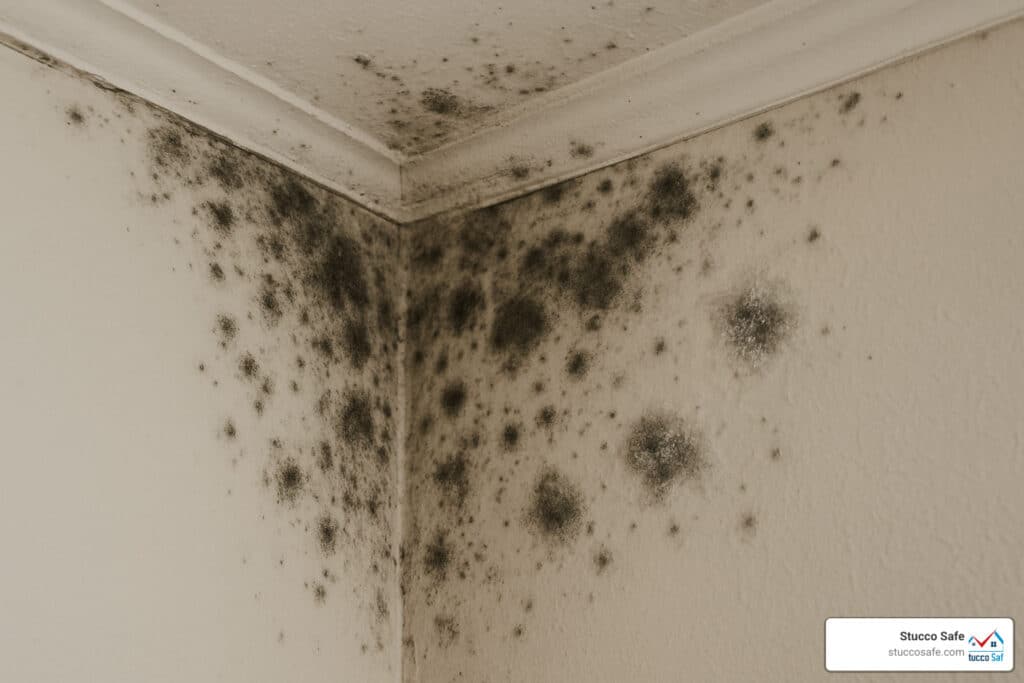
- Look for visible signs: Dark spots, discoloration, or fuzzy growth on walls, ceilings, or corners
- Follow your nose: Track musty, earthy odors to potential problem areas
- Check high-risk areas: Bathrooms, kitchens, basements, attics, and around windows
- Use a moisture meter: Readings above 15-20% indicate potential mold conditions
- Inspect for water damage: Stains, warping, bubbling paint, or soft drywall
Mold is a common indoor air pollutant that can begin growing within just 24-48 hours of moisture exposure. How to detect mold in your home requires a combination of visual inspection, moisture detection, and sometimes professional testing. While some mold is visible on surfaces, the most concerning growth often happens in hidden spaces—behind walls, under floors, inside HVAC systems, or within ceiling cavities.
Detecting mold early is crucial not only for your home’s structural integrity but also for your family’s health. Mold produces allergens, irritants, and in some cases, potentially toxic substances that can trigger respiratory issues, allergic reactions, and other health problems, especially in vulnerable individuals.
I’m Gabe Kesslick, and I’ve been detecting hidden moisture and mold issues since 2001 as a certified building envelope inspector with expertise in how to detect mold in your home through comprehensive moisture investigations. My experience with thousands of inspections has shown that early detection can save homeowners from costly repairs and potential health complications.

Understanding Mold and Why It Matters
Ever wondered what that fuzzy stuff growing in your shower corner actually is? Mold is a fascinating (though unwelcome) houseguest – a type of fungus that’s literally everywhere around us. Mother Nature created thousands of mold varieties, all sharing one simple life goal: spread and grow. These tiny organisms release microscopic spores that float through the air like nature’s glitter until they find the perfect spot to call home. When these spores land on a damp surface with something organic to munch on – like your drywall, wooden window frames, or even dust – they waste no time setting up shop.
What makes mold particularly sneaky is its efficiency. Given the right conditions (with moisture being the VIP requirement), mold can transform from invisible spores to visible colonies faster than your Amazon delivery – typically within just 24-48 hours. This is precisely why that small water leak under your sink or the flooding in your basement after heavy rain can quickly become a much bigger problem.
Health Risks Associated with Mold
Let’s talk about why we should care about these fuzzy invaders. Mold isn’t just unsightly – it can actually make you feel pretty awful, especially if you’re sensitive to it:
Your body might respond with allergic reactions like sneezing fits, a constantly runny nose, red irritated eyes, or mysterious skin rashes. For folks with asthma, mold can be a significant trigger, causing wheezing, chest tightness, and breathing difficulties. Even if you don’t have allergies, mold can still cause irritation to your eyes, skin, nose, throat, and lungs.
Some molds are overachievers in the worst way – they produce substances called mycotoxins that can cause more serious reactions, particularly in people with weakened immune systems. According to the CDC’s research, there’s solid evidence connecting indoor mold exposure to upper respiratory symptoms in otherwise healthy people. Even more concerning, some research suggests mold exposure might contribute to the development of asthma in children.

Mold vs. Mildew—Know the Difference
Mold and mildew are like cousins in the fungi family – related but definitely not identical. Knowing the difference helps you understand what you’re dealing with:
| Characteristic | Mold | Mildew |
|---|---|---|
| Appearance | Fuzzy or slimy; green, black, blue, red, or other colors | Flat, powdery; gray, white, or yellow |
| Texture | Often appears raised and can penetrate surfaces | Remains on the surface |
| Habitat | Can grow on any organic material | Typically on damp surfaces like shower walls |
| Health Impact | Can cause allergic reactions and respiratory issues | Less likely to cause health problems |
| Damage Level | Can cause structural damage if left untreated | Generally cosmetic damage |
| Cleanup Difficulty | Often requires professional remediation for extensive growth | Usually can be removed with household cleaners |
This distinction matters because while mildew is usually just an unsightly nuisance you can tackle with some elbow grease and cleaning spray, mold – especially when it’s worked its way deep into materials – might require professional help and poses greater health concerns.
Common Causes of Indoor Mold Growth
Understanding what invites mold into your home is half the battle in keeping it out. In my years inspecting homes across Southeastern Pennsylvania, New Jersey, and Delaware, I’ve seen these common culprits time and again:
Plumbing problems are mold’s best friend – even that tiny, almost imperceptible drip under your bathroom sink provides enough moisture for a mold colony to thrive. Similarly, roof leaks might start small but can lead to significant mold growth in attics and ceiling spaces before you even notice water stains.
After any flooding event, you’re in a race against time – mold can begin colonizing wet materials within 24-48 hours if they aren’t properly dried. This is particularly challenging in our region’s older homes where materials may absorb moisture more readily.
Condensation often flies under the radar – those cold water pipes running through warm spaces create perfect little mold nurseries as water droplets form and fall. And let’s talk about humidity – our region’s sometimes sticky summer air can push indoor humidity above 60%, creating mold-friendly conditions even without any visible leaks.
Many homes I inspect have ventilation issues in bathrooms, kitchens, and laundry rooms, trapping moisture that would otherwise escape. Damp basements and crawlspaces are especially common in our area’s older housing stock, where ground moisture seeps in through aging foundations.
Outside your home, water management problems like improper grading, clogged gutters, or damaged downspouts can direct water toward your foundation, creating moisture issues that eventually lead to mold.
At Stucco Safe, we’ve seen how our region’s seasonal weather shifts create unique moisture challenges. Our humid summers followed by freezing winters can stress building materials and create moisture problems that aren’t as common in other parts of the country. Knowing how to detect mold in your home starts with understanding these moisture sources – because without moisture, mold simply can’t grow.
How to Detect Mold in Your Home
Detecting mold requires a systematic approach. Let’s explore the various methods you can use to determine if mold is present in your home.
How to Detect Mold in Your Home: Visual Clues and Sensory Signs
Your senses are powerful tools for initial mold detection. Here’s what to look and smell for:
1. Follow the Musty Odor
One of the first indicators of a mold problem is often a distinctive musty, earthy smell. This odor comes from microbial volatile organic compounds (MVOCs) released during mold growth—sometimes humorously called “mold farts” by professionals. If you notice this smell, especially in areas prone to moisture, it’s a strong signal that mold may be present, even if you can’t see it.
2. Look for Visual Signs
- Discoloration: Mold can appear as black, green, yellow, brown, or even white spots or patches.
- Water Stains: Yellow or brownish marks on walls, ceilings, or floors often indicate water damage where mold can grow.
- Bubbling or Peeling Paint/Wallpaper: This suggests moisture behind the surface—a prime condition for mold growth.
- Dark Grout or Sealant: Especially in bathrooms, darkened grout lines often indicate mold growth.

3. Check for Structural Changes
- Warping or Bulging: Walls, floors, or ceilings that appear warped may have moisture issues.
- Squishy Flooring: Soft spots in flooring, especially near water sources, can indicate water damage and potential mold.
- Cracked or Deteriorating Surfaces: Damage to surfaces can allow moisture to penetrate and create conditions for mold growth.
4. Pay Attention to Health Symptoms
If you or family members experience the following symptoms that improve when away from home, mold could be the culprit:
* Persistent coughing or throat irritation
* Worsening asthma or allergies
* Nasal congestion
* Eye irritation
* Skin rashes
* Headaches
5. Observe Pet Behavior
Interestingly, pets may avoid areas with mold or show signs of respiratory distress if mold is present. Their behavior can sometimes alert you to problems before you notice them yourself.
High-Risk Areas Checklist
When conducting a mold inspection, focus on these high-risk areas where moisture tends to accumulate:
Bathrooms
– [ ] Around shower and tub enclosures, especially grout and caulking
– [ ] Under sinks and around toilet bases
– [ ] On ceiling and walls, particularly if ventilation is poor
– [ ] Behind toilets where condensation often forms
Kitchens
– [ ] Under sinks and around dishwasher connections
– [ ] Behind refrigerators (check the drip pan)
– [ ] Around windows above sinks
– [ ] Under flooring, especially near water sources
Basements
– [ ] Around foundation walls, especially below grade
– [ ] Near sump pumps or floor drains
– [ ] Around windows and where pipes enter the home
– [ ] On exposed framing or unfinished walls

HVAC Systems
– [ ] Inside ductwork, especially if there’s been water intrusion
– [ ] Around air handlers and evaporator coils
– [ ] Near condensate drain lines and pans
– [ ] At air vents where condensation may form
Attics
– [ ] Near roof penetrations (vents, chimneys)
– [ ] Along the underside of the roof sheathing
– [ ] Around bathroom exhaust fan outlets
– [ ] Where water stains appear on ceiling joists
Crawlspaces
– [ ] On exposed soil (should be covered with vapor barrier)
– [ ] On floor joists and subflooring
– [ ] Around foundation walls
– [ ] Near plumbing penetrations
Additional Areas
– [ ] Around windows, especially those that frequently condensate
– [ ] Behind furniture placed against exterior walls
– [ ] Inside closets, especially on exterior walls
– [ ] Under carpeting in areas with potential moisture issues
At Stucco Safe, we’ve found that homes in our service area (Southeastern Pennsylvania, New Jersey, and Delaware) often have specific risk factors related to our climate and building practices. For example, stucco homes in this region frequently develop moisture issues that can lead to hidden mold growth behind exterior walls.
Tools and Technology for Accurate Mold Detection
While visual inspection is a good starting point, various tools can help you detect mold more accurately, especially when it’s hidden from view.
Moisture Meters & Thermal Cameras
Moisture Meters
These devices measure moisture content in building materials and are essential for detecting conditions that could support mold growth. There are two main types:
- Pin-type moisture meters: These have two metal pins that penetrate the surface being tested. They measure electrical resistance, which changes with moisture content. They’re ideal for:
- Wood and drywall testing
- Determining exact moisture percentage
-
Checking specific spots with precision
-
Pinless moisture meters: These use radio frequency signals to detect moisture without damaging surfaces. They’re best for:
- Initial scanning of large areas
- Testing finished surfaces you don’t want to damage
- Detecting moisture patterns over wide areas
When using a moisture meter, readings above 15-20% in wood or liftd readings in other materials generally indicate conditions that can support mold growth.
Thermal Cameras (Infrared Imaging)
Thermal cameras detect temperature differences that can indicate moisture problems. They’re particularly useful for:
- Identifying temperature anomalies that suggest moisture
- Scanning large areas quickly
- Finding hidden leaks in walls, ceilings, or floors
- Documenting moisture patterns for remediation planning
At Stucco Safe, our certified inspectors use professional-grade thermal imaging and moisture meters to create detailed moisture maps of homes. This allows us to pinpoint potential mold-prone areas, even when they’re hidden behind walls or under floors.
Hygrometers
These devices measure relative humidity in the air. Since mold thrives when relative humidity exceeds 60%, a hygrometer can help you identify areas with liftd moisture levels in the air. Many digital hygrometers also track temperature, which is useful since condensation forms more easily in areas with temperature differentials.
Borescopes
A borescope is a small camera on a flexible tube that can be inserted into small openings to view areas that would otherwise require destructive testing. They’re excellent for:
- Looking inside wall cavities through small holes
- Inspecting inside ductwork
- Checking behind appliances or fixed cabinets
- Examining drain lines
IoT Sensors and Smart Monitoring
Modern technology now offers continuous monitoring solutions:
- WiFi-connected moisture and humidity sensors
- Smart home systems that alert you to potential moisture issues
- Air quality monitors that can detect mold spores and VOCs
These technologies allow for early detection of conditions that could lead to mold growth, potentially saving thousands in remediation costs.
How to Detect Mold in Your Home with DIY Test Kits
If you suspect mold but can’t visibly confirm it, DIY mold testing kits can provide additional information. Here are the most common types:
Air Sampling Cassettes
These professional-grade kits draw air through a collection device that captures mold spores:
- Most reliable DIY option (uses same technology as professionals)
- Typically includes a small pump that draws a specific volume of air
- Samples are sent to a lab for analysis
- Results include spore counts and sometimes mold species identification
- Cost range: $50-$150, plus lab fees
Tape-Lift Surface Tests
These tests collect samples directly from surfaces:
- Adhesive tape or slide is pressed against a suspect surface
- Collected sample is sent to a lab for analysis
- Good for identifying visible mold
- Cost range: $10-$40, plus lab fees
Petri Dish Kits
These kits use growth media to culture mold:
- Dishes are exposed to air or touched to surfaces
- Mold grows on the media over several days
- Results are less precise than lab analysis
- May show presence of mold but not specific types or quantities
- Cost range: $10-$30
Important Limitations of DIY Testing
While DIY kits can be helpful, they have limitations:
- They may not detect mold hidden in walls or HVAC systems
- Results can be difficult to interpret without professional guidance
- False negatives are possible if sampling is done incorrectly
- They don’t identify the moisture source causing the mold
The EPA notes that testing for mold is generally unnecessary if visible mold is present—in those cases, it’s more important to focus on fixing the moisture problem and cleaning up the mold.
When to Call a Professional Inspector
While DIY detection methods can be useful, certain situations warrant professional help:
The 10 Square Foot Rule
The EPA suggests that if the moldy area is less than about 10 square feet (roughly a 3 ft. by 3 ft. patch), in most cases, you can handle the cleanup yourself. However, larger areas should be assessed by professionals.
Other Situations Requiring Professional Inspection:
-
Persistent Health Issues: If family members are experiencing unexplained respiratory problems, allergic reactions, or other symptoms that might be mold-related.
-
Hidden Mold Suspected: If you smell mold but can’t find the source, or if moisture readings indicate problems in inaccessible areas.
-
After Major Water Events: Following flooding, major leaks, or sewage backups, professional assessment helps ensure thorough remediation.
-
Real Estate Transactions: When buying or selling a home, especially if there are signs of water damage or moisture issues.
-
Insurance Claims: If you’re filing an insurance claim for mold or water damage, professional documentation is often required.
-
Recurring Mold Problems: If mold returns after cleanup attempts, you likely need professional help to identify and address the root cause.
At Stucco Safe, our certified inspectors bring specialized equipment and expertise to detect hidden moisture and mold throughout homes in Southeastern Pennsylvania, New Jersey, and Delaware. Our stucco inspections range from $495 to $1595, depending on the size of the home and the extent of testing required.
Professional inspectors use advanced techniques not available to homeowners:
- Comprehensive thermal imaging scans
- Professional-grade moisture mapping
- Controlled air sampling for laboratory analysis
- Forensic testing methods to determine moisture sources
- Detailed documentation for insurance or remediation planning
Preventing Mold From Coming Back
After you’ve tackled existing mold problems, the last thing you want is a return visit from these unwelcome fungi. Trust me, I’ve seen too many homeowners deal with recurring mold issues simply because they addressed the symptom but not the cause. Let’s talk about how to keep your home mold-free for good.
Control Indoor Humidity
If there’s one thing I’ve learned in my years of inspections, it’s that controlling humidity is your best defense against mold. Think of humidity as mold’s favorite invitation to dinner.
Keep your indoor relative humidity between 30% and 50% – this sweet spot makes your home comfortable while making it decidedly uncomfortable for mold spores. In our Mid-Atlantic climate, this often requires some help, especially during those muggy summer months.
Dehumidifiers are your best friends, particularly in naturally damp areas like basements. I often tell homeowners to think of dehumidifiers as “mold prevention in a box.” They’re especially important if you’ve had mold issues before.
Don’t forget about those everyday moisture generators in your home! Bathroom exhaust fans aren’t just for odors – they’re critical for removing shower steam. Similarly, kitchen range hoods and laundry room vents should always duct completely outside, not into attics or crawlspaces where they’ll just create new mold habitats.

Address Water Intrusion Promptly
Water and mold have a speed-dating relationship – they get together fast! When water shows up unexpectedly in your home, the clock starts ticking.
Fix leaks immediately, even those seemingly harmless drips under the sink. In the mold world, there’s no such thing as a minor leak. I’ve seen a slow faucet drip turn into thousands of dollars in mold remediation costs.
The 24-48 hour rule is critical: if materials get wet, they need to be thoroughly dried within this window to prevent mold growth. This might mean pulling out fans, dehumidifiers, or even calling water restoration professionals for bigger issues.
After you’ve had repairs done, don’t just assume the problem is solved forever. Monitor previously repaired areas regularly, especially after heavy rains. Sometimes what seems fixed can resurface when conditions are right.
Improve Air Circulation
Stagnant air creates perfect pockets for mold growth. I like to tell homeowners that “mold hates a moving target” – good airflow disrupts the stable, damp conditions mold needs to thrive.
Simple solutions like ceiling fans make a surprising difference. Even leaving interior doors open can improve circulation throughout your home. If you have rooms that feel stuffy or damp, that’s a red flag that air isn’t moving properly.
One common mistake I see is furniture pushed right against exterior walls, especially in older homes. Leave a small gap between furniture and exterior walls to allow air to circulate and prevent condensation from being trapped.
Moisture Control Best Practices
Beyond the basics, these practices will significantly reduce your mold risk:
When it comes to ventilation, make sure everything that generates moisture vents completely outside. I’ve found bathroom fans venting directly into attics – a recipe for mold disaster! Similarly, clothes dryers, stoves, and heating appliances need proper external venting.
Your home’s exterior water management is just as important as what happens inside. Well-maintained gutters and downspouts direct water away from your foundation rather than creating a mold-friendly moat around your home. In our Southeastern Pennsylvania region, where we get significant rainfall, proper grading around your foundation is essential – the ground should slope away from your home, not toward it.
Material choices matter too. When renovating moisture-prone areas, invest in mold-resistant products like specialized drywall or paints with mold inhibitors. These cost a bit more upfront but can save thousands down the road. And please, avoid carpet in bathrooms and basements – it’s basically a welcome mat for mold.
Your HVAC system can either be part of the solution or part of the problem. HEPA filters capture mold spores before they circulate throughout your home. Regular professional maintenance ensures your system isn’t harboring mold or distributing spores. Some of our clients have even installed UV light systems in their HVAC units, which can help reduce mold spores in circulation.
Routine Maintenance & Monitoring
Mold prevention isn’t a one-and-done task – it requires ongoing vigilance. The good news is that with a systematic approach, this doesn’t have to be overwhelming.
Each season brings different mold risks. Spring inspections should focus on checking for winter damage and ensuring drainage systems work properly as snow melts. Summer is prime time to monitor air conditioning systems for condensation issues. Fall is perfect for cleaning gutters before winter and checking attic ventilation. During winter, keep an eye on indoor humidity levels and watch for condensation on windows – a warning sign of excessive moisture.
Technology has made monitoring much easier. WiFi-connected humidity sensors can alert you to conditions favorable for mold growth before it starts. Smart water detectors provide immediate notification of leaks, often before visible damage occurs. Programmable dehumidifiers maintain optimal humidity levels automatically, and smart HVAC systems help balance humidity throughout your home.

At Stucco Safe, we often recommend ongoing moisture monitoring for homes that have experienced previous issues. This proactive approach has saved our clients thousands in potential remediation costs by catching small problems before they become mold disasters. When it comes to how to detect mold in your home, prevention is always easier and less expensive than remediation.
Frequently Asked Questions About Mold Detection
Do I need air testing if I can already see mold?
If you can already see mold growing in your home, you probably don’t need to spend money on testing. The EPA and most health experts agree that visible mold is all the evidence you need to take action. Rather than waiting for test results, you’re better off directing your energy toward:
Fixing whatever moisture source allowed the mold to grow in the first place. Mold needs water to thrive, so eliminating the moisture is your first priority.
Cleaning up the existing mold safely and thoroughly. The visible mold you see is just the tip of the iceberg if the moisture problem has been ongoing.
Taking steps to prevent future moisture problems through proper ventilation, humidity control, and maintenance.
That said, testing does become valuable in certain situations. If you’re experiencing health symptoms but can’t find visible mold, or if you need documentation for insurance claims or legal purposes, professional testing makes sense. Testing can also help verify that remediation efforts were successful, especially if family members have health sensitivities.
How soon can mold start growing after a leak?
Mold can begin growing with surprising speed—often within just 24-48 hours after materials become wet. This rapid timeline is why water damage restoration professionals emphasize immediate action after any water intrusion.
The mold timeline typically follows this pattern:
Within the first day or two, invisible mold spores that are always present in your home begin to germinate when they find moisture.
Between days 3-12, you might start noticing visible mold colonies forming on surfaces, especially porous materials like drywall, wood, and carpet.
After two weeks or more, extensive colonization can occur, potentially causing structural damage and releasing significant amounts of spores and mycotoxins into your indoor air.
I’ve seen countless situations where homeowners thought a small leak was no big deal, only to find extensive mold growth just days later. This is why professional water damage restoration emphasizes the critical 24-48 hour window for drying wet materials.
Is bleach a good idea for cleaning mold?
Despite what many people believe, bleach is usually not the best choice for cleaning mold. While it can kill surface mold on non-porous materials like tile or glass, bleach has several significant limitations:
It doesn’t penetrate porous surfaces like wood or drywall, leaving the root system (hyphae) intact and ready to regrow. Think of it like cutting the top off a weed but leaving the roots.
Ironically, the high water content in liquid bleach can actually provide moisture that feeds any remaining mold after the chlorine evaporates.
Bleach loses its effectiveness relatively quickly when exposed to air or sunlight, and may not kill all types of mold.
It’s harsh on many surfaces, can damage finishes, and creates fumes that can irritate your respiratory system—not ideal when you’re already dealing with potential mold exposure.
Instead, consider gentler but effective alternatives like detergent and water for hard surfaces, commercial mold cleaners designed for specific materials, white vinegar (which kills about 82% of mold species), or hydrogen peroxide. For extensive mold problems covering more than 10 square feet, professional remediation following EPA guidelines is your safest bet.
Can I have mold in my house and not see it?
Absolutely—hidden mold is incredibly common and often more concerning than visible mold. Mold doesn’t need light to grow, just moisture and organic material, which means it thrives in dark, concealed spaces like:
Inside wall cavities, especially after plumbing leaks or exterior water intrusion
Above ceiling tiles where roof leaks or condensation might occur
Under flooring, particularly in bathrooms, kitchens, or areas with past water damage
Inside HVAC systems, including ductwork and drain pans
Behind furniture positioned against exterior walls
Under carpet padding where spills or pet accidents happened
You might suspect hidden mold if you notice musty odors that you can’t trace to a visible source, unexplained allergic symptoms that improve when you’re away from home, water stains on walls or ceilings, or warping and discoloration of building materials.
At Stucco Safe, our inspectors often use moisture meters to detect liftd moisture levels in walls and other areas where mold might be growing out of sight. Sometimes, this leads to controlled demolition (removing small sections of drywall or other materials) to access and assess suspected problem areas. This forensic approach helps us find hidden issues before they become major problems requiring expensive remediation.
Conclusion
Let’s face it—mold isn’t just unsightly; it’s a silent invader that can compromise both your home’s structure and your family’s health. Throughout this guide, we’ve explored the many facets of how to detect mold in your home, from visual inspections to professional testing methods.
The journey to a mold-free home isn’t complicated, but it does require awareness and consistency. Think of moisture as mold’s lifeline—cut off the water, and you starve the mold. This simple principle underpins everything we’ve discussed.
Control moisture in your home by maintaining indoor humidity between 30-50%. Those dehumidifiers aren’t just collecting dust in the corner—they’re your first line of defense against fungal invaders. Regular inspections of bathrooms, kitchens, basements, and other high-risk areas can catch small problems before they become renovation-sized headaches.
Remember the 24-48 hour rule: act quickly after any water event. I’ve seen countless homeowners delay addressing “minor” leaks, only to face thousands in remediation costs weeks later. Water and time are a costly combination when it comes to mold growth.
Improving ventilation in moisture-prone areas isn’t just about preventing fogged mirrors—it’s about creating an environment where mold simply can’t thrive. And please, don’t ignore those unexplained sniffles or persistent coughs. Sometimes your body’s symptoms are the first warning system for hidden mold.
At Stucco Safe, we’ve walked alongside thousands of homeowners throughout Southeastern Pennsylvania, New Jersey, and Delaware as they’ve steerd moisture and mold concerns. Our certified inspectors don’t just find the mold—we’re like moisture detectives, using forensic methods to track down the root causes so problems don’t keep returning like unwanted houseguests.
Whether you’re a cautious home buyer, experiencing those mysterious health issues that improve when you’re away from home, or simply want to ensure your castle is truly your sanctuary, professional inspection provides both peace of mind and documented evidence of your home’s condition. Our comprehensive inspections, ranging from $495 to $1595 depending on home size, often reveal issues that might otherwise lurk behind walls or under floors until major damage occurs.
Early detection truly is your best ally against costly mold damage. By implementing the strategies we’ve discussed and staying vigilant about moisture control, you’re not just protecting your investment—you’re safeguarding your family’s health and comfort for years to come.
For more information about our professional moisture and mold detection services, or to schedule an inspection, please reach out to our team. We proudly serve communities throughout the region, including Philadelphia, West Chester, Cherry Hill, Trenton, and Wilmington areas, bringing our expertise and caring approach to each home we inspect.