
How to Install Screws into Stucco: 5 Safe Steps
Why How to Install Screws into Stucco Matters for Your Home
How to install screws into stucco requires the right technique to avoid cracking, moisture damage, and failed installations. Here’s the process:
- Gather tools: masonry drill bits, a power drill, corrosion-resistant screws, stucco anchors, waterproof silicone caulk, and painter’s tape.
- Prepare the surface: mark your location, apply painter’s tape to prevent chipping, and check for studs or hidden pipes.
- Drill a pilot hole: use a masonry bit slightly smaller than your anchor, drill slowly without the hammer setting, and clean out debris.
- Insert the anchor: apply silicone caulk in the hole, then tap the anchor flush with the stucco surface.
- Drive the screw: avoid overtightening, and seal around the screw head with additional caulk.
Stucco is a hard, brittle, cement-based material. Standard screws won’t hold, and improper drilling can crack the surface, creating entry points for water. Moisture intrusion is the biggest threat to stucco homes—unsealed holes can lead to rot, mold, and structural damage that costs tens of thousands to repair.
While many homeowners fear drilling into stucco, this guide provides a safe, manageable DIY process. With the proper technique, you can securely mount everything from house numbers to outdoor lighting without compromising your wall’s integrity.
I’m Gabe Kesslick, an EDI Level 2 Certified Stucco Inspector with experience since 2001. I’ve seen countless cases where improper fastener installation led to costly water intrusion. This guide walks you through every step, from selecting the right anchors to sealing holes against moisture, ensuring you can protect your home’s structural integrity.

Gearing Up: The Right Tools and Fasteners for Stucco
Before drilling, gathering the right equipment is essential for protecting your home and ensuring a lasting installation. Stucco’s cement-like hardness demands specialized tools and fasteners.

Choosing Your Fasteners: Screws and Anchors Explained
Standard wood screws won’t work in stucco; you need fasteners designed for masonry. Always choose corrosion-resistant screws and anchors (stainless steel or coated) for outdoor projects to prevent rust stains.
- Plastic ribbed anchors are for light-duty items (up to 20 lbs) like house numbers. They expand inside the hole for a friction grip.
- Metal sleeve anchors are for medium-duty items (20-50+ lbs) like mailboxes or light fixtures. The sleeve expands for a very strong hold.
- Masonry screws (e.g., Tapcon) are hardened screws for light to medium loads (20-50 lbs). Their self-tapping threads cut directly into the stucco.
- Toggle bolts are for heavy items (50+ lbs) in hollow walls. Wings deploy behind the stucco to distribute the load over a larger area.
For more details, see our guides on Best Anchors for Stucco and Stucco Screw Anchors.
| Anchor Type | Ideal Use Case | Weight Capacity (Approx.) | Key Feature |
|---|---|---|---|
| Plastic Ribbed Anchors | Light-duty items | Up to 20 lbs | Expands for friction grip |
| Metal Sleeve Anchors | Medium to heavy-duty items | 20-50+ lbs | Sleeve expands for strong hold |
| Masonry Screws (Tapcon) | Light to medium items | 20-50 lbs | Self-tapping, direct grip |
| Toggle Bolts | Very heavy items (hollow) | 50+ lbs | Spreads load across larger area |
| Wedge Anchors | Very heavy structural items | 50+ lbs | Extremely strong, for solid substrates |
Essential Tools for the Job
Having the right tools makes the job manageable and safe.
- Power Drill: A standard drill is fine for small holes, but a hammer drill is better for larger holes, making drilling faster and extending bit life.
- Masonry Drill Bits: You must use carbide or diamond-tipped bits. Regular bits will dull instantly. Learn more at What Drill Bits Can I Use for Stucco? and Best Drill Bit for Stucco.
- Safety & Precision Tools: Safety glasses are a must. A level and measuring tape ensure a professional look. Painter’s tape prevents chipping around the hole.
- Sealing & Finishing: A caulk gun with waterproof silicone caulk is non-negotiable for sealing every hole against moisture. You’ll also need a hammer to tap in anchors and a screwdriver to drive screws.
How to Install Screws into Stucco: A Step-by-Step Guide
Now let’s walk through how to install screws into stucco safely and securely. Following these steps will ensure a professional result and protect your home from damage.

Step 1: Preparation and Locating Support
Proper prep work is the key to success. First, use a measuring tape and level to precisely mark your location. Apply an ‘X’ of painter’s tape over the mark to help prevent the stucco from chipping during drilling.
Before drilling, it’s critical to check for hidden pipes and wires. A stud finder may help, but if you are unsure, consult a professional to avoid a dangerous mistake. For heavier items, try to locate a wood stud behind the stucco using a stud finder or by tapping the wall and listening for a solid sound. Anchoring into a stud provides the strongest possible hold.
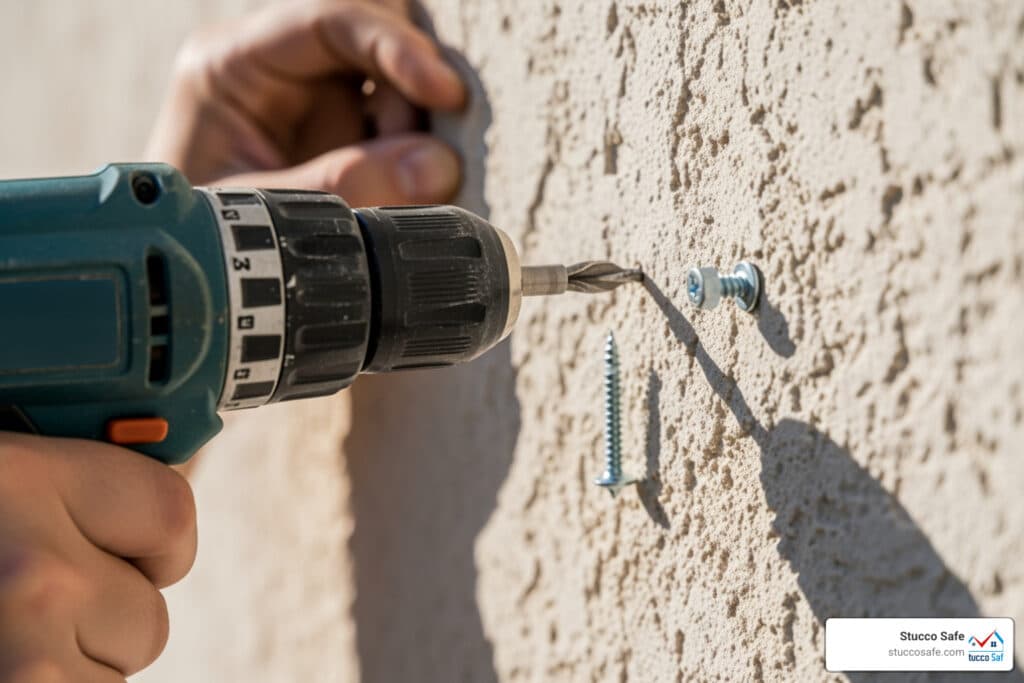
Step 2: The Proper Technique for Drilling Pilot Holes in Stucco
This step is crucial for preventing cracks. Select a carbide or diamond-tipped masonry drill bit with a diameter slightly smaller than your anchor to ensure a snug fit. For more on bit selection, see What Drill Bits Can I Use for Stucco? and Best Drill Bit for Stucco.
Hold your drill perpendicular to the wall and start drilling slowly and steadily. Let the bit do the work; forcing it increases the risk of cracking. Avoid using the hammer setting on your drill for the initial pilot hole, as the aggressive action can cause damage. Once you’ve drilled to the required depth (slightly deeper than your anchor), reverse the drill to back the bit out.
Finally, clean the hole of all dust and debris. A can of compressed air or a simple turkey baster works well. For more tips, see our guide on the Best Way to Drill into Stucco. You can also find helpful information in this comprehensive guide to hanging items on stucco walls.
Step 3: Installing the Anchor and Sealing for Protection
This final step secures your item and protects your home from water damage, which can lead to rot, mold, and costly structural repairs.
First, inject waterproof silicone caulk into the drilled hole. This is a non-negotiable step that creates a barrier against moisture. Next, gently push your anchor into the caulk-filled hole, tapping it with a hammer until it is flush with the wall. For more details, see How to Install Anchors in Stucco.

Drive your screw into the anchor slowly and steadily. Avoid overtightening, which can crack the stucco or strip the anchor. Stop as soon as the item is secure. As a final precaution, apply another bead of caulk around the screw head and any gaps between the mounted item and the wall to create a final, watertight seal.
Advanced Considerations: Heavy Loads, Alternatives, and When to Call a Pro
Now that you’ve mastered the basics of how to install screws into stucco, let’s cover advanced situations like hanging heavy objects and knowing when a DIY approach isn’t the best choice.
Mounting Heavy vs. Light Items
The item’s weight determines the fastener you need. Always check the manufacturer’s weight ratings on the anchor packaging.
- Lightweight items (up to 20 lbs): For house numbers or small decor, plastic ribbed anchors are sufficient.
- Medium items (20-50 lbs): For mailboxes or light fixtures, use more robust metal sleeve anchors or masonry screws (like Tapcon).
- Heavy items (over 50 lbs): For railings, large planters, or awnings, you must take extra precautions. The best method is to anchor directly into a wood stud behind the stucco. If a stud isn’t available, use heavy-duty toggle bolts or wedge anchors (for solid block). These require larger holes and careful installation.
Our Stucco Anchors Complete Guide covers these options in greater detail.
Are There Alternatives to Drilling Screws into Stucco?
Yes, for very lightweight or temporary items, you can use alternatives, but they have limitations.
Outdoor adhesive hooks can work for seasonal decorations, but success depends entirely on meticulous surface preparation. The stucco must be scrubbed clean, rinsed, and completely dry before application. Even then, consider them a temporary solution not suitable for anything valuable or heavy. For more non-drilling ideas, see these tips for hanging items on stucco walls.
When to Call a Professional
As a stucco inspector since 2001, I know there are times when a DIY job is too risky. It’s wise to hire a professional in these situations:
- Heavy or structural items: Awnings, railings, or anything subject to significant weight or wind load requires a professional who understands structural anchoring.
- Old or brittle stucco: If your stucco seems fragile or has existing cracks, an expert can assess the risk and use appropriate methods to prevent further damage.
- Visible signs of distress: If you see moisture stains, soft spots, bulging, or extensive cracking, stop immediately. These are warning signs of underlying water damage or structural problems. Drilling into a compromised wall can be catastrophic.
- Uncertain wall composition: If you don’t know if you have traditional stucco, synthetic stucco (EIFS), or what substrate is behind it (plywood, OSB, block), a professional assessment is invaluable.
At Stucco Safe, we’ve seen hidden moisture damage lead to repairs costing over $50,000. Our professional stucco inspection services in Southeastern Pennsylvania, New Jersey, and Delaware use forensic testing to find these issues early. An inspection, costing between $495 and $1595, is a small price for peace of mind.
Frequently Asked Questions About Installing Screws in Stucco
Let’s address some common questions about how to install screws into stucco.
Can you drill screws directly into stucco without an anchor?
No, not for a reliable hold. Stucco is brittle and will crumble around a standard screw’s threads, offering no grip. The screw will be loose and unable to support weight.
The two exceptions are:
- Masonry screws (e.g., Tapcon): These are designed to cut their own threads into masonry. They can work for light to medium loads, but for maximum reliability, we still recommend using a traditional anchor.
- Anchoring to a stud: If you drill through the stucco and drive a long screw into a solid wood stud behind it, the wood provides the holding power, not the stucco. You must still drill carefully and seal the hole with caulk.
For most situations, a proper masonry anchor is essential. Learn more in our article on Anchor Screw into Stucco.
How much weight can a screw in stucco hold?
The screw itself holds almost no weight. The holding capacity depends entirely on the anchor type, installation quality, and the stucco’s condition.
- Light-duty plastic anchors: Up to 20 pounds.
- Medium-duty metal sleeve anchors or masonry screws: 20 to 50 pounds.
- Heavy-duty toggle bolts or anchoring into a stud: 50+ pounds.
Always check the weight rating on your anchor’s packaging and consider it a maximum. If in doubt, choose a stronger anchor than you think you need.
How do you prevent stucco from cracking when drilling?
Preventing cracks is achievable with the right technique:
- Use painter’s tape: Apply an ‘X’ of tape over the drill spot to prevent chipping.
- Use a sharp masonry bit: A carbide or diamond-tipped bit is essential. A dull bit requires force, which causes cracks.
- Drill slowly and steadily: Start at a low speed and let the bit do the work. Don’t force it.
- Avoid the hammer drill setting initially: Use the standard drill mode for the pilot hole to prevent aggressive impacts from cracking the surface.
- Don’t overtighten the screw: Stop tightening as soon as the item is secure to avoid creating stress points.
Following these steps, as detailed in our guide on How to Drill into Stucco, will ensure a clean, crack-free installation.
Conclusion: Anchor with Confidence and Protect Your Home
You now know how to install screws into stucco the right way—a method that secures your belongings while protecting your home. This is about more than just hanging an item; it’s about preventing costly damage.
We’ve covered the essential steps: gathering the right tools, preparing the surface, drilling a careful pilot hole, and installing the anchor. Most importantly, we’ve stressed the need to seal every penetration with waterproof silicone caulk. As a certified stucco inspector, I can confirm that unsealed holes are a primary cause of moisture intrusion. Water that gets behind stucco leads to rot, mold, and structural decay, with repair bills that can exceed $50,000.
By caulking the hole before inserting the anchor and sealing around the screw head afterward, you create a vital barrier against these long-term threats. It’s a simple step that provides crucial protection.
While you are now equipped to handle lightweight projects, remember to call a professional for heavy structural items or if your stucco shows any signs of distress like cracks, stains, or soft spots.
At Stucco Safe, we specialize in detecting hidden moisture and structural issues before they become disasters. Our professional stucco inspection and testing services are available throughout Southeastern Pennsylvania, New Jersey, and Delaware. An inspection, typically costing $495 to $1595, is a small investment compared to the potential cost of major repairs.
Your home’s wall integrity is paramount. With the proper technique, you can mount what you need while keeping your home protected. For more information, explore our guides on stucco screw anchors.
