
how to repair stucco: 7 Proven Steps for Stunning Results 2025
Stucco Repair: The Essential Guide
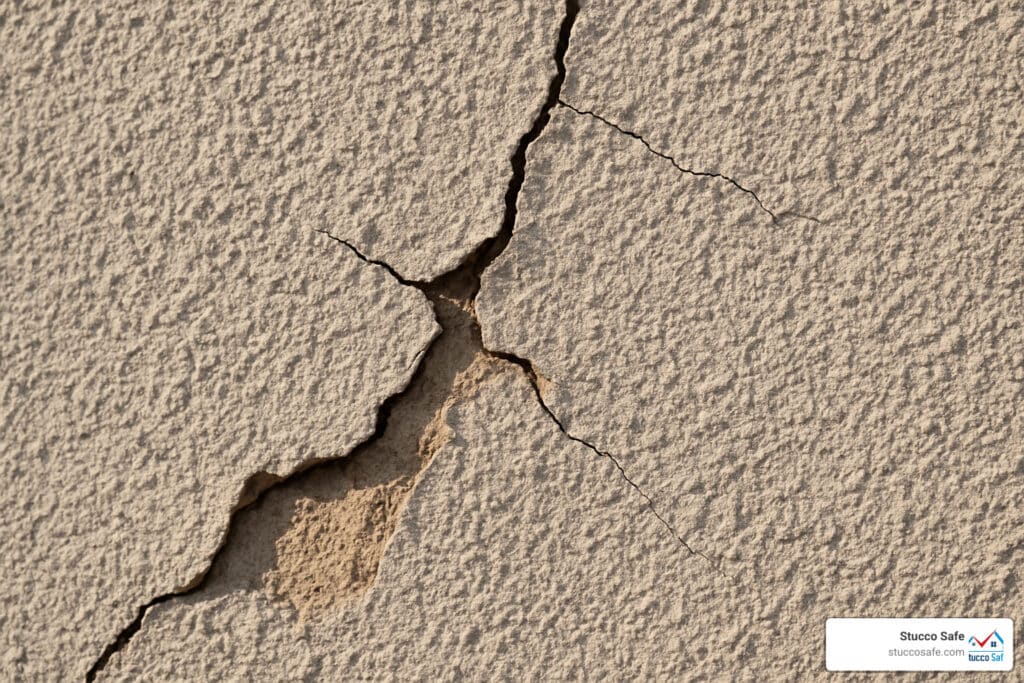
That first hairline crack in your stucco might seem harmless, but it’s actually sending you an important message. Your home’s protective shield needs some attention. Learning how to repair stucco isn’t just about patching holes—it’s about preserving your home’s integrity and curb appeal for decades to come.
I’m Gabe Kesslick, a certified stucco inspector with over 20 years in the field, and I’ve seen how small problems can quickly become big headaches when ignored. The good news? With the right approach, most stucco repairs are completely manageable, whether you’re a DIY enthusiast or planning to hire a pro.
Think of stucco as the cast iron skillet of home exteriors—remarkably durable but requiring proper care when issues arise. When maintained correctly, stucco can protect and beautify your home for a century or more. But even small cracks can invite unwelcome moisture that leads to serious damage beneath the surface.
The secret to successful stucco repair lies in matching your approach to your specific damage scenario. For quick hairline cracks, you’ll want acrylic-based materials that maintain flexibility. For larger damaged areas, the traditional three-coat system delivers the lasting results your home deserves.
Before grabbing your trowel, you’ll need to assess the damage carefully. Is it just a surface crack, or is something more serious happening? Next, gather your materials—stucco mix (pre-mixed or traditional), trowels, wire brush, bonding agent, and possibly metal lath for larger repairs. Preparing the area properly by removing loose material and cleaning thoroughly sets the foundation for success.
The application process follows time-tested methods: apply in layers using the three-coat approach for substantial repairs, match texture and color while the final coat is still workable, and allow proper curing by misting regularly and waiting at least 7 days before painting. Each step builds on the previous one to create a repair that seamlessly blends with your existing finish.
Over the years, I’ve developed comprehensive repair methods that combine traditional techniques with modern materials to prevent future moisture problems. This balanced approach ensures your repairs will stand the test of time—potentially lasting decades with proper maintenance.

In the following sections, we’ll dive deeper into each aspect of stucco repair, from understanding what makes this material so special to mastering the techniques that ensure your repairs look like they were never needed in the first place. Whether you’re facing hairline cracks or larger damaged sections, you’ll soon have the knowledge to tackle your stucco repairs with confidence.
Stucco 101: What It Is & Why It Lasts a Century
Ever wondered why those charming Mediterranean villas still look gorgeous after decades? The secret lies in their stucco exterior. This isn’t just any coating—it’s a remarkable building material with roots stretching back to ancient civilizations.
Today’s stucco is primarily a Portland cement-based plaster that blends aggregate with a lime and sand binder, plus water. When applied correctly and given proper care, stucco can last 100 years or more. Pretty impressive for something that starts out as a wet mixture!
“Stucco is about as carefree and long-lived a cladding as anyone could wish,” as industry experts often say. And they’re right—this stuff is built to endure.
Don’t confuse traditional stucco with its synthetic cousin, EIFS (Exterior Insulation and Finish Systems). Traditional stucco has earned its reputation through a time-tested three-coat application process:
- Scratch coat: The foundation layer that grips the metal lath beneath, creating that crucial mechanical bond
- Brown coat: The middle layer that evens everything out and builds proper thickness
- Finish coat: The beautiful outer layer that gives stucco its distinctive texture and appearance
This three-layer system isn’t just tradition—it’s engineering genius. Each coat plays a vital role in creating a surface that’s both tough and breathable. The breathability factor is key—it allows moisture to escape rather than getting trapped and causing damage.
Beyond its impressive longevity, stucco brings other benefits to your home. It offers excellent fire resistance (a big plus for safety-minded homeowners), provides decent insulation value, and ranks high on sustainability metrics since it’s made from abundant natural materials.
Perhaps most appealing to homeowners is stucco’s incredible versatility. Want a smooth, modern look? Stucco can do that. Prefer a rustic, textured Mediterranean feel? Stucco shines there too. From colonial to contemporary, this material adapts beautifully to virtually any architectural style.
The real magic of stucco lies in its unique combination of toughness and adaptability. It can expand and contract slightly with temperature changes while maintaining its structural integrity. This resilience explains why how to repair stucco isn’t something most homeowners need to learn frequently—though knowing the basics is still valuable for those occasional maintenance needs.
Damage Control: Types, Causes & Early Diagnosis
When it comes to your home’s stucco exterior, catching problems early can save you thousands in repairs later. I’ve seen countless homeowners who wished they’d spotted those tiny warning signs before they turned into major headaches.
Types of Stucco Damage
Your stucco might be trying to tell you something through various signs of distress. Hairline cracks – those thin fissures less than 1/32″ wide – often seem merely cosmetic but can be your first warning. Flaking or spalling occurs when the surface layer decides to peel away like sunburned skin. When you notice bulging areas, that’s the stucco literally pulling away from what it’s supposed to be attached to – never a good sign.
Physical damage comes in different forms too. Impact holes from that errant baseball or basketball are obvious culprits, while woodpecker damage leaves those distinctive round holes that seem almost perfectly drilled. Then there are the moisture tells: water stains discoloring your beautiful finish and efflorescence – that chalky white powder that appears like magic (but is actually mineral deposits from water movement).
“I once inspected a home where the owner had ignored a small water stain on their garage wall,” I tell clients. “Six months later, we were dealing with a full-blown mold situation that cost them ten times what an early repair would have.” This real-world example highlights why catching problems early matters so much.
Common Causes of Stucco Damage
Your home isn’t static – it’s constantly responding to forces around it. Settlement movement happens as your house naturally settles over time, creating stress on the rigid stucco. Thermal expansion and contraction occurs daily as temperatures fluctuate, making materials expand and shrink slightly. More concerning are structural shifts that indicate bigger movement in your building’s framework.
Many issues stem from improper installation – incorrect mixing ratios or application techniques that doom the stucco from day one. But the most insidious enemy is water intrusion, moisture finding its way behind the stucco surface where it can quietly wreak havoc for months before showing visible signs. And of course, there’s always impact damage from life’s little accidents.
Diagnosing Stucco Problems
Before you grab your repair tools, take time to understand what you’re dealing with.
An invasive inspection with moisture readings using a moisture meter can detect hidden dampness your eyes can’t see. Core samples will confirm damage.

Red Flags That Mean “Stop & Investigate”
Some warning signs should stop you in your tracks before attempting DIY repairs. Dark streaks running down your wall aren’t just unsightly – they signal active water getting where it shouldn’t. Soft spots in your stucco mean the substrate beneath is likely compromised. If you detect a mold odor near exterior walls, hidden moisture has likely been at work for some time. And when interior drywall starts buckling or staining, that’s moisture that’s made its way all the way through your wall system.
These red flags demand professional assessment before you attempt any repairs. In our region of Southeastern Pennsylvania, New Jersey, and Delaware, where rainfall is substantial, moisture problems can escalate quickly. At Stucco Safe, our forensic testing methods help identify hidden moisture and structural issues before they turn into catastrophic failures that threaten your home’s integrity and your family’s health.
For more comprehensive information about moisture-related stucco problems, check out our detailed guide at More info about Stucco Moisture Problems.
Your DIY Stucco Repair Toolkit & Safety Prep
Getting ready for a stucco repair project is a bit like preparing for a baking trip – having the right tools and ingredients makes all the difference between a smooth process and a frustrating mess. Let’s walk through everything you’ll need to tackle your stucco project confidently.
Essential Tools:
That toolbox in your garage is about to come in handy! For stucco repairs, you’ll want to gather a 6-in-1 tool (or a sturdy putty knife), a cold chisel with hammer for removing damaged sections, and a wire brush for cleaning the repair area. Don’t forget a caulking gun for those hairline cracks.
“The right trowels make all the difference,” says Maria, a DIY enthusiast who restored her 1920s stucco bungalow. You’ll need both a flat trowel and a margin trowel, plus a hawk for holding your stucco mix. The red sponge float helps with base coats, while the green sponge float gives your finish coat that perfect texture.
Round out your toolkit with a mixing bucket (or wheelbarrow for larger jobs), a drill with mixing paddle if you want to save your arm muscles, a misting sprayer for proper curing, and a sharp utility knife for trimming mesh.
Materials:
For the actual repair, you’ll need to choose between pre-mixed stucco patching compound or traditional stucco mix. Fiberglass mesh tape works wonders for reinforcing cracks, while metal lath provides the necessary foundation for larger repairs. Don’t skip the building paper or moisture barrier – this critical layer prevents future moisture problems.
A quality bonding agent helps new stucco adhere to old surfaces, and you’ll need roofing nails to secure the lath firmly. For those tiny hairline cracks, acrylic masonry caulk often does the trick without requiring a full stucco application.
Safety Equipment:
Safety first isn’t just a catchy phrase when working with stucco. The materials can be caustic, so protect your eyes with safety goggles and your hands with nitrile gloves (cement can cause nasty chemical burns). A dust mask or respirator is non-negotiable when mixing or sanding, and a sturdy ladder with proper footing will prevent falls. Drop cloths protect your landscaping and make cleanup easier.
“I learned the hard way that cement burns are no joke,” shares Chris F., an experienced stucco contractor. “Preparation is all important for this kind of work.”
Weather Considerations:
Mother Nature has a big say in when you should tackle how to repair stucco. Avoid working when nighttime temperatures drop below 40°F, when rain is expected within the next 24-48 hours, or during extremely hot or windy conditions that cause the material to dry too quickly.
The sweet spot for stucco work is mild, overcast days with temperatures between 50-80°F. This gives you optimal working time and proper curing conditions.
Pre-Mixed vs. Traditional Stucco Mix

For weekend warriors tackling small repairs, pre-mixed stucco patch offers unbeatable convenience – just open and apply. But if you’re facing a larger repair area, traditional bagged stucco mix is more economical and gives you better control over the final result.
Once water hits traditional stucco mix, you’re on the clock – it remains workable for only 30-90 minutes. Plan your mixing quantities accordingly so you’re not racing against time or wasting materials.
With your toolkit assembled and safety gear ready, you’re well-prepared to tackle that stucco repair with confidence. The right preparation now means fewer headaches later and a finished repair that will protect your home for years to come.
How to Repair Stucco: Step-by-Step Guide
Ready to roll up your sleeves and tackle that stucco repair? The good news is that with the right approach, you can restore your stucco to its former glory. Let’s break down the process based on the type of damage you’re facing.
How to Repair Stucco Cracks & Pinholes
Those hairline cracks might seem minor, but they’re actually moisture’s favorite entry point. Here’s how to seal them properly:
First, grab your wire brush and thoroughly clean the crack to remove any loose material or dust. For slightly wider cracks, consider using a utility knife to create a small V-shaped groove—this gives your repair material more surface area to grip.
Next, reach for your acrylic masonry caulk. “Cut the tip of the caulk tube as small as possible,” suggests Maria, a stucco repair veteran. “Precision is everything here.” Apply a thin bead directly into the crack, then use a gloved finger or small putty knife to press it firmly into place, smoothing it flush with the wall.
While the caulk is still tacky, use a small brush or sponge to mimic the surrounding texture—this step makes all the difference between a repair that disappears and one that screams “patch job!” Allow at least 24 hours of curing time before painting.
For those pesky woodpecker holes, specialized repair kits work wonders. Each kit typically handles holes up to 2.5 inches in diameter and includes everything you need for a seamless repair.
How to Repair Stucco Over Large Areas
Remove all stucco from top to bottom and corner to corner. Remove, pan flash and replace windows. You’ll apply 2 layers of minimum grade D building paper, with asphalt on the outside layer, rainscreen and wire.
Now comes the mixing. For your scratch coat, follow the manufacturer’s directions, but a typical blend includes half a bag (47 lbs) of Portland cement, six shovels of sand, one shovel of lime, and half a cup of bonding agent. “Too much water makes it unworkable,” cautions one stucco specialist. “You’re aiming for buttercream frosting consistency.”
Before applying, mist the edges of the existing stucco to prevent moisture-stealing. Apply your scratch coat about ¼-½ inch thick, pressing firmly to embed it into the lath. Once the surface sheen disappears but while still wet, score horizontal grooves across the surface to create “teeth” for the next layer.

Scratch, Brown & Finish: Timing That Prevents Future Cracks
Patience is truly a virtue when it comes to how to repair stucco. Each layer needs proper curing time to develop strength and prevent future cracking.
Allow your scratch coat to cure for 24-48 hours, misting it several times daily and covering with plastic sheeting to retain moisture. “Working with stucco is like baking bread,” explains Tony, a repair specialist. “You have to let it rise properly. Rush this part, and you’ll pay for it later with cracks.”
Once properly cured, apply your brown coat—mixed slightly differently with half a bag of cement, eight shovels of aggregate sand, one shovel of lime, and half a cup of bonding agent. This layer should be about ⅜ inch thick, leaving just ⅛ inch for your final finish coat.
The brown coat needs 5-7 days of curing time with regular misting. Yes, it’s a wait, but it’s worth it for a repair that lasts decades instead of months. Recent research from industry experts confirms that proper curing time reduces repair failures by over 60%.
Finally, mix and apply your finish coat—often pre-colored or containing finer aggregate—at about ⅛ inch thickness. Allow this final layer to cure for at least a full week before painting, continuing to mist regularly.
Matching Texture While Mud Is “Plastic”
The art of matching existing stucco texture makes the difference between a repair that disappears and one that stands out like a sore thumb. You’ll need to work while the finish coat is still “plastic”—industry speak for that perfect workable consistency.
First, identify what texture you’re matching. Is it skip-trowel with its irregular raised areas? Sand float with its uniform sandy finish? Perhaps it’s dash with its spattered appearance, or smooth with minimal texture? Maybe it’s a specific 20/30 blend (referring to aggregate size)?
Practice your technique on a scrap board before committing to the wall. For skip-trowel, use a small pointing trowel with minimal pressure to create those characteristic raised spots. Sand float texture requires a green sponge float moved in circular motions. Dash texture involves flicking material onto the surface with a brush or specialized dash tool. For smooth finishes, use a steel trowel with light pressure.
“Use small, controlled strokes for better blending,” advises one professional. “The base or brown coat should include raised sand grit achieved with a float to create a background texture.”
The most challenging part? Feathering the edges to blend your repair into the existing stucco. Work from the center outward, gradually lightening your pressure as you approach the original surface. This technique creates that seamless transition that makes repairs virtually invisible.
Finish Strong: Color Match, Cure & Preventative Maintenance
After all your hard work applying those perfect layers of stucco, the final stretch is where many DIYers falter. I’ve seen countless beautifully executed repairs that end up looking like obvious patches because the homeowner rushed through these last critical steps.
Color Matching
Getting your repair to blend seamlessly with existing stucco is honestly one of the trickiest parts of the whole process. Here’s what works best:
Painting the entire wall is often your simplest solution. Let’s face it – trying to match new patch material to decades-old stucco is like trying to match your natural hair color from memory at the drugstore. Use an alkali-resistant primer first (this is non-negotiable with fresh stucco!), then follow with quality acrylic latex exterior paint.
For larger areas, consider a fog coat – a thin cement-based coating that can be tinted to match your existing stucco. It gives you that authentic stucco look without the thickness of another layer.
If you’re tackling a complete re-stucco project, integral color mixed directly into your finish coat eliminates the need for painting altogether. The color goes all the way through the material, so chips and scratches won’t reveal different colors underneath.
“I learned the hard way that no patch will perfectly match old stucco color,” admits Mark, a homeowner in Philadelphia. “I ended up painting the entire south-facing wall, and now you’d never know there was ever damage there.”
Final Curing
Patience pays off tremendously in this stage. Before you apply any paint or sealer:
Wait at least 7 full days after applying your finish coat. I know it’s tempting to rush this, especially when the repair looks dry on the surface, but moisture is still evaporating from deep within.
A simple plastic wrap test can save you from premature painting regrets. Just tape a 12″ square of clear plastic to the repair, seal all edges completely, and check after 24 hours. If you see condensation on the inside of the plastic, your stucco is still releasing moisture and needs more curing time.
For the tech-minded, make sure moisture content reads below 15% on a moisture meter before painting. These inexpensive tools are available at most hardware stores and provide peace of mind before you invest in paint.

Preventative Maintenance
Think of your stucco like your teeth – regular maintenance prevents painful, expensive problems down the road.
Elastomeric sealers are worth their weight in gold for stucco maintenance. These flexible coatings are substantially thicker than regular paint and can bridge those tiny hairline cracks that inevitably form. They create a waterproof barrier while still allowing the stucco to breathe.
Don’t overlook your expansion joints. These are the unsung heroes of stucco longevity. Check that the caulking remains intact and flexible, replacing any that has hardened or pulled away from the edges.
Your gutters and downspouts might seem unrelated to stucco care, but they’re actually critical. Make sure they’re clean, properly aligned, and directing water well away from your stucco surfaces. I’ve seen countless stucco repairs that could have been avoided entirely with better water management.
Set a calendar reminder for annual inspections, especially after severe weather events. Look for new cracks or damage when the light is low and casting shadows across the surface – this makes imperfections much easier to spot.
“Stucco repair is as much about artistry as it is about construction,” a restoration specialist once told me. “Patience is key for a durable, seamless stucco finish.”
At Stucco Safe, we recommend yearly stucco check-ups to catch small issues before they become wallet-draining problems. Our certified inspectors help homeowners throughout Southeastern Pennsylvania, New Jersey, and Delaware identify potential issues early. We’re particularly active in Philadelphia, West Chester, Cherry Hill and surrounding communities, where historic stucco homes require special attention to maintain their character and value.
For more detailed guidance on maintaining your stucco exterior, check out our comprehensive guide on Stucco Exterior Maintenance.
How soon can I paint after I repair stucco?
Patience truly is a virtue when it comes to painting freshly repaired stucco. The minimum waiting period should be 7 days after applying your finish coat—but that’s truly the minimum. The ideal waiting period is 28 days, which allows for optimal curing and significantly reduces the risk of future problems.
Before you open that paint can, grab your moisture meter again. The reading should be below 15% to ensure you’re not trapping moisture beneath your new paint job. For the truly thorough, pH-testing strips can confirm that alkalinity levels have dropped below 10, making the surface ready for paint.
“Allow the new stucco to cure for about 28 days, misting regularly, before applying primer and paint,” advises Ashley Goldman, a DIY stucco repair specialist who learned this lesson the hard way.
If circumstances force you to paint sooner, don’t grab just any paint from your garage. Use only alkali-resistant primers and paints specifically formulated for fresh masonry surfaces—these products are designed to withstand the highly alkaline environment of new stucco while it continues to cure.
At Stucco Safe, our inspections (ranging from $495 to $1595 depending on home size) often reveal premature painting as a contributing factor to stucco failure. That extra waiting time can save you thousands in repairs down the road—sometimes the best repair technique is simply patience.

Whether you’re tackling that repair yourself or seeking professional assistance, understanding how to repair stucco is your first step toward preserving your home’s beauty and structural integrity. With proper care, your stucco finish can continue protecting and beautifying your home for generations to come.
If you’re in Southeastern Pennsylvania, New Jersey, or Delaware and would like professional guidance, our team at Stucco Safe is ready to help ensure your stucco continues performing as it should. After all, your home deserves nothing less than expert care.