
Best way to anchor into stucco: 5 Secure Steps
Why Proper Anchoring Matters for Stucco Walls
The best way to anchor into stucco involves using the right fasteners, drilling correctly, and sealing the area to prevent water intrusion. Here’s a quick overview:
Quick Answer for Secure Stucco Anchoring:
- Choose corrosion-resistant anchors – Use stainless steel or coated screws matched to your load weight.
- Drill precise pilot holes – Use masonry bits slightly smaller than your anchor diameter.
- Install anchors flush – Tap gently until anchors sit level with the stucco surface.
- Seal the installation – Apply silicone caulk around fasteners to prevent water damage.
- Avoid overtightening – Stop when secure to prevent cracking the brittle stucco.
Stucco is hard but brittle, requiring special techniques to avoid cracks. A poor installation can allow water entry, leading to hidden damage.
I’m Gabe Kesslick, an EDI Level 2 Certified Stucco Inspector since 2001. I’ve seen countless moisture problems caused by improper anchoring, which is why knowing the best way to anchor into stucco is critical for protecting your home.
 Select proper corrosion-resistant anchors based on load weight, 2) Mark location and drill precise pilot holes with masonry bits, 3) Install anchors flush with stucco surface, 4) Apply silicone sealant around fasteners, 5) Mount item without overtightening to prevent cracks - best way to anchor into stucco infographic")
Understanding Your Stucco Wall: The First Step to a Secure Anchor
Before drilling, understanding your stucco is the best way to anchor into stucco without causing damage. Stucco is a hard, brittle mix of cement, sand, and water, prone to cracking under improper force.
Traditional homes often have 3-coat stucco, about an inch thick over wire lath. Newer construction may use 1-coat stucco or EIFS (Exterior Insulation and Finishing System), which can include foam insulation layers. Knowing the system and its thickness is key to choosing the right screw length to reach structural supports.
For any significant weight, you must anchor into the structure behind the stucco, such as wood sheathing (plywood/OSB) or wall studs. A modern stud finder can typically locate these supports through the dense stucco.
Why Wall Type Matters
The structure behind your stucco dictates the anchoring method and weight capacity.
- Shear walls have solid backing like plywood or OSB. This provides a continuous surface for anchors to grip, distributing weight effectively. For heavy items, choose fasteners long enough to embed firmly into this backing.
- Open stud walls have hollow cavities between studs. For anything beyond light decorations, hitting a stud is crucial. Otherwise, you must rely on hollow-wall anchors, which are less secure for heavy loads.
Always assess your stucco’s condition first. Cracks or crumbling signal underlying issues; anchoring into compromised stucco will only worsen the problem.
Preparing the Stucco Surface for Anchoring
Proper preparation ensures a lasting, damage-free installation.
- Clean the surface: Use a stiff brush and soapy water to remove dirt and debris that could interfere with sealants. Let it dry completely. For adhesives, wipe with rubbing alcohol.
- Mark the location: Use a pencil for precision. Apply painter’s tape over the drill spot to prevent the bit from “walking” and to minimize chipping.
- Check for hazards: Before drilling, check for hidden pipes and electrical wires, especially near outlets, spigots, and light fixtures. Use a stud finder with detection features, but always exercise caution.
Choosing the Right Fasteners: A Guide to Stucco Screws and Anchors
The best way to anchor into stucco starts with selecting the right hardware.
First, always choose corrosion-resistant screws. Exterior fasteners face the elements, so use stainless steel or specially coated screws to prevent rust stains and fastener degradation.
Second, match your anchor to the load weight. We can group items into three categories:
- Light-duty: House numbers, small signs, or lightweight art.
- Medium-duty: Mailboxes, outdoor light fixtures, or sturdy decorations (up to 20-30 lbs).
- Heavy-duty: Large fixtures, trellises, or pergola supports that require anchoring to the structure.
Comparing Anchor Types for Stucco
This table breaks down common anchor options for stucco projects:
| Anchor Type | Weight Capacity | Best Use Case | Pros | Cons |
|---|---|---|---|---|
| Expansion Anchors | Light to medium loads | Decorations, small fixtures, house numbers | Easy to install, good for hollow areas, distributes load well | Not suitable for heavy items, can work loose over time |
| Sleeve Anchors | Medium to heavy loads | Outdoor fixtures, mailboxes, medium shelves | Excellent holding power, works in solid backing, very reliable | Requires precise drilling, permanent installation, more expensive |
| Wedge Anchors | Heavy loads | Pergola supports, large fixtures, ledger boards | Maximum holding strength, ideal for structural attachments | Requires concrete backing, permanent, can crack stucco if overtightened |
| Toggle Bolts | Medium to heavy loads | Items where you can’t hit studs, hollow areas | Great for hollow wall applications, strong holding power | Requires larger holes, difficult to remove, needs access to back of wall |
The best way to anchor into stucco for Light to Medium Loads
For most common projects, plastic or nylon expansion anchors are ideal. They expand behind the stucco, creating a secure grip without excess stress. Masonry screws are another great option, as they cut their own threads into a pilot hole for a tight fit, especially with solid backing.
The best way to anchor into stucco for Heavy Loads
For substantial items, you need robust anchors. Sleeve anchors expand along their length, distributing heavy loads effectively. Wedge anchors offer maximum strength but require a solid concrete or masonry substrate. Toggle bolts are excellent for hollow walls when you can’t hit a stud but need strong holding power. For the most secure connection, always try to locate and fasten directly into wall studs. For additional DIY tips and examples, see A guide to hanging items on stucco walls.
Understanding Your Stucco Wall: The First Step to a Secure Anchor
A successful anchoring project starts with understanding the material you’re working with. Stucco is a hard but brittle cement-based siding that requires a careful approach to avoid damage.
Key considerations include:
- Stucco System: Is it a traditional 3-coat system or a modern 1-coat/EIFS system with foam? This affects the required fastener length.
- Wall Structure: Is there solid sheathing (a shear wall) or are there hollow cavities between studs (an open stud wall)? This determines where you can anchor and how much weight the wall can support.
- Stucco Condition: Never anchor into cracked, crumbling, or water-damaged stucco. Address any existing damage before starting your project.
Choosing the Right Fasteners: A Guide to Stucco Screws and Anchors
Selecting the correct fastener is critical for a secure, long-lasting hold on a stucco wall. Simply using any screw from your toolbox can lead to rust, cracks, and failed installations.
Follow these two main principles:
- Use Corrosion-Resistant Hardware: Always choose stainless steel or coated screws to prevent rust from staining your stucco and weakening the fastener.
- Match the Anchor to the Load:
- Light to Medium Loads: Use plastic expansion anchors or masonry screws (like Tapcon) for items like house numbers, mailboxes, and light fixtures.
- Heavy Loads: Use sleeve anchors, wedge anchors, or toggle bolts for heavier items like trellises or large fixtures. For maximum security, anchor directly into the wall’s structural framing (studs).
The Best Way to Anchor into Stucco: A Step-by-Step Guide
Now that we understand our stucco and have chosen the right fasteners, it’s time for the practical steps. This section details the proper procedure for drilling into stucco without causing damage.

With the right tools and technique, you can achieve a secure, damage-free installation. Gather a drill, masonry drill bits, a screwdriver, a hammer, safety glasses, a stud finder, a level, and exterior-grade silicone caulk. A standard drill is fine for stucco; only use a hammer drill setting if you hit concrete block behind it.
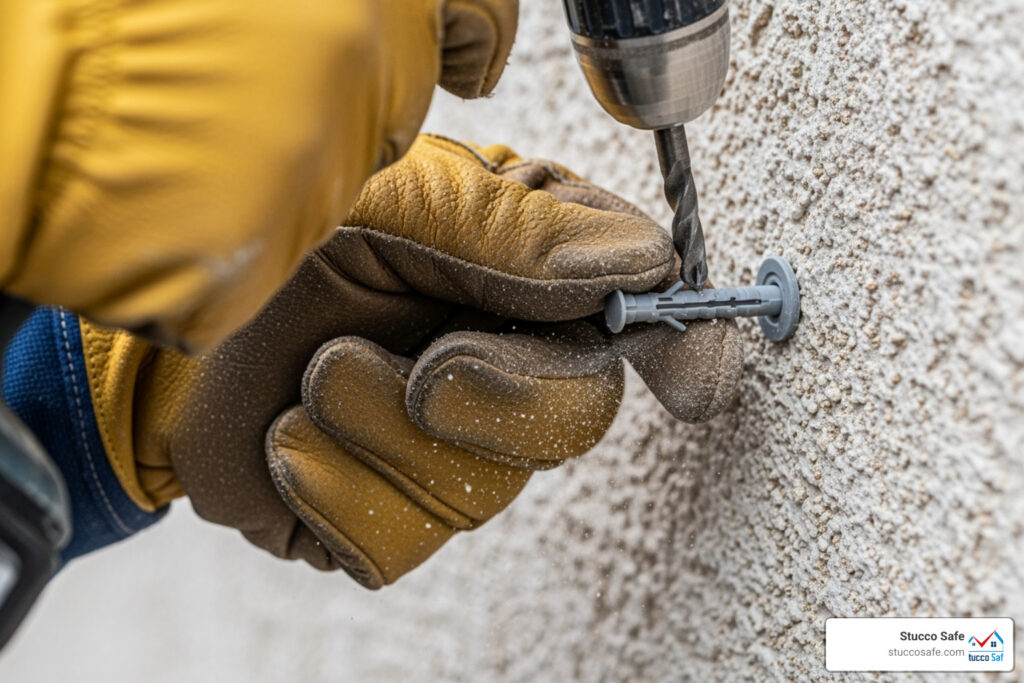
Step 1: Drill a Precise Pilot Hole
A proper pilot hole is essential. After marking your spot (using painter’s tape helps prevent the bit from slipping), select a masonry bit that matches your anchor’s specified diameter. Drill slowly and steadily, keeping the drill perpendicular to the wall to avoid creating an oversized hole. Let the bit do the work without forcing it. Once at the correct depth, clear any dust from the hole.
Step 2: Install the Anchor Securely
For a superior waterproof seal, apply a small amount of exterior-grade silicone caulk into the pilot hole before inserting the anchor. Push the anchor in until it is flush with the stucco surface. If needed, tap it gently with a hammer. It should fit snugly without being forced.
Step 3: Drive the Screw and Mount Your Item
The final step brings everything together, changing your careful preparation into a secure mounting point.

Position your item and drive the screw into the anchor. Avoid overtightening. Stop as soon as the screw is snug and the item is secure. Overtightening can crack the stucco or strip the anchor. For a final layer of protection, apply a bead of silicone caulk around the edge of the mounted fixture to seal it against the wall.
Common Mistakes, Alternatives, and When to Call a Pro
Knowing what to avoid is as important as knowing what to do. The best way to anchor into stucco involves sidestepping common pitfalls.

Common mistakes include using the wrong fasteners (e.g., wood screws), hammering nails directly into stucco, overtightening screws, and skipping the crucial step of sealing the hole with caulk. Never drill into stucco that is already cracked or damaged without addressing the underlying issue first.
Alternatives to Drilling into Stucco
For lightweight or temporary items, you can avoid drilling. High-quality adhesive hooks rated for outdoor use on rough surfaces can work for decorations. For flush-mount items like house numbers, an outdoor construction adhesive can be effective if the surface is perfectly clean and dry. Be aware that these solutions have strict weight limits and are less reliable than mechanical anchors.
When to Seek Professional Help
While many projects are DIY-friendly, call a professional for:
- Mounting very heavy items: Attaching ledger boards, large signs, or awnings requires structural knowledge.
- Signs of existing stucco damage: Cracks, soft spots, or staining indicate potential moisture problems that need inspection.
- Uncertainty about wall structure: If you can’t locate studs or are unsure what’s behind the wall, a pro can assess it safely.
At Stucco Safe, we specialize in identifying these issues. A professional inspection, costing between $495 and $1595, can prevent thousands in future repairs by diagnosing problems before you drill.
Frequently Asked Questions about Anchoring into Stucco
Here are answers to some common questions about working with stucco.
Can I screw directly into stucco without an anchor?
You technically can for very light items, but it is not recommended. Screwing directly into the brittle material creates stress points that can lead to cracks. A regular screw won’t grip well. Using a proper anchor distributes the load over a wider area, creating a much stronger and more reliable hold.
How do I remove an anchor from stucco and patch the hole?
First, remove the screw. Use needle-nose pliers to gently work a plastic anchor out of the hole. For stubborn or metal anchors, you may need to cut them flush with the wall. To patch the hole, clean out any debris and fill it with a color-matched exterior-grade caulk or a stucco patching compound. Use a putty knife to apply the patch, trying to match the surrounding texture. Let it cure completely before painting.
Can I paint over stucco anchors to match my wall?
Yes, painting over anchors helps them blend in. Ensure the anchor is flush with the wall and that any metal parts are corrosion-resistant or primed to prevent rust. Use a quality exterior paint designed for masonry, such as an elastomeric paint, which is flexible enough to move with the stucco as it expands and contracts.
Conclusion
The best way to anchor into stucco relies on preparation, precision, and protection. By understanding your wall type, choosing the correct corrosion-resistant fasteners, and using proper drilling techniques, you can create secure attachments without causing damage.
The most critical step is sealing. A bead of silicone caulk around fasteners and fixtures is your best defense against water intrusion, which can lead to costly hidden repairs.
If you see signs of existing damage like cracks or stains, or if you’re mounting a particularly heavy item, it’s wise to get a professional opinion first.
At Stucco Safe, we can identify hidden issues before they become major headaches. A professional inspection, with costs ranging from $495 to $1595, is a sound investment in your home’s integrity, potentially saving you thousands in the long run. With the right knowledge, you can confidently anchor items to your stucco walls. For more detailed information about choosing the right hardware for your specific situation, learn more about the best anchors for stucco.