
Stucco moisture probe selecting test location is vital in preventing water intrusion issues in homes. Identifying the right spots for testing ensures accurate results and can safeguard your property from costly damages.
- Key Test Locations:
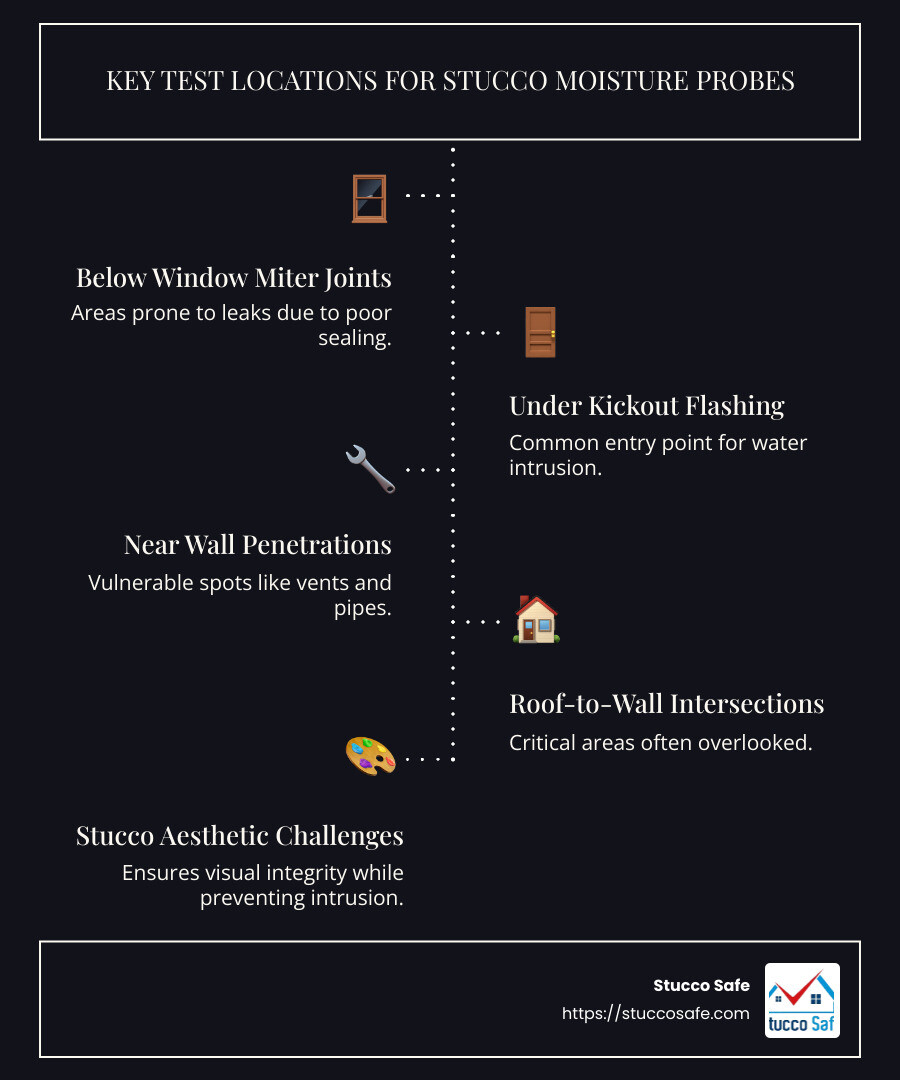
- Below window miter joints – prone to leaks.
- Under kickout flashing – common entry points.
- Near wall penetrations – such as vents or pipes.
- Around roof-to-wall intersections – often overlooked yet critical.
Stucco homes, known for their aesthetic appeal and durability, pose a unique challenge: water intrusion. Since the 1980s, many Minnesota homes have seen failures in stucco due to moisture problems, leading to extensive and pricey repairs. While all exterior cladding materials can be vulnerable to water damage, stucco tends to amplify the issue, making proper moisture testing indispensable.
I’ve been in the field of leak detection and repair since 2001. With expertise in stucco moisture probe selecting test location, I help homeowners like you prevent potential disaster and maintain the structural integrity of their properties. Let’s explore this crucial aspect further.
Understanding Moisture Testing
Moisture testing is your first line of defense against water intrusion in stucco homes. By understanding moisture content and detecting water penetration early, you can save yourself from costly repairs and preserve your home’s integrity.
Moisture Content: The Basics
Moisture content refers to the amount of water present in the materials behind your stucco. It’s crucial to monitor this because excessive moisture can lead to structural damage and mold growth. A moisture meter, like the Delmhorst Moisture Meter, is often used to get precise readings. Readings above 19% are considered wet and may indicate water damage.
Water Penetration: The Silent Threat
Water can sneak into your walls through tiny cracks or poorly sealed areas, often going unnoticed until significant damage is done. Stucco homes in Minnesota, especially those built since the 1980s, have a history of such failures. Early detection of water penetration is vital to avoid extensive repairs.
Early Detection: Your Best Defense
Catching moisture issues early can prevent minor problems from becoming major headaches. Regular moisture testing helps identify water intrusion before it reaches the drywall or causes visible damage. Strategic testing locations, such as below window miter joints and around roof-to-wall intersections, are key to effective moisture detection.

By understanding and implementing these moisture testing principles, you can protect your stucco home from the hidden dangers of water intrusion. Now, let’s dig deeper into why selecting the right test locations is so important.
Importance of Selecting the Right Test Locations
When it comes to stucco moisture probe selecting test location, choosing the right spots is crucial. Water intrusion is sneaky, and it can cause significant damage if not detected early. That’s why identifying strategic locations for testing is key.
Strategic Locations: The Heart of Effective Testing
Selecting the right locations for moisture testing isn’t just a guessing game. It’s a science. Moisture tends to accumulate in certain areas more than others, often where water can easily find its way in. These areas include:
- Below window miter joints: These joints can be prone to leaks, making them a critical area to test.
- Roof-to-wall intersections: Water can pool here, increasing the risk of intrusion.
- Around doors and windows: Poor sealing can allow water to seep in, making these spots essential for testing.
Water Intrusion: A Widespread Challenge
Water intrusion doesn’t discriminate. It can happen in any home, but stucco homes are particularly at risk. This is because stucco can slow down the drying process, allowing moisture to linger and cause damage. In Minnesota, for example, stucco homes built since the 1980s have faced significant water intrusion issues.
Critical Areas: Where Problems Lurk
Focusing on critical areas during testing can help detect issues before they escalate. These include spots where architectural features meet, such as:
- Chimney and wall junctions: These can be weak points for water entry.
- Deck and balcony attachments: Improper flashing here can lead to serious water damage.
Selecting these locations for probe testing helps ensure that any hidden moisture problems are uncovered. By drilling small holes and using a moisture meter, inspectors can get accurate readings and provide a clear picture of your home’s health.
In the next section, we’ll explore the different methods used for moisture detection, including visual inspections and thermal imaging.
Stucco Moisture Probe Selecting Test Location
Exterior Probe Testing
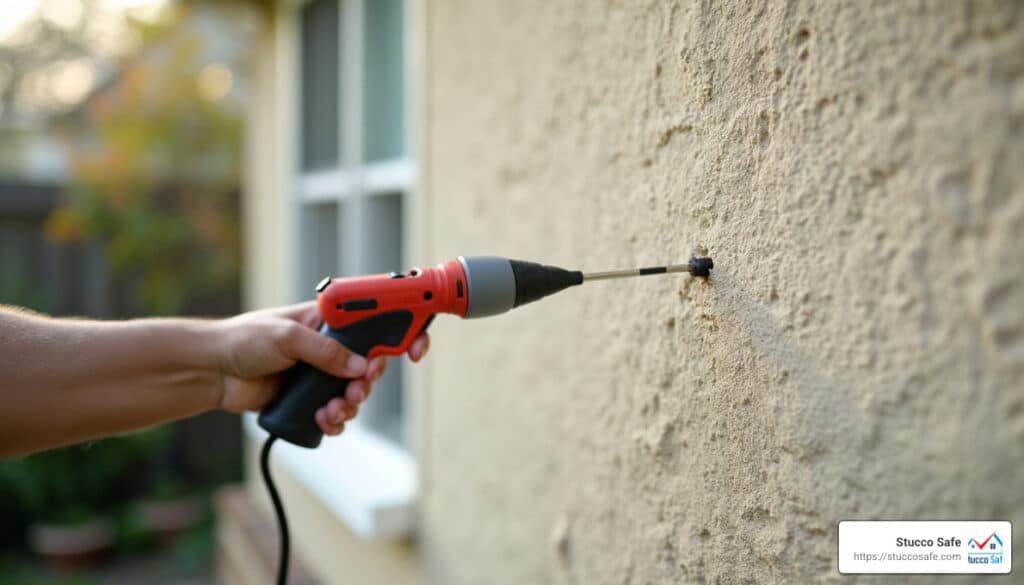
When it comes to stucco moisture probe selecting test location, exterior probe testing is a tried-and-true method. This approach involves drilling small holes at strategic locations on the outside of a home to accurately measure moisture levels.
Why Drill Holes?
Drilling holes might sound invasive, but it’s a necessary step to access the sheathing beneath the stucco. These holes are typically 3/16” to 1” apart. Once drilled, a moisture meter is inserted to get a precise reading of the moisture content. This helps identify hidden water issues that might not be visible from the outside.
Strategic Locations Matter
Choosing where to drill is crucial. The focus is on areas likely to have water intrusion, such as:
- Below window miter joints: A common spot for leaks.
- Roof-to-wall intersections: Water can easily pool here.
- Around doors and windows: Poor sealing can lead to seepage.
By targeting these areas, inspectors can uncover moisture problems that might otherwise go unnoticed.
Sealing the Deal
After testing, the drilled holes are sealed with silicone caulk. This step is vital to protect the home from further water intrusion and to maintain its aesthetic appeal. The caulk is typically color-matched to the stucco for a seamless finish.
Interior Probe Testing
Interior probe testing is another method, but it’s less common due to its limitations. This involves drilling from the inside of the home, which can be tricky.
Limited Access
The main challenge with interior testing is limited access. Interior finishes like drywall or paneling can make it hard to reach the exterior sheathing. This means some critical areas for moisture intrusion might be out of reach.
Interior Finishes: A Hurdle
Drilling through interior finishes can also be more disruptive. It often requires patching and repainting, which might be noticeable and less desirable for homeowners.
Less Thorough
Due to these challenges, interior probe testing is generally considered less thorough than exterior testing. It might be useful in certain situations, but it doesn’t provide the comprehensive insights that exterior testing does.
In the next section, we’ll dig into the various methods of moisture detection, including visual inspections and thermal imaging, to offer a complete picture of how to keep your stucco home in top shape.
Methods of Moisture Detection
When it comes to detecting moisture in stucco, there are several methods that can help identify potential issues before they turn into costly repairs. Let’s explore two popular techniques: visual inspection and thermal imaging, as well as the use of moisture meters.
Visual Inspection
A visual inspection is often the first step in detecting moisture problems in stucco. This method involves a thorough examination of the stucco surface to spot any visible signs of water intrusion.
-
Surface Staining: Discoloration or streaks can indicate water damage. These stains are often the first clue that moisture has infiltrated the stucco.
-
Cracks: Even small cracks can be a gateway for water to seep into the walls, leading to more significant issues over time.
-
Improper Flashing: Flashing is meant to direct water away from the home. If it’s improperly installed or damaged, it can become a major entry point for water.
Visual inspections are crucial because they provide the initial clues about where moisture might be entering your home. However, they are not foolproof and should be complemented by other methods for a comprehensive assessment.
Thermal Imaging
Thermal imaging uses infrared cameras to detect temperature variations on the stucco surface. These variations can suggest the presence of moisture.
-
Temperature Variations: Wet areas tend to be cooler due to evaporative cooling. Infrared cameras can capture these cooler spots, potentially indicating moisture presence.
-
Infrared Cameras: These cameras provide a visual representation of temperature differences, highlighting areas that may need further investigation.
However, thermal imaging can be an inconclusive method on its own. While it is useful for identifying potential problem areas, it cannot measure actual moisture content. Therefore, it’s best used in conjunction with other methods, like moisture probes, to confirm suspicions.
Moisture Meters
Moisture meters are essential tools in moisture detection. They measure the moisture content in the stucco walls, providing precise readings that can confirm the presence of water.
-
How They Work: Moisture meters work by detecting differences in electrical resistance. Lower resistance indicates higher moisture levels.
-
Accuracy: When used correctly, moisture meters offer a reliable way to pinpoint moisture issues that might not be visible to the naked eye.
Combining these methods—visual inspection, thermal imaging, and moisture meters—provides a comprehensive picture of the moisture condition in your stucco walls. Identifying issues early can save homeowners from costly repairs down the line.
Next, we’ll explore the costs and considerations associated with stucco moisture testing, helping you understand what to expect and how to plan your budget effectively.
Costs and Considerations
When planning a stucco moisture inspection, understanding the costs and considerations involved is crucial. Let’s break down the key factors that can influence the pricing and what you should expect.
Inspection Costs
Stucco moisture inspections can vary significantly in price, ranging from $495 to $1,595 or more for very large homes. The cost largely depends on the type of inspection you choose:
-
Visual Inspection: Typically the least expensive option, focusing on surface-level issues.
-
Moisture Mapping: More costly due to the precision equipment and expertise required.
-
Comprehensive Exterior Inspection: This combines visual checks with moisture mapping for a thorough assessment.
While the upfront cost may seem high, investing in a thorough inspection can prevent much more expensive repairs down the road. Identifying small issues early can save you from significant structural damage.
Home Size
The size of your home is a major factor in determining inspection costs. Larger homes naturally require more time and resources to inspect. More square footage means more areas to check for potential moisture issues, increasing the overall cost.
-
Larger Homes: Expect higher costs due to the increased number of inspection points.
-
Smaller Homes: Generally incur lower costs as there are fewer areas to inspect.
Accessibility
The accessibility of your home can also impact inspection costs. Homes with difficult-to-reach areas may require specialized equipment and additional time, leading to higher expenses.
-
Challenging Landscapes: If certain sections of your stucco are hard to access due to landscaping or architectural features, inspection costs may rise.
-
Specialized Equipment: Some areas might need special tools to ensure a thorough inspection, adding to the cost.
Overall, while the cost of a stucco inspection can vary, it is an investment in your home’s longevity and safety. By understanding these factors, you can better prepare for the inspection process and make informed decisions about maintaining your property.
Next, we’ll answer some frequently asked questions about stucco moisture testing to further clarify the process and help you make the right choices for your home.
Frequently Asked Questions about Stucco Moisture Testing
How do you test stucco for moisture?
Testing stucco for moisture involves a few key steps to ensure accuracy and reliability. Here’s a simple breakdown:
-
Drilling Holes: Small holes are drilled into the stucco at strategic locations. This allows access to the materials behind the stucco, where moisture levels can be accurately measured.
-
Moisture Meter: A specialized device, such as a Delmhorst Moisture Meter, is used to measure the moisture content. The meter’s probes are inserted into the drilled holes to provide precise readings.
-
Sealing Holes: After testing, the drilled holes are sealed with silicone caulk. This helps maintain the integrity of the stucco and ensures a clean finish.
How much does it cost to test stucco moisture?
The cost of stucco moisture testing can vary widely based on several factors:
-
Inspection Type: Whether you opt for a visual inspection, moisture mapping, or a comprehensive exterior inspection, each type comes with its own price range. For instance, a basic visual inspection might be less expensive compared to a full moisture mapping.
-
Average Cost: Generally, stucco moisture tests range from $495 to $1,595. The exact cost will depend on your location and the specifics of your home.
-
Influencing Factors: Key factors affecting the cost include the size of your home, accessibility of the stucco surfaces, and the expertise of the inspector. Homes with more complex designs or larger square footage will typically incur higher inspection costs.
How is a stucco inspection done?
A stucco inspection involves a series of tests to assess moisture levels and the condition of exterior surfaces:
-
Visual Inspection: Inspectors walk around the property, looking for signs like staining, cracks, or improper flashing. These can be indicators of moisture intrusion.
-
Moisture Probes: This step involves drilling small holes in the stucco and inserting a moisture meter to measure moisture levels within the wall.
-
Exterior Surfaces: The inspection focuses on the condition of the exterior surfaces, identifying any potential problem areas that could lead to moisture intrusion.
By combining these methods, inspectors can accurately assess the condition of your stucco and recommend necessary repairs or maintenance. Understanding these steps can help you maintain your home’s integrity and prevent costly repairs.
Next, we’ll explore the different types of stucco moisture testing and how each method provides unique insights into the health of your home’s exterior.
Conclusion
At Stucco Safe, we understand the critical importance of maintaining the integrity of your stucco home. Moisture intrusion can lead to extensive damage if not identified early. That’s why we employ forensic testing methods that are both accurate and comprehensive.
Our team of certified inspectors is trained to use advanced techniques to detect moisture and structural issues. We focus on key areas where water intrusion is most likely, ensuring that no potential problem goes unnoticed. Our expertise in stucco moisture probe selecting test location means we strategically choose the best spots for testing, giving you the most reliable results.
We serve homeowners across Southeastern Pennsylvania, New Jersey, and Delaware, offering peace of mind with our thorough inspections. Whether you’re a homeowner or property owner, our goal is to provide you with the most accurate assessment of your stucco system.
If you’re concerned about the condition of your stucco, don’t wait until it’s too late. Contact us for a professional stucco inspection. Our inspections vary in cost from $495 to $1,595, depending on the size and complexity of your home.
For more information on our services, visit our Stucco Inspection and Testing page. Let us help you keep your home safe and sound. Your home deserves the best care, and with Stucco Safe, that’s exactly what you’ll get.