
Stucco Repair: Flawless Guide 2025
Why Stucco Repair Matters for Your Home’s Integrity
Stucco repair is essential for protecting your home from moisture damage, preserving its structural integrity, and maintaining its curb appeal. Here’s what you need to know:
Quick Guide to Stucco Repair:
- Identify the damage – Look for cracks, staining, bulging, or soft spots.
- Gather your tools – You’ll need a hammer, chisel, trowels, wire brush, and patch material.
- Prepare the surface – Remove loose material, widen cracks, and check the lath.
- Apply three layers – Scratch coat, brown coat, and finish coat.
- Match texture and color – Blend your repair seamlessly with the existing surface.
- Know when to call a pro – Large cracks or bulging walls require expert assessment.
Properly installed stucco can last 50-80 years, but even the best stucco needs occasional attention. Small repairs might run $150-500, while professional inspections typically cost $495-$1,595.
The challenge? Stucco is often the last component to show signs of failure. By the time you see cracks or staining, moisture may have already damaged the sheathing and framing beneath. This is especially true for homes built between 1993 and 2006, which have failure rates as high as 90% due to incorrect building codes during that period.
I’m Gabe Kesslick, a certified stucco inspector and forensic building envelope specialist. Since 2001, I’ve specialized in detecting and repairing leaks and moisture intrusion. I’ve seen how early intervention can save homeowners thousands in structural damage costs.
This guide covers DIY repairs for minor damage and helps you recognize when professional help is necessary. Understanding stucco repair protects your investment.

Identifying Stucco Damage: When to Repair
Recognizing the early warning signs of stucco damage can prevent minor issues from becoming major, costly repairs. Here are the common signs that your stucco needs attention:
- Hairline vs. Growing Cracks: Small hairline cracks (1/32″ or less) are often cosmetic. However, growing cracks signal deeper issues, potentially allowing moisture intrusion that leads to blistering and peeling.
- Staining or Discoloration: Dark streaks, especially below windows or near the roofline, often signal a failed water-resistance barrier. This means water is getting behind the stucco and can damage the underlying structure.
- Bulging or Warped Walls: Bulging stucco is a serious sign of trapped moisture. The water causes the underlying materials to swell, pushing the stucco outward. This requires urgent repair.
- Soft or Crumbling Areas: If stucco feels soft or crumbles when pressed, the material is deteriorating. This is often caused by prolonged moisture exposure or a poor initial mix.
- Mold and Mildew: While surface mold can be cleaned, mold growing on the stucco itself indicates an ongoing moisture problem behind the wall, which can spread to the interior.
- Moisture Intrusion: Stucco is porous, and if water gets behind it without a way to drain, it causes significant damage. This is a major concern in climates with freeze-thaw cycles, like Southeastern PA, New Jersey, and Delaware.
- High Failure Rate (1993-2006 Homes): Homes built in this period have a high stucco failure rate (up to 90%) due to outdated building codes. If your home is from this era, a professional inspection is highly recommended.

What are the differences between traditional stucco and synthetic stucco (EIFS)?
It’s crucial to know if you have traditional stucco or synthetic stucco (EIFS), as the repair methods and materials differ significantly.
| Feature | Traditional Stucco (Hard-Coat) | Synthetic Stucco (EIFS) – |
| Composition | Traditional stucco consists of a mix of Portland cement, sand, and water, often with a chemical additive for hardening and for a more resilient finish. It’s applied in multiple layers. | EIFS is a multi-layered finish that uses a polymer-based (synthetic) stucco system. It’s applied over insulation board and includes a base coat with fiberglass mesh reinforcement, and an acrylic topcoat. |
| Common Issues | Cracks (hairline, map, structural), deterioration due to moisture infiltration, efflorescence, chipping, flaking, and bulging due to underlying structural issues or failed moisture barrier. | Cracking (often at windows/doors), blistering, delamination from the substrate, and significant moisture intrusion behind the system if not properly installed with drainage, leading to hidden rot. |
| Repair Method | Repairs typically involve removing damaged material, inspecting and repairing underlying lath, applying new stucco in layers (scratch, brown, finish), and blending texture/color. | Repairs often require specialized acrylic-based patches. For moisture issues, it may involve removing sections, repairing the substrate/insulation, addressing drainage, and reapplying the EIFS layers. |
| Lifespan | Well-installed traditional stucco is very durable and can last 50-80 years, with some installations lasting 100 years or more. Small repairs may be needed every 5-10 years. | The lifespan of EIFS can vary, but generally, it is designed for long-term durability. However, its longevity is highly dependent on proper installation, especially regarding moisture management. |
Your DIY Stucco Repair Toolkit and Materials
This section outlines the necessary tools and materials for a successful DIY stucco repair project, ensuring you’re well-prepared before you begin.
Essential Tools for the Job
Gathering the right tools is half the battle for any stucco repair.
- Hammer and Cold Chisel: For removing damaged stucco.
- Wire Brush: To clean the repair area of debris and dust for better adhesion.
- Trowels (Brick, Finishing, Pointing): A variety for applying, smoothing, and texturing the stucco.
- Mortar Hawk: A flat plate to hold stucco mix while you work.
- Protective Gear: Always wear gloves, goggles, and a dust mask/respirator for safety.
- Buckets: For mixing stucco and holding clean water.
- Tarps or Drop Cloths: To protect the ground and surrounding areas.
- Snips, Utility Knife, Roofing Nails: For cutting and securing metal lath and building paper.
- Wheelbarrow and Mortar Hoe: For mixing larger batches of stucco.

Choosing the Right Stucco Patch
Selecting the correct patching material is critical for a durable and seamless stucco repair.
- Pre-mixed Patch: Convenient for small hairline cracks and minor repairs. Brands like DAP or Sika offer ready-to-use formulas that are easy to tool and blend with existing stucco.
- Traditional Mix (Portland Cement, Sand, Lime): For larger repairs on traditional stucco, you’ll likely need to mix your own. An acrylic bonding agent can be added to improve adhesion.
- Acrylic-Based Patch for EIFS: If your home has synthetic stucco (EIFS), use a compatible acrylic-based patch to maintain the system’s flexibility and integrity.
- Pigments for Color Matching: For integrally colored stucco, add pigments that meet ASTM C 979 standards to your finish coat mix to match the existing color. For more in-depth information, the Stucco Repair guide from the Cement Association of Canada provides excellent insights.
The Step-by-Step Guide to Flawless Stucco Repair
This guide provides a detailed, multi-step process for repairing damaged stucco, from initial preparation to applying the final, textured coat for a seamless finish.
Step 1: Preparation and Lath Inspection
Proper preparation is the key to a lasting stucco repair.
- Remove Damaged Stucco: Use a hammer and chisel to carefully remove all loose and crumbling stucco until you reach a solid edge. Cut away any damaged metal mesh with snips.
- Widen Cracks: For cracks wider than a hairline, use a chisel to widen them to at least 1/4 inch with an inverted ‘V’ shape. This helps the new patch bond securely.
- Clean the Area: Use a wire brush to scrub away all loose particles, dust, and dirt. A clean surface is essential for good adhesion.
- Inspect and Repair Lath: Check the exposed metal lath for rust or damage. Replace any compromised sections with new, galvanized metal lath, securing it to the wall studs.
- Replace Building Paper: If the water-resistive barrier (building paper) is damaged, replace it. Cover the exposed area with two layers of Grade-D builder’s paper, securing it with roofing nails.
Step 2: Applying the Three Stucco Layers
Traditional stucco repair uses three layers for strength and durability. Each layer needs time to cure properly.
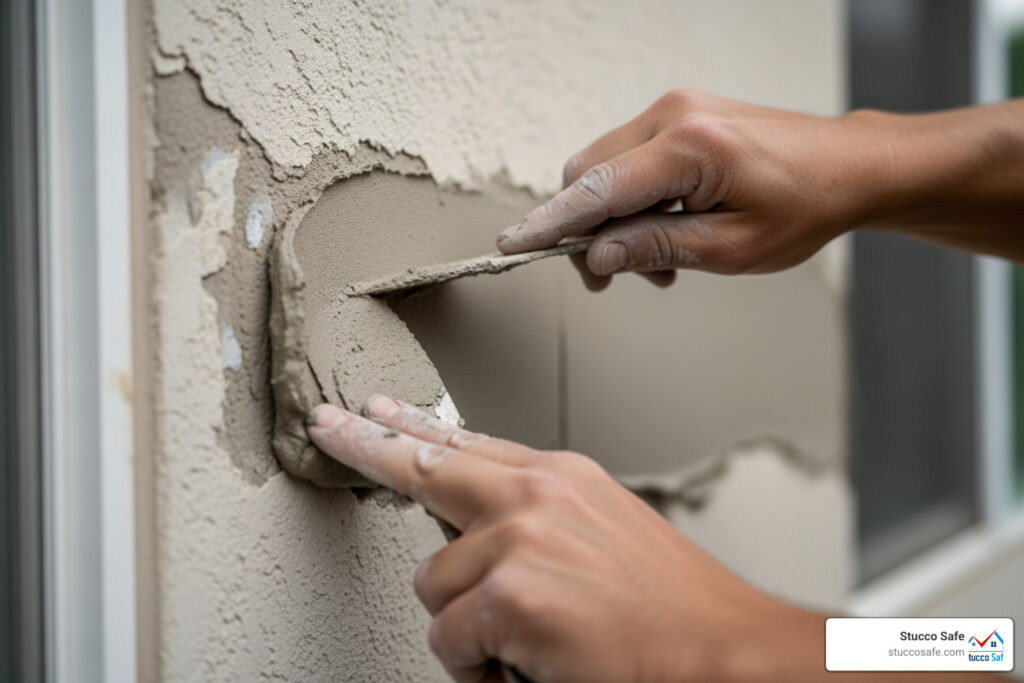
- Scratch Coat Application: Mix your stucco to a thick consistency. After wetting the edges of the old stucco, apply a 1/4-inch layer over the lath. Pack it firmly and smooth it with a trowel.
- Scoring Technique: Once the scratch coat loses its wet sheen, score it with horizontal grooves using a trowel. This creates a key for the next layer. Cover with plastic and let it cure for 24-48 hours, misting occasionally to keep it damp.
- Brown Coat Application: After the scratch coat cures, mist it and apply the 3/8-inch brown coat. This layer builds thickness and levels the surface. Smooth it to just below the existing stucco level. Cover and let it cure for 5 to 7 days, misting daily.
- Finish Coat Application: After the brown coat has cured for a week, mist it and apply the final finish coat. This thin layer is where you’ll match the texture. Blend it carefully with the surrounding stucco. Let it cure for another week before painting. For more details, see this How To Repair Stucco guide.
Step 3: Mastering Texture and Color Matching for your stucco repair
Matching the existing texture and color is crucial for an invisible stucco repair.
- Texture Matching Techniques: This is the trickiest part. Examine the existing texture (smooth, rough, swirled, or “dash” finish) and try to replicate it. Practice on a scrap piece of plywood first.
- Using a Trowel for Texture: Use a finishing trowel for smooth finishes or a rubber grout float for rougher textures.
- Using a Sponge for Texture: Dabbing or swirling with a damp sponge can create certain patterns.
- Dash Finish: Flick small amounts of stucco onto the surface with a brush.
- Color Matching with Pigments: If your stucco is integrally colored, add pigments to your finish coat mix. Test the color on a scrap piece and let it dry completely, as the color will lighten.
- Painting Over the Patch: The best way to ensure a perfect color match is to paint the entire wall or section after the patch has fully cured. Wait at least one week after applying the finish coat before painting.
- Waiting for the Patch to Cure: Before painting, let your stucco patch fully cure—at least one week after the finish coat is applied. Painting too soon can trap moisture and cause peeling. Use a breathable, alkaline-tolerant paint to allow the stucco to breathe.
Preventing Damage and Knowing When to Call a Professional
While many minor repairs are DIY-friendly, some situations require professional expertise to prevent further, more costly damage.
Best Practices for Stucco Maintenance
Preventative care can extend your stucco’s life and minimize the need for stucco repair.
- Regular Inspections: Inspect your stucco twice a year for cracks, stains, or bulging. Early detection is key, especially in areas like Southeastern PA, New Jersey, and Delaware.
- Keep it Clean: Gently wash your stucco to remove dirt and mildew that can trap moisture.
- Sealing and Painting: A breathable, water-repellent sealer or a fresh coat of permeable, alkaline-tolerant paint can seal hairline cracks and add protection.
- Gutter and Flashing Maintenance: Ensure gutters are clean and flashing around windows and doors is intact to prevent water from getting behind the stucco.
- Stucco Lifespan: Well-installed stucco can last 50-80 years or more, but may need minor repairs every 5-10 years. Following American Society for Testing and Materials (ASTM) standards is crucial for longevity.
Red Flags: When Your Stucco Repair Needs an Expert
While DIY repairs are great for minor issues, some signs mean it’s time to call a professional. Ignoring these can lead to costly structural damage.
- Widespread Cracking: Extensive spiderweb cracking or large cracks (wider than 1/16 inch) suggest deeper problems like structural movement or widespread moisture damage.
- Large Bulging Areas: Bulging or warping is a critical red flag for trapped moisture and severe damage to the underlying structure. This is not a cosmetic issue; it’s a structural one.
- Signs of Foundation Settling: Continuous, diagonal cracks from the ground up may indicate foundation issues that require a structural engineer’s assessment.
- Extensive Water Staining: Pervasive staining across large areas points to a systemic moisture problem that needs professional diagnosis and remediation.
- Uncertainty About the Root Cause: If you’re unsure of the problem’s root cause, especially if you suspect moisture, consult a professional. A poor repair can mask the real issue, allowing rot and mold to worsen. As experts in forensic testing, we specialize in detecting these hidden issues.
Frequently Asked Questions about Stucco Repair
What is the typical cost of professional stucco repair services?
The cost of professional stucco repair varies based on the extent of damage, stucco type, and complexity.
- Small Repairs: Patching minor cracks or holes typically costs between $150–$500.
- Per Square Foot Costs: For larger jobs, expect to pay $7–$11 per square foot for traditional stucco and $9–$15 for synthetic stucco (EIFS). Repair costs can be higher than new installation due to the need for matching and blending.
- Factors Affecting Cost: Complexity, height (requiring scaffolding), stucco type, and necessary prep work all influence the final price.
For professional stucco inspections, which are crucial for identifying hidden issues, the cost typically ranges from $495 to $1,595, depending on the property size.
How long does stucco typically last?
When properly installed and maintained, stucco is very durable, lasting 50–80 years or even longer.
Key factors influencing its lifespan include:
- Installation Quality: This is the most critical factor. Improper application, especially regarding moisture management, will shorten its life.
- Climate: Harsh weather, like the freeze-thaw cycles in Southeastern PA, New Jersey, and Delaware, can cause wear, requiring minor repairs every 5–10 years.
- Maintenance: Regular cleaning, sealing cracks, and maintaining gutters and flashing are essential for maximizing stucco’s longevity.
Why is moisture management so critical for stucco?
Moisture management is vital for the health of your stucco system. Here’s why:
- Stucco is Porous: Stucco can absorb water. If this water gets trapped behind the wall, it causes serious problems.
- Risks of Trapped Moisture: Trapped moisture is the main cause of stucco failure. It leads to:
- Wood Rot: The underlying wood sheathing and framing can rot, compromising your home’s structural integrity.
- Mold Growth: Damp, dark spaces behind stucco are perfect for mold, which can affect air quality and cause further damage.
- The Importance of a Water-Resistive Barrier (WRB): A properly installed Water-Resistive Barrier (WRB) is the last line of defense, preventing water from reaching the sheathing. If this barrier fails, moisture management fails.
Effective moisture management requires a complete system, including drainage planes, weep screeds, and proper flashing around all openings. Without these, even the toughest stucco is vulnerable.
Conclusion
We hope this extensive guide has shed light on the importance of stucco repair and empowered you with the knowledge to address minor issues yourself. From identifying the subtle signs of damage to understanding the meticulous steps of applying each stucco layer, we’ve covered the techniques for achieving a flawless finish.
While DIY repairs are suitable for small, cosmetic concerns, knowing when to call a professional is paramount. For a lasting solution, it’s crucial to identify and fix the underlying cause of stucco damage, not just the visible crack. A professional inspection can uncover hidden moisture issues before they lead to major structural problems.
At Stucco Safe, we specialize in forensic stucco inspection and stucco testing services for homeowners in Southeastern PA, New Jersey, and Delaware. Our certified inspectors use advanced testing methods to detect moisture and structural issues that often go unnoticed during a visual inspection. Don’t let hidden damage compromise your home’s integrity.