
How to fix cracks in exterior stucco walls: Ultimate Guide 2025
Why You Can’t Ignore Stucco Cracks
How to fix cracks in exterior stucco walls starts with understanding what you’re dealing with and acting fast. Here’s the quick answer:
Quick Fix Guide:
- For hairline cracks (< 1/8"): Clean debris, apply elastomeric caulk, smooth and feather edges
- For small cracks (1/8″ – 1/4″): Widen crack slightly, apply bonding agent, fill with pre-mixed stucco patch in thin layers
- For larger cracks (> 1/4″): Chisel out loose material, apply scratch coat (cure 24-48 hours), apply brown coat (cure 5-7 days), finish with texture-matched top coat
Allow proper curing time between coats and match texture before painting.
Stucco is one of the most durable wall surfaces you can have on your home—it can last 100 years when properly maintained. But here’s the reality: that durability comes with a catch. Stucco’s rigid nature means it will crack over time from settling, weather extremes, or moisture issues. What starts as a hairline crack today can become a water intrusion problem tomorrow, leading to hidden damage behind the facade that costs thousands to repair.
The good news? Most cracks are fixable with the right approach. Hairline cracks might only need a quick patch, while water stains or multiple cracks could signal structural concerns that need immediate attention. The key is knowing the difference.
Why act now? Every crack is a potential entry point for moisture. When water gets behind your stucco, it can damage the sheathing and framing without any visible signs on the exterior. By the time you see dark staining, damp interior drywall, or mold spots, the damage may already be extensive.
I’m Gabe Kesslick, and I’ve been investigating and repairing stucco issues since 2001. Through my work as an EDI Level 2 Certified Stucco Inspector, I’ve seen how knowing how to fix cracks in exterior stucco walls properly can save homeowners from costly remediation down the road. My goal is to give you the knowledge to tackle repairs correctly—or recognize when professional help is needed.
, pattern cracks (forming geometric patterns, may indicate settlement), and structural cracks (wider than 1/4 inch, often with displacement or water stains, requiring professional assessment). Each crack type includes visual representation, typical causes, and recommended repair approach. - how to fix cracks in exterior stucco walls infographic")
Understanding Stucco Cracks: From Cause to Assessment
Before you grab your tools and start learning how to fix cracks in exterior stucco walls, let’s take a step back. Understanding why cracks appear and how serious they are makes all the difference between a repair that lasts and one that fails in six months.
Here’s something most homeowners don’t realize: stucco’s greatest strength is also its weakness. That incredible durability comes from its rigid structure, but rigidity means it doesn’t flex when your house shifts or temperatures swing. The result? Cracks are practically inevitable over time.
The encouraging news is that most cracks start small—hairline fractures that widen gradually. Cracks up to 1/4-inch wide are typically manageable DIY repairs. But here’s where it gets serious: if you see water stains accompanying those cracks, you’re looking at potential structural concerns that need immediate attention. Water doesn’t just sit on the surface—it infiltrates, and that’s when expensive damage begins.
Identifying the Cause of the Crack
Think of cracks as your home’s way of communicating. They’re telling you something important, and understanding their message helps prevent them from coming back after you patch them.
House settling and structural movement top the list of crack causes. Your home is constantly making tiny adjustments—settling into its foundation, responding to soil shifts beneath it. This natural movement stresses rigid stucco, especially around corners, windows, and doors where the wall plane changes. It’s completely normal, but it explains why those areas crack first.
Then there’s moisture intrusion, which I consider stucco’s arch-nemesis. Stucco is porous by nature, so when moisture gets in, it expands and contracts with temperature changes. This constant cycle weakens the material from within. Even worse, water that gets behind your stucco can cause catastrophic damage you won’t see until it’s extensive. Our guide on Stucco Moisture Problems explains how this hidden damage develops—and trust me, you don’t want to find it the hard way.
Thermal expansion and contraction work hand-in-hand with moisture issues. When your stucco bakes in summer sun, it expands. When winter cold hits, it contracts. Repeat this cycle hundreds of times, add in freeze-thaw conditions, and you’ve got the perfect recipe for cracks. This is especially problematic on south and west-facing walls that take the brunt of afternoon heat.
Sometimes the problem started before you even moved in. Poor installation or shortcuts during the original application leave stucco vulnerable from day one. Maybe the contractor skimped on reinforcement mesh. Perhaps they didn’t seal properly around windows. I’ve seen countless homes built between 1993 and 2006 with serious issues—during that period, incorrect building codes led to an estimated 90% failure rate in some areas. If your home falls in that range, extra vigilance is warranted.
Even perfectly installed stucco faces an enemy it can’t beat: aging. After decades of exposure, stucco becomes more brittle and less forgiving. The elasticity it once had diminishes, making cracks more likely even from minor stress.
Finally, there’s impact damage—the straightforward stuff. A baseball through the wall, hail from a severe storm, or that time you backed the truck up a bit too far. These create localized damage that’s usually obvious and easier to diagnose than the other causes.
For a comprehensive look at how stucco fails, check out our detailed resource on Stucco Cracks. And if you’re noticing bubbling alongside cracks, our article on Bubbling Stucco: A Guide to Prevention and Repair will help you understand that specific problem.
How to Assess Crack Severity
Now that you know what causes cracks, let’s figure out what you’re actually dealing with. This assessment determines whether you’re looking at a weekend DIY project or a situation that needs professional eyes.
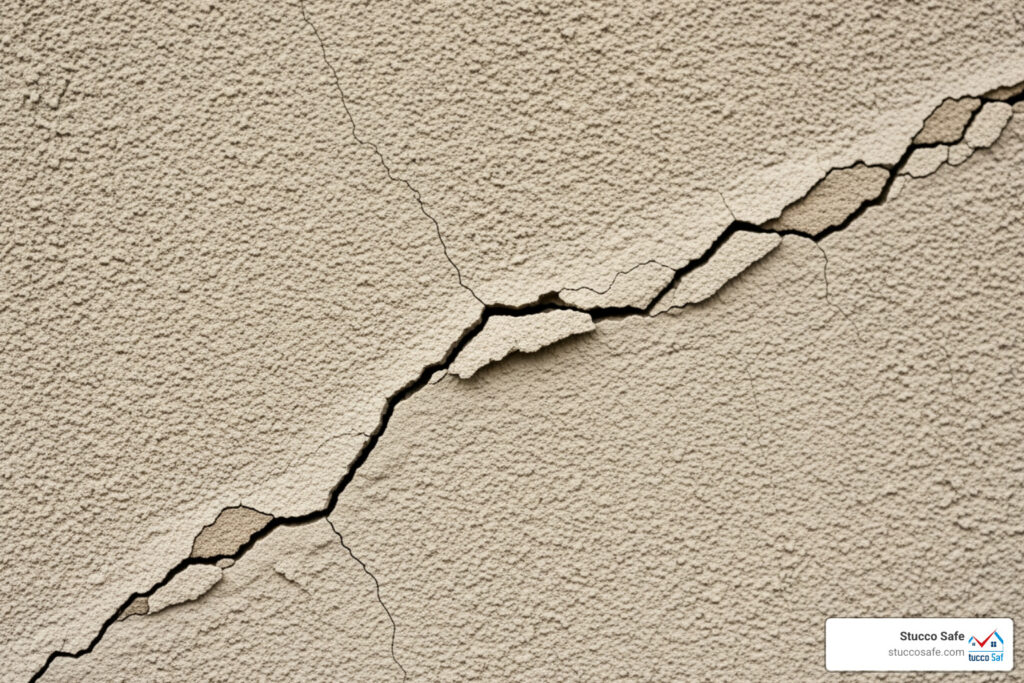
Start with a thorough visual inspection. Walk around your entire house, looking carefully at every wall section. Are you seeing a single crack, or multiple cracks forming patterns? Pattern cracking often indicates settlement or movement issues. Look closely for water stains—those telltale dark streaks or discoloration around cracks. These are serious warning signs that shouldn’t be ignored. Our guide on Stucco Water Stains helps you interpret what those stains mean.
Here’s a simple trick I teach every homeowner: the credit card test. Grab a credit card and try sliding it into the crack. If the crack is too narrow to fit the card edge, you’ve got a hairline crack—usually cosmetic and easily fixed with elastomeric caulk. If the card edge fits snugly but doesn’t go deep, it’s a small crack (typically 1/8″ to 1/4″ wide), perfect for DIY repair with patching compounds. But if that credit card slides in easily and goes deep, or if the crack is wider than 1/4″, you’re dealing with something more substantial that might need professional assessment.
Check for movement by running your hand across the crack. Does one side feel higher than the other? This displacement suggests structural movement rather than simple surface cracking. That’s usually beyond a simple patch job—the underlying issue needs addressing first.
Signs of moisture go beyond visible stains. Press gently on the stucco around cracks. Does it feel soft or spongy? That’s moisture damage. Look for discoloration, darker patches, or chalky white deposits (efflorescence). If you detect a musty odor near the crack, water has been infiltrating for a while.
Finally, examine the surrounding area carefully. Is the stucco bubbling, peeling, or crumbling near the crack? These indicate delamination—the stucco separating from its base—or advanced moisture damage. You can’t just patch over these issues; they require proper repair of the underlying problem first.
A proper assessment takes time, but it’s time well spent. For additional DIY guidance on making these determinations, the article DIY Stucco Repair: Make Your Exterior Look New Again offers helpful perspectives on tackling repairs yourself.
Gearing Up: Tools, Materials, and Surface Prep
Before you dive into actually fixing those cracks, let’s talk about getting ready. Think of it like preparing for a recipe—having everything measured and laid out makes the whole process so much smoother. And honestly? Proper preparation is what separates a repair that lasts from one that fails in six months.

Essential Tools and Materials
Walking back and forth to the garage or hardware store mid-project is frustrating. Trust me, I’ve been there. So let’s gather everything you’ll need before you start.
For tools, you’ll want a hammer and cold chisel for widening cracks and chipping away loose material—this is crucial prep work that many people skip. A wire brush or stiff-bristled brush helps you thoroughly clean out debris from the crack. You’ll need trowels—both a finishing trowel and a smaller margin trowel work great—for mixing and applying your patch material. A rubber float is also excellent for pressing the material in and blending edges. Keep a putty knife or 5-in-1 painter’s tool handy for scraping and feathering.
You’ll also need a 5-gallon bucket for mixing, along with a stir stick or mixing paddle. Don’t forget a sturdy ladder if you’re working above ground level, and a garden hose with spray nozzle for keeping your repair moist during curing.
Now for the safety gear—and please don’t skip this part. Safety glasses or goggles are absolutely non-negotiable. Wet stucco contains alkalis that can cause chemical burns, so gloves protect your hands. A dust mask keeps you from breathing in stucco dust when you’re chiseling or brushing.
As for materials, you’ll need stucco patching compound (we’ll talk about which type in a moment), elastomeric caulk for those hairline cracks, and an acrylic bonding agent to help new stucco stick to old. Have plenty of water on hand for mixing and misting. Plastic sheeting or tarps will protect your repair while it cures, and keep some rags nearby for cleanup.
Choosing the Right Stucco Patch
Not all patches are created equal, and using the wrong product is one of the most common mistakes I see homeowners make when learning how to fix cracks in exterior stucco walls.
For hairline cracks less than 1/8 inch wide, elastomeric caulk is your friend. It’s flexible, paintable, and perfect for those tiny surface cracks. Just clean the crack, apply the caulk, smooth it out, and you’re done.
Pre-mixed stucco patch works beautifully for small cracks and holes up to about 1/4 inch wide. It comes ready to use straight from the container—no mixing required—which makes it convenient for quick repairs. The consistency is already right, so there’s less guesswork involved.
For larger repairs—anything wider than 1/4 inch or deeper than an inch—you’ll want traditional stucco mix. This is typically a dry powder that you mix with water to achieve the right consistency (think peanut butter). It’s more work, but it’s also stronger and more durable for bigger jobs. You’ll often apply this in multiple coats, which we’ll cover in detail in the next section.
Surface Preparation and Safety
Here’s where many DIY repairs go wrong: inadequate surface prep. You can use the best materials in the world, but if you’re applying them to a dirty, loose surface, they won’t bond properly.
Start by cleaning out the crack thoroughly. Use your wire brush to remove all dust, dirt, loose stucco bits, and any old paint or caulk. For larger cracks, you’ll actually want to widen them slightly using your cold chisel and hammer—this might seem counterintuitive, but it creates a better surface for the patch to grip. Undercut the crack slightly (make it wider at the bottom than at the top) so the patch material can really lock in.
Remove any loose or crumbling stucco around the damaged area. If it sounds hollow when you tap it or feels soft, it needs to come out. Better to remove it now than have your patch fail later because it was sitting on unstable material. Check out our guide on How to Repair Exterior Stucco Cracks for more detailed preparation techniques, and Stucco Repair: How To Fix Cracks and Blisters offers additional visual guidance.
Once everything’s clean and prepped, use your hose to lightly mist the area. Stucco needs to cure, not dry out, and a damp surface helps the new material bond better and prevents it from drying too quickly.
Now, about those safety precautions: Wet cement is highly alkaline and can cause chemical burns if left on your skin. Always wear gloves when handling stucco materials, and if you do get any on your skin, wash it off immediately with plenty of water. Your eyes are especially vulnerable, so keep those safety glasses on. And when you’re chiseling or grinding, that dust mask protects your lungs.
Taking these precautions seriously means you’ll finish your repair safely and with all your fingers intact—which is definitely the goal!