
How to Test for Mold: 7 Powerful Ways to Avoid Disaster 2025
Why Testing for Mold is Critical for Your Home’s Health
How to test for mold in your home involves four main approaches: visual inspection for visible growth and moisture signs, DIY test kits using petri dishes or swabs, professional air sampling with spore traps, and surface sampling for lab analysis. Here’s what you need to know:
Quick Testing Methods:
– Visual inspection – Look for dark spots, water stains, musty odors
– DIY kits – $10-$50 petri dish or swab tests (48-hour results)
– Professional air sampling – Spore traps compare indoor/outdoor levels
– Surface sampling – Lab analysis identifies specific mold species
– Moisture detection – Use hygrometers and thermal imaging
That musty smell in your basement isn’t just unpleasant – it could signal a serious problem lurking behind your walls. Mold testing reveals hidden threats that can damage both your health and your home’s structure, often growing undetected for months after water intrusion.
According to EPA data, about 50% of homes experience water damage at some point, and mold can begin growing within just 24-48 hours of moisture exposure. Most dangerous mold growth happens where you can’t see it – inside wall cavities, under flooring, or in HVAC systems.
Why act now? Early detection saves thousands in remediation costs and protects your family from respiratory issues, allergic reactions, and other health problems linked to mold exposure.
I’m Gabe Kesslick, and I’ve been investigating moisture intrusion and mold issues in homes since 2001, with certifications in building envelope forensics and moisture detection. Through my work at Stucco Safe, I’ve learned that understanding how to test for mold properly can mean the difference between a minor cleanup and a major structural repair.

Basic how to test for mold glossary:
– home inspection basement moisture
– home mold inspection
– how to detect mold in your home
Why Mold Matters: Health, Safety & Hidden Damage
Here’s something that might surprise you: that “old house smell” could actually be costing you thousands of dollars and putting your family’s health at risk. Mold isn’t just an unsightly nuisance – it’s a serious threat that can literally eat away at your home’s structure while making you sick.
Research shows that up to 50% of homes have some degree of dampness that increases mold growth risk, while about 75% of homes inspected show significant mold or bacterial contamination, often from water leaks that homeowners never even noticed.
When mold takes hold, it produces mycotoxins – toxic substances that become airborne and can trigger everything from mild irritation to severe respiratory problems. Hidden mold growth can compromise wooden framing, requiring extensive reconstruction that can cost hundreds of thousands of dollars.
Insurance companies know this too, which is why they’re increasingly scrutinizing mold claims. Early detection and proper documentation become crucial for getting coverage when you need it most. This is exactly why understanding how to detect mold in your home isn’t just helpful – it’s essential.
Common Symptoms of Mold Exposure
Your body often knows there’s a mold problem before your eyes do. If you feel better when you’re away from home and worse when you return, that’s your first clue that something’s wrong with your indoor air quality.
The most telling symptoms include persistent stuffy nose, chronic coughing that seems worse at home, wheezing or difficulty breathing, throat irritation, unexplained fatigue that mysteriously improves during vacations, and location-specific headaches.
Children and pets are often the canaries in the coal mine when it comes to mold exposure. Kids may experience worsened asthma symptoms, while pets may show excessive scratching, respiratory distress, or unusual lethargy.
Visible vs. Invisible Mold Signs
The mold you can see is often just the tip of the iceberg. While obvious dark discoloration or fuzzy growth needs immediate attention, the real problems usually hide where you can’t see them.
The invisible warning signs are more important to recognize. That persistent musty odor with no obvious source is often your nose detecting mold colonies growing behind walls or under flooring. Water stains, peeling, bubbling, or cracking paint, warped flooring, and humidity levels consistently above 50% all point to moisture issues that need investigation.

Research shows that relying on visual inspection and musty odors is actually more reliable than short-term air sampling for identifying mold problems. Your senses are pretty good detectors – trust them when something doesn’t seem right.
Pinpointing the Problem: When & Where to Look for Mold
Timing is everything when it comes to how to test for mold effectively. Mold needs three things to thrive: moisture, something organic to eat (like wood or drywall), and temperatures between 40-100°F. Since most homes provide perfect temperature and plenty of organic materials, moisture becomes the key factor you can control.
The 24-48 hour rule is critical to remember. That’s how quickly mold can begin growing after water intrusion. The clock starts ticking the moment water touches building materials.
When to test immediately: after any flooding, pipe leaks, or roof damage, even if the area seems dry. HVAC problems deserve special attention since they can spread mold spores throughout your entire home. If you’re buying a home, especially an older property, testing should happen before you sign papers.
Watch your humidity levels closely. When indoor humidity consistently stays above 50%, you’re creating a mold-friendly environment. Basements naturally tend toward dampness, while bathrooms and kitchens generate moisture daily.
Hidden moisture sources often surprise homeowners. Condensation around windows and doors, moisture behind walls near plumbing, and damp areas under carpeting all provide ideal mold habitats. HVAC systems and ductwork can harbor mold and distribute it throughout your home.
Essential detection tools make the difference between guessing and knowing. Hygrometers measure relative humidity (aim for 30-50%), while moisture meters detect moisture in building materials before visible damage appears. Thermal imaging cameras reveal temperature differences that indicate hidden moisture problems.

In our work across Chester County, Philadelphia, and South Jersey, we’ve learned that homes with drainage issues, aging stucco exteriors, or basement moisture problems face the highest mold risks. For thorough moisture investigation, our Home Mold Inspection service uses forensic testing methods to uncover issues that basic visual inspection might miss.
How to Test for Mold: Step-by-Step Methods
Testing for mold becomes your next critical step when visual inspection reveals potential problems. The key is understanding how to test for mold effectively while matching your approach to both your situation and budget.
Safety comes first, always. Before you begin any mold testing, gear up properly. An N95 respirator mask is your minimum protection. Disposable gloves and protective clothing keep contamination off your skin. Open windows for ventilation, but avoid creating drafts that might stir up spores. Keep kids and pets away from testing areas.
The CDC and NIOSH don’t actually recommend routine air sampling for mold. Visual inspections combined with detecting musty odors often provide more reliable information than expensive air tests. However, testing becomes valuable when you need documentation for insurance claims, real estate transactions, or when hidden mold is suspected.
The cost and accuracy of different testing methods vary dramatically. DIY kits run $10-$50 with moderate accuracy for initial screening. Professional air sampling costs $400-$1,000 with high accuracy for detecting hidden mold. Surface sampling runs $300-$600 and provides excellent species identification. Comprehensive professional assessments range from $500-$1,500.
DIY Mold Test Kits: how to test for mold on a budget
DIY mold test kits offer an affordable entry point into mold detection for $10-$50, providing basic screening results within 48 hours.
Petri dish tests work like tiny science experiments in your home. You place open dishes containing growth medium in suspect areas for 24-48 hours, allowing mold spores to settle and grow into visible colonies. The key is comparing indoor results to outdoor control samples.
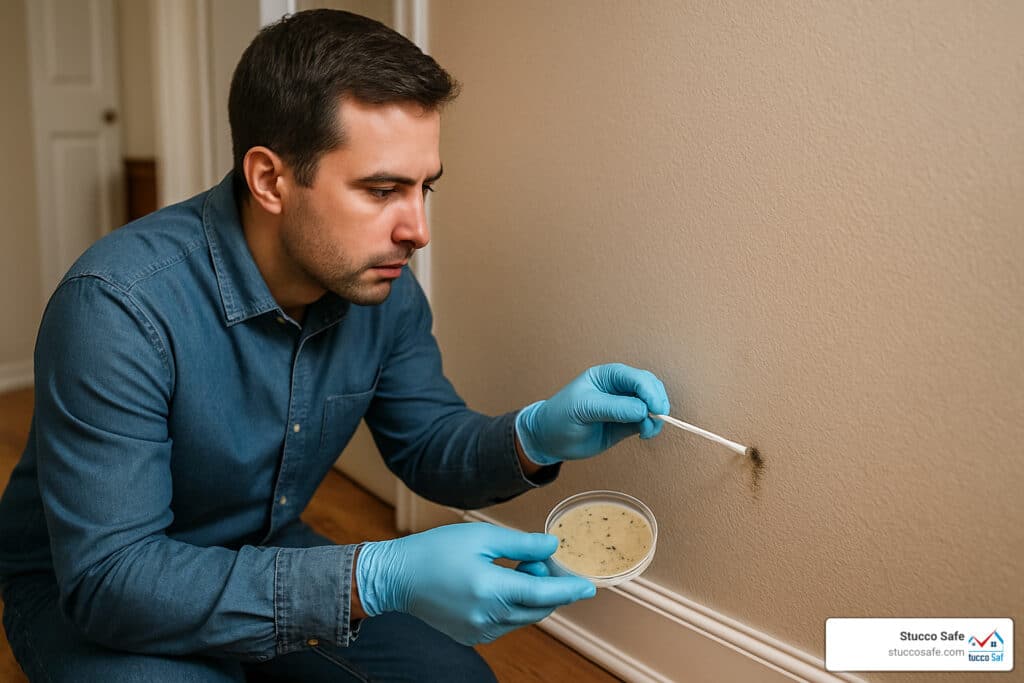
Swab tests offer the most reliable DIY approach for surface mold. You directly sample suspicious growth with a sterile swab, then either send it to a lab or use instant color-change tests.
Tape lift samples capture spores and mold fragments from surfaces. Press clear tape against the suspect area, then examine it under magnification or send for analysis.

Here’s your step-by-step DIY testing process: Start with preparation 24 hours before testing by closing windows and doors, then turning off HVAC systems. Gather all materials and safety equipment, then document your testing locations with photos. During sample collection, follow kit instructions precisely and label each sample clearly with location, date, and time. Always take an outdoor control sample simultaneously.
Understanding DIY limitations helps set realistic expectations. These tests cannot identify specific mold species or toxicity levels. Results may not represent typical conditions since they capture just a moment in time. False positives are common, and DIY kits cannot detect mold behind walls or provide guidance on health risks.
For comprehensive guidance on when DIY methods work versus when professional help is necessary, check out our Home Mold Test resources.
Professional Assessments: how to test for mold like the pros
Professional mold testing delivers the accuracy and comprehensive analysis that DIY kits simply cannot match. Certified professionals use sophisticated equipment and follow standardized protocols that provide reliable, legally defensible results.
The professional process starts with a systematic visual inspection covering every accessible area. Inspectors use thermal imaging cameras to detect hidden moisture patterns, while moisture meters provide precise readings in building materials.
Air sampling with spore traps represents the gold standard of professional testing. Air-O-Cell® cassettes capture airborne particles while calibrated pumps ensure consistent sample volumes. Indoor samples are compared to outdoor baselines to determine if indoor levels are abnormally high.
Surface sampling techniques complement air testing by examining specific suspect areas. Tape lifts capture material from surfaces, while bulk samples analyze contaminated materials directly.
Professional certifications matter significantly when choosing an inspector. Look for CIEC (Certified Indoor Environmental Consultant), CMC (Certified Microbial Consultant), or ACAC (American Council for Accredited Certification) credentials.
Professional testing becomes essential when mold coverage exceeds 10 square feet, when hidden mold is suspected behind walls, or when health symptoms require documentation. Real estate transactions often need professional verification, and insurance claims require professional reports.
For homes throughout Southeastern Pennsylvania, New Jersey, and Delaware, our Mold Safe Mold Testing service combines professional air sampling, surface testing, and thermal imaging for comprehensive mold assessment.
The EPA’s guidance on mold testing standards provides valuable information for homeowners trying to decide when professional testing adds value beyond basic visual inspection.
Making Sense of Results & Choosing Remediation
Getting your mold test results back can feel overwhelming, but understanding what those numbers and findings mean helps you make smart decisions about protecting your home and family. How to test for mold is only half the battle – interpreting results correctly determines your next steps.
When looking at DIY test results, focus on comparing what grew indoors versus your outdoor control sample. If your indoor petri dishes show two to three times more colony growth than the outdoor sample, that’s a red flag worth investigating further.
Professional lab reports provide detailed information, including spore concentrations measured in spores per cubic meter of air. The key insight comes from comparing indoor levels to outdoor baselines. Your indoor air shouldn’t have significantly higher mold spore counts than outside air.

The species identification section tells you exactly what types of mold are present. Some species like Stachybotrys (black mold) or Aspergillus carry higher health risks and require more aggressive remediation approaches.
Contamination covering less than 10 square feet can often be handled with careful DIY cleanup using proper safety gear and detergent solutions. The critical part is addressing whatever moisture source allowed the mold to grow.
Large-scale contamination over 10 square feet demands professional remediation. Professional remediators use specialized equipment and follow strict protocols to safely remove contamination without spreading spores throughout your home.
When tests reveal hidden mold behind walls or in HVAC systems, you’ll need professional investigation to determine the full extent of the problem. This might require some destructive testing – carefully removing sections of drywall to access contaminated areas.
Post-remediation clearance testing confirms that cleanup efforts actually worked. This involves both visual inspection and air sampling to verify that spore levels have dropped to acceptable ranges.
For homes with stucco exteriors, mold problems often signal deeper moisture intrusion issues within the building envelope. Our Mold Inspection in Stucco Homes service addresses both surface mold and the underlying structural problems that allow water penetration.
Keeping Mold Away: Prevention & Continuous Monitoring
Think of mold prevention like maintaining your car – a little regular attention saves you from expensive repairs down the road. Preventing mold is far easier and cheaper than dealing with an established problem.
The secret lies in controlling moisture, since mold can’t survive without it. When you understand how to test for mold, you also learn what conditions allow it to thrive – and how to eliminate those conditions before problems start.
Humidity management forms your first line of defense. Keep indoor humidity between 30-50% year-round, and you’ll create an environment where mold simply can’t establish itself. Place digital hygrometers throughout your home, especially in basements and upper floors where humidity tends to be highest.
Dehumidifiers become your best friend in naturally damp areas like basements and crawl spaces. Modern units can be set to maintain specific humidity levels automatically. During our inspections across Pennsylvania and New Jersey, we consistently find that homes with properly maintained dehumidifiers rarely develop serious mold problems.

Ventilation improvements make a dramatic difference in preventing moisture buildup. Install exhaust fans in bathrooms and kitchens that run during use and for at least 30 minutes afterward. Your HVAC system plays a crucial role too – clean filters regularly and consider upgrading to HEPA-rated options that capture mold spores.
Water intrusion prevention stops problems at their source. Fix any leaks within 24-48 hours – this is the critical window before mold begins growing. Maintain proper grading so water flows away from your foundation, clean gutters regularly, and seal any cracks in foundation walls or exterior surfaces.
Smart monitoring systems take the guesswork out of prevention. WiFi-enabled humidity sensors can alert your smartphone when conditions become favorable for mold growth, even when you’re away from home.
Regular inspection schedules catch problems early. We recommend monthly visual checks of high-risk areas like basements, bathrooms, and around windows. Look for the same signs you’d check when learning how to test for mold – water stains, musty odors, or visible discoloration.
Choose mold-resistant materials during renovations. Mold-resistant drywall, paints with antimicrobial properties, and proper vapor barriers in crawl spaces all contribute to long-term prevention.
Research from Lawrence Berkeley National Laboratory on building dampness prevalence confirms that proactive moisture control significantly reduces mold risk compared to waiting for problems to develop.
Prevention isn’t just about avoiding mold – it’s about creating healthier indoor air quality for your family while protecting your home’s structural integrity and value.
Frequently Asked Questions about Mold Testing
Let’s tackle the most common questions homeowners ask about how to test for mold. After years of investigating moisture problems in homes across Pennsylvania, New Jersey, and Delaware, I’ve heard these concerns countless times.
How accurate are DIY kits compared to professional testing?
DIY kits work okay for basic screening – they can tell you if mold spores are present in the air or on surfaces. But these $10-$50 kits can’t identify which specific types of mold you’re dealing with, and they certainly can’t tell you about health risks or toxicity levels.
The bigger problem? False positives happen all the time with DIY testing. Every home has some mold spores floating around naturally, so a positive result doesn’t necessarily mean you have a problem. Without proper interpretation, you might panic over normal background levels or miss serious contamination hiding where the kit can’t detect it.
Professional testing follows strict laboratory protocols – either AIHA or ACGIH standards that ensure reliable, consistent results. We use calibrated equipment, controlled sampling procedures, and accredited labs that can identify specific mold species and their potential health impacts.
Do I need to test if I can already see or smell mold?
This might surprise you, but both the CDC and EPA actually say testing usually isn’t necessary when mold is obviously present. If you can see it growing on your walls or smell that unmistakable musty odor, you already have your answer.
Visual inspection beats sampling every time for obvious contamination. Why spend money confirming what your eyes and nose already know? Research consistently shows that your senses are more reliable than air samples for detecting mold problems.
But testing does add value in specific situations. When you’re dealing with insurance claims, you need professional documentation. Real estate transactions often require verification from certified inspectors. And if you’re experiencing health symptoms but can’t locate the source, professional testing can uncover hidden mold behind walls or in HVAC systems.
What certifications should a mold inspector have?
The gold standard certifications include CIEC (Certified Indoor Environmental Consultant) – this comprehensive credential covers indoor air quality, moisture assessment, and mold investigation. CMC (Certified Microbial Consultant) specifically focuses on mold and bacterial contamination, while ACAC credentials demonstrate ongoing professional development.
Don’t forget about state licensing requirements – many states now require specific mold inspector licenses beyond general certifications. Your inspector should also carry professional liability insurance.
Here’s a major red flag: avoid inspectors who also perform remediation work. This creates an obvious conflict of interest. Legitimate professionals stick to inspection and testing, leaving remediation to separate companies.
At Stucco Safe, our certified inspectors maintain credentials from recognized professional organizations and follow forensic testing protocols. We focus exclusively on assessment and testing, never remediation, so you get unbiased results you can trust.
Conclusion
Understanding how to test for mold in your home isn’t just about following a checklist – it’s about protecting the people and place you care about most. You now have the knowledge to make smart decisions about your home’s health.
Start with what you can see and smell. Most mold problems announce themselves through musty odors, water stains, or visible growth. This costs you nothing but a few minutes of careful observation, yet it’s often the most reliable way to identify issues.
When you need to dig deeper, choose your testing approach based on your specific situation. DIY kits work great for basic peace of mind and cost just $10-$50, while professional testing becomes essential when you’re dealing with health concerns, real estate transactions, or suspected contamination behind walls.
Time matters more than perfection. Mold can start growing within 24-48 hours of moisture exposure, so quick action beats perfect action every time. Small areas under 10 square feet? You can often handle the cleanup yourself with proper safety gear. Larger contamination areas require professional remediation.
The real secret to winning the mold battle is focusing on prevention rather than reaction. Keep humidity between 30-50%, fix leaks immediately, ensure proper ventilation, and maintain your home’s exterior. These simple steps prevent most mold problems before they start and cost far less than dealing with contamination after it’s established.
Take action today by doing a visual inspection of your basement, bathrooms, and other high-risk areas. Document any concerns with photos, check your humidity levels, and address obvious moisture sources right away. When you’re unsure about what you’re seeing or smelling, professional assessment provides the clarity and peace of mind you need.
For homeowners throughout Southeastern Pennsylvania, New Jersey, and Delaware, Stucco Safe offers certified forensic mold inspections that go beyond surface testing. We identify both the contamination and the underlying structural issues that allow moisture intrusion – because fixing the symptom without addressing the cause just sets you up for future problems.
Your home’s health depends on your attention, but it doesn’t require perfection. With the right knowledge and a proactive approach, keeping mold at bay becomes just another part of caring for your home and family.
For comprehensive professional mold testing services that combine building science expertise with forensic investigation methods, explore our mold testing services designed specifically for the unique challenges of homes in our region.