
Best anchors for stucco: Secure Hold 2025
Why Finding the Right Stucco Anchors Makes All the Difference
Best anchors for stucco keep valuables on the wall and costly repairs off your to-do list. Because stucco is a thin layer of cement—not soft drywall—ordinary screws usually pulverize the surface or create cracks.
Quick Answer: The Best Stucco Anchors by Use Case
- Light items (under 10 lbs): Plastic sleeve anchors or nylon expansion anchors
- Medium loads (10-50 lbs): Metal sleeve anchors or concrete screws
- Heavy items (over 50 lbs): Wedge anchors or toggle bolts anchored into studs
- Outdoor use: Stainless steel or galvanized anchors for corrosion resistance
A regular screw concentrates all the weight on a pinpoint. Stucco responds by crumbling or spider-cracking. Purpose-made anchors expand behind the finish coat, spreading the load so the hard but brittle surface stays intact.
Why should homeowners care? Every crack or loose fastener is a hidden water path. On many stucco homes—especially those built between 1993 and 2006—moisture intrusion can rot framing and erode property value.
I’m Gabe Kesslick, an EDI Level 2 Certified Stucco Inspector. After two decades of forensic testing across Southeastern Pennsylvania, New Jersey and Delaware, I can promise that choosing the right anchor, drilling correctly and sealing the hole is the cheapest insurance you’ll ever buy.

Understanding Stucco and Why Special Anchors are Crucial
To understand why you need the best anchors for stucco, you first need to appreciate what makes stucco so different from other wall materials. Think of stucco as nature’s concrete armor for your home – it’s incredibly tough, but that toughness comes with a price.
Stucco starts with a mixture of Portland cement, sand, and water that gets applied over wire or metal lath in multiple layers. You’ve got your base coat that bonds to the lath, followed by a brown coat that creates the bulk and strength, and finally a finish coat that gives you that distinctive textured appearance we all recognize.
This layered system is what makes stucco such an effective moisture barrier stucco when properly installed. The cement-based composition creates a surface that laughs at insects, doesn’t rot like wood, and can handle decades of weather without breaking a sweat.
But here’s where things get tricky for homeowners. That same cement composition that makes stucco so durable also makes it incredibly brittle. Unlike drywall that has some give, or wood that you can drive a screw into, stucco is hard as a rock and about as forgiving as your high school math teacher.
The Problem with Standard Screws
I’ve seen countless homeowners grab a regular wood screw or drywall screw and try to mount something on their stucco wall. It’s like trying to hang a picture with a toothpick – it might work for about five minutes, but you’re setting yourself up for disappointment.
The cement surface simply won’t let screws bite and hold securely. Instead of creating threads that grip, the drilling action often just creates loose cement powder that prevents any real connection. It’s like trying to anchor into sand – there’s nothing for the screw to grab onto.
Even worse, when you drive a screw directly into stucco, you’re creating what engineers call stress concentration. All the weight of whatever you’re hanging gets focused on one tiny point, and stucco responds to that kind of treatment by cracking. These cracks aren’t just ugly – they can become entry points for moisture that lead to serious stucco siding problems.
The real kicker is long-term failure. Even if your screw seems secure at first, stucco expands and contracts with temperature changes. That constant movement will eventually work even the most stubborn screw loose, often taking a chunk of your wall with it.
How Stucco Anchors Provide a Secure Hold
The best anchors for stucco work with the material’s natural properties instead of fighting against them. These clever little devices use an expansion principle that’s actually quite brilliant when you think about it.
When you install a proper stucco anchor, it expands inside the drilled hole like a tiny umbrella opening up. This creates a mechanical lock that distributes the weight across a much larger surface area. Instead of all the stress being concentrated on one point, it gets spread out over the entire expanded surface of the anchor.
This is the key difference – regular screws try to force their way into an unwilling surface, while stucco anchors create a partnership with the wall. The expansion mechanism actually uses the stucco’s hardness as an advantage, creating a connection that gets stronger under load rather than weaker.
The result is a mounting system that protects your wall from cracking while providing the secure hold you need for everything from lightweight decorations to heavy outdoor fixtures. It’s the difference between working with your stucco’s natural strengths and fighting against them.
A Guide to the Different Types of Stucco Anchors

Walking into a hardware store looking for stucco anchors can feel overwhelming – there are so many options! But don’t worry, each type serves a specific purpose. Understanding what makes each anchor special will help you choose exactly what you need for your project.
The key is matching the anchor to your specific needs. Light-duty applications like hanging a welcome sign need different anchors than heavy-duty applications like mounting a mailbox. Material type and corrosion resistance become crucial factors, especially for outdoor installations where moisture and weather can wreak havoc on inferior hardware.
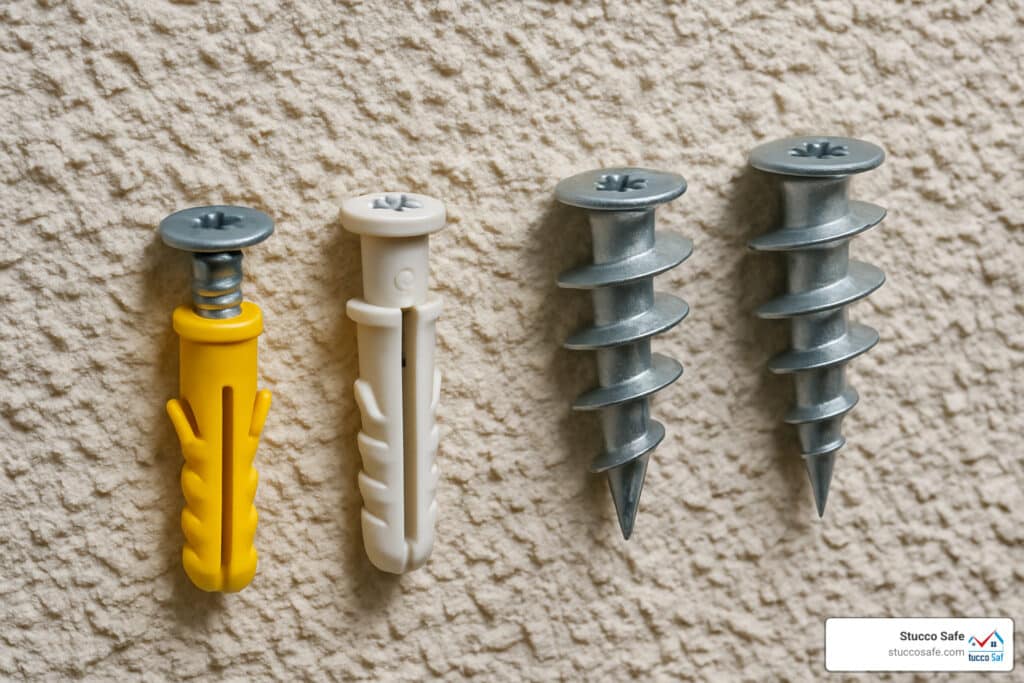
Plastic and Nylon Sleeve Anchors
These are your go-to choice for lightweight items around the house. Made from durable plastic or nylon, these anchors are perfect workhorses that won’t let you down for everyday mounting needs.
They’re ideal for picture frames that bring personality to your walls, house numbers that help visitors find your home, and other decorative touches that make your space feel welcoming. The beauty of these anchors lies in their simplicity – the expansion mechanism works by having the screw force the anchor to spread out and grip the hole walls.
What makes them appealing is their ease of use. You don’t need special tools or advanced DIY skills to get great results. They work well for both interior use and exterior use, though you’ll want to consider upgraded materials for outdoor applications that face harsh weather conditions.
Metal Expansion Anchors (Sleeve & Wedge)
When you need to mount something substantial, metal anchors step up to handle medium to heavy loads with confidence. These are the anchors you’ll reach for when mounting handrails that need to support human weight or hose reels that get pulled and tugged regularly.

The high holding power comes from their robust construction and superior expansion mechanism. These anchors provide excellent durability and work best when you’re fastening into solid masonry substrate behind the stucco. Research shows that properly installed metal expansion anchors can securely hold over 50 pounds per anchor, making them suitable for most residential mounting challenges.
Concrete Screws
These clever fasteners feature a self-threading design that makes them incredibly versatile for stucco applications. Unlike traditional anchors that rely on expansion, concrete screws cut their own threads as you drive them in.
The key to success with concrete screws is drilling proper pilot holes using a masonry drill bit. This preparation step ensures the screw threads properly and achieves maximum holding power. They’re particularly good for concrete or block substrates behind your stucco, where their threading action creates a secure mechanical connection.
For detailed installation guidance, this comprehensive guide walks through the complete process step-by-step.
Specialized Anchors for Unique Situations
Sometimes standard anchors just won’t cut it. Toggle bolts become essential when you’re dealing with hollow spaces behind your stucco, such as areas with foam insulation. The toggle mechanism opens behind the wall, spreading the load across a larger area.
Helical anchors serve a completely different purpose – they’re designed for delaminated stucco repair situations where the stucco has separated from its substrate. These specialized fasteners can re-anchor loose sections and restore structural integrity. If you’re dealing with this type of problem, our guide on how to repair stucco provides detailed information on when and how to use these anchors effectively.
Comparing Stucco Anchor Types
| Anchor Type | Load Capacity | Common Uses | Substrate Type | Installation Difficulty |
|---|---|---|---|---|
| Plastic Sleeve | 5-25 lbs | Light decorations, house numbers | Any | Easy |
| Metal Sleeve | 25-75 lbs | Handrails, medium fixtures | Solid masonry | Moderate |
| Wedge Anchor | 50-200+ lbs | Heavy fixtures, structural | Solid masonry | Moderate |
| Concrete Screw | 20-80 lbs | General purpose, versatile | Solid masonry | Easy |
| Toggle Bolt | 25-100 lbs | Hollow wall applications | Hollow/foam backing | Moderate |
The best anchors for stucco ultimately depend on your specific project requirements, but understanding these different types puts you in control of making the right choice for your home’s needs.
How to Choose the Best Anchors for Stucco Projects
Selecting hardware comes down to three factors: weight, wall construction and exposure to weather. Get these right and the rest is straightforward.
Finding the best anchors for stucco based on load weight
- Under 10 lb: 3/16–1/4 in plastic or nylon sleeves.
- 10–50 lb: 1/4–3/8 in metal sleeves or concrete screws.
- Over 50 lb: Wedge anchors or toggles that grab framing; use several points for anything above 100 lb.
Actually weigh the item—guessing is what leads to failures.
What are the best anchors for stucco over different substrates?
- Stucco over solid masonry (block, brick, poured concrete): Any masonry-rated anchor works; wedge anchors deliver the highest capacity.
- Stucco over wood sheathing: Fine for light loads, but heavy items must engage studs. Use a stud finder and a longer fastener that bites at least 1 in into the framing.
Routine stucco exterior maintenance keeps every penetration sound and watertight.
Outdoor vs. Indoor Use: The Importance of Corrosion Resistance
Rusty fasteners stain stucco. Outdoors, choose stainless for permanent fixtures, or galvanized/coated screws for everyday projects. A few extra dollars now beat scrubbing rust streaks later.
The Proper Installation Process: A Step-by-Step Guide

Getting the installation right is where many homeowners stumble. Even the best anchors for stucco will fail miserably if you don’t install them properly. The good news? With the right approach and attention to detail, you can achieve professional-quality results that will last for years.
The key is understanding that stucco installation isn’t just about drilling a hole and shoving in an anchor. It’s about working with precision, prioritizing safety, and most importantly, preventing moisture damage that can turn a simple mounting project into an expensive repair nightmare.
Essential Tools and Safety Gear
Before you touch that drill, make sure you have everything you need. There’s nothing more frustrating than getting halfway through a project only to realize you’re missing a critical tool.
Your hammer drill is essential for creating clean holes in the hard cement surface. A regular drill simply won’t cut it for most stucco applications. You’ll also need masonry drill bits – and I can’t stress this enough – make sure they’re carbide-tipped. Cheap bits will dull quickly and create rough, oversized holes that compromise your anchor’s holding power.
Don’t forget the basics: a level and tape measure for accurate positioning, a caulk gun for sealing, and screwdriver bits that match your anchors. Safety-wise, safety glasses are non-negotiable – stucco drilling creates debris that can seriously damage your eyes. A dust mask is equally important because inhaling cement dust isn’t doing your lungs any favors.
Step 1: Mark and Drill the Pilot Hole
Start by taking your time with the marking process. Use your level to ensure everything lines up perfectly, especially if you’re installing multiple anchors. Nothing screams “amateur installation” like crooked mounting points.
Here’s a professional trick that will save you from chips and cracks: place a piece of painter’s tape over each drilling location before you start. This simple step prevents your drill bit from wandering and protects the stucco surface from chipping around the hole edges.
Choose your drill bit size carefully – it should match your anchor diameter exactly. Too small, and you’ll struggle to insert the anchor. Too large, and you’ll lose the tight fit that makes the expansion mechanism work properly. Most stucco anchors require bits ranging from 3/16″ to 1/2″.
When you start drilling, use steady, moderate pressure and let the drill do the work. Drilling slowly is crucial – rushing this step often leads to overheating, which can damage both your bit and create a rough hole that won’t hold your anchor securely. For more detailed guidance on this critical step, check out our comprehensive guide on how to drill into stucco.
Once you’ve drilled to the proper depth, take time to clean all debris from the hole using a stiff brush or compressed air. Any loose cement powder left behind will prevent your anchor from seating properly and reduce its holding power.
Step 2: Seal the Hole to Prevent Moisture Intrusion
This is the step that separates the pros from the weekend warriors, and it’s absolutely critical for exterior installations. Every hole you drill in stucco is a potential entry point for moisture, and moisture intrusion is the leading cause of serious stucco problems.
Apply a small amount of silicone caulk into the hole before inserting your anchor. This creates a waterproof seal that prevents water from getting behind your stucco system. Don’t skip this step – we’ve seen too many cases where improper penetrations contributed to stucco moisture problems that cost thousands to repair.
Use a high-quality exterior-grade silicone caulk that’s designed for masonry applications. Clear or color-matched caulk will be nearly invisible once your installation is complete, maintaining your home’s appearance while providing crucial protection.
Step 3: Insert the Anchor and Fasten Your Item
Now comes the moment of truth. Insert the anchor into the prepared hole until it sits flush with the stucco surface. For most anchors, you can tap them gently with a hammer to ensure they’re properly seated, but don’t get aggressive – stucco doesn’t respond well to heavy-handed treatment.
When you start driving the screw, begin slowly and maintain steady pressure. As the screw engages the anchor’s expansion mechanism, you’ll feel the resistance increase. This is exactly what you want – it means the anchor is expanding and gripping the hole walls securely.
Here’s where patience pays off: avoid over-tightening at all costs. Over-tightening can damage the anchor, strip the threads, or create stress cracks in the stucco around your installation point. Tighten just until your fixture is secure and the anchor is properly seated. If you feel excessive resistance, stop and check your work rather than forcing it.
A properly installed anchor should feel rock-solid without requiring excessive force during installation. If something doesn’t feel right, it’s better to start over than to risk damaging your stucco or creating a weak mounting point.
Frequently Asked Questions about Stucco Anchors
How much weight can a stucco wall hold with anchors?
Anchor type sets the limit. Plastic sleeves handle 5-25 lb, metal sleeves 25-75 lb, and wedge anchors 50-200 lb when driven into solid masonry. Substrate strength and installation quality matter just as much, so drill the correct pilot hole, seal it, and spread loads over multiple anchors once you pass the 100-lb mark.
Can you screw directly into stucco without an anchor?
You can, but you shouldn’t. Stucco is too brittle to form reliable threads; direct screws often loosen or crack the finish within months. Use at least a masonry screw with a pilot hole and always seal the penetration.
How do you fix a hole in stucco after removing an anchor?
Back out the screw, pull the anchor, brush out debris and fill the cavity with an exterior stucco patch. Texture to match, let it cure, then prime and paint. For step-by-step photos see Patching a Hole in Stucco.
Conclusion: Protecting Your Stucco and Your Valuables
Finding the best anchors for stucco goes far beyond simply keeping your wall hangings secure – it’s about safeguarding your home’s structural integrity and protecting your investment for years to come. When you choose the right anchor and install it properly with appropriate sealing, you’re creating a mounting system that works harmoniously with your stucco rather than against it.
The key takeaways that will serve you well in any stucco anchoring project are straightforward but crucial. Matching your anchor to your specific load requirements ensures you’re not under-engineering a heavy application or over-engineering a simple one. Understanding whether you’re dealing with stucco over solid masonry or wood sheathing helps you select the right anchor length and type for maximum holding power.
Perhaps most importantly, never skip the moisture sealing step. This simple addition of silicone caulk around your anchor installation can prevent water intrusion that leads to expensive structural damage down the road. We’ve investigated countless cases where unsealed penetrations became the starting point for serious moisture problems.
When you’re uncertain about your stucco’s condition or facing a particularly challenging installation, consulting with professionals can save you from costly mistakes. This is especially true for homes built between 1993 and 2006, where stucco systems are more vulnerable to moisture-related issues.
At Stucco Safe, our forensic approach to stucco evaluation has revealed how proper anchoring techniques preserve both functionality and home value. We’ve also documented the extensive damage that results from improper installations – damage that’s entirely preventable with the right knowledge and approach.
If you’re concerned about your stucco’s condition before beginning any drilling project, a professional evaluation provides the confidence you need to proceed safely. Our comprehensive stucco inspections can identify potential vulnerabilities and help you make informed decisions about anchoring into your specific stucco system. Learn more about our comprehensive stucco inspections.
Whether you’re installing a simple address plaque or mounting a substantial outdoor fixture, investing the time to choose and install the right anchors properly will reward you with reliable performance, maintained appearance, and genuine peace of mind. Your stucco walls and everything you hang on them deserve this level of care and attention to detail.