
Drill Bit Stucco: Safe Drilling in 5 Steps
Why Drill Bit Stucco Selection Makes or Breaks Your Project
When working with drill bit stucco applications, choosing the wrong bit can crack your exterior walls and lead to costly moisture problems. Drilling into stucco isn’t like drilling into wood; this concrete-like material becomes incredibly hard after its 90-day curing period. Using the wrong bit will result in cracked stucco, a damaged moisture barrier, and ruined equipment.
Quick Guide:
- Best Bits: Carbide-tipped masonry bits are most reliable. Diamond-tipped bits are a premium option for multiple holes.
- Essential Drills: A hammer drill is best for most projects. A rotary hammer is needed for heavy-duty work. A standard drill should only be used for holes 3/8″ or smaller.
- Common Sizes: 3/16″, 1/4″, and 5/16″ cover most household needs.
The biggest mistake is using standard wood or metal bits, which overheat and create jagged holes that compromise your home’s weather protection. As one forum user learned: “I tried drilling a couple holes into the side of our place (stucco and cement) and it’s near impossible with a regular drill + masonry bit.”
I’m Gabe Kesslick, an EDI Level 2 Certified Stucco Inspector since 2001. Through countless drill bit stucco inspections, I’ve seen how improper drilling turns small projects into expensive remediation jobs. This guide will help you avoid those mistakes.

Drill bit stucco terms you need:
Step 1: Understanding Stucco Composition and Challenges
Before touching a drill bit stucco combination, understand the material. Stucco is a mix of cement, sand, lime, and water that hardens into a dense, concrete-like surface. It takes about 90 days to fully cure; drilling before then can cause cracking. Once cured, stucco is durable but brittle, making it prone to chipping if not handled carefully.
Many stucco walls also contain a hidden wire mesh (lath) for reinforcement, which can complicate drilling. Behind the stucco is a moisture barrier (house wrap or building paper), your home’s defense against water. Every hole you drill penetrates this barrier, so proper sealing afterward is essential to prevent costly moisture damage.
Why Drilling Into Stucco is Tricky
Drilling into stucco presents unique problems:
- Chipping and Cracking: The brittle surface can easily chip or crack if you use the wrong bit, drill too fast, or apply uneven pressure.
- Hitting Metal Lath: Encountering the hidden wire mesh can cause the drill bit to bind, deflect, or splinter the stucco.
- Water Intrusion: Every hole penetrates the moisture barrier. The primary challenge is to seal the hole properly to prevent water from getting behind the stucco, which can lead to mold, rot, and structural damage.
- Older Stucco Hardness: Stucco on older homes (pre-1980s) can be exceptionally dense and hard, requiring more powerful tools and patience to drill through.
Understanding these challenges is the first step to a successful project. For more details on different stucco systems, you can explore More info about different stucco systems.
Step 2: Selecting the Right Drill for Stucco
Choosing the right drill is as important as the drill bit stucco combination. A standard drill lacks the power and “hammer action” needed to penetrate stucco efficiently. Using one will lead to frustration, overheated bits, and damaged walls. You need a drill designed for masonry.
Hammer Drill vs. Standard Drill

For most homeowners, a hammer drill is the best tool for stucco. It combines the spinning motion of a standard drill with a rapid, pounding action. This percussive force chips away at the brittle stucco, allowing the bit to penetrate quickly and cleanly. This dual action makes the job faster, extends the life of your masonry bits, and is ideal for most household projects.
While a powerful standard drill might work for a couple of very small holes (3/8-inch or less), it will take more effort and generate more heat. For ease and effectiveness, the hammer drill is the smarter choice.
For larger holes (1/2-inch or more) or extensive projects, a rotary hammer is the champion. These are more powerful than hammer drills and often use an SDS chuck system for superior power transfer. A rotary hammer makes heavy-duty stucco work feel almost effortless and is worth renting or buying for big jobs. It’s all about matching the drill to the project’s scale.
To learn more about the mechanics, you can explore The difference between hammer drills and rotary hammers.
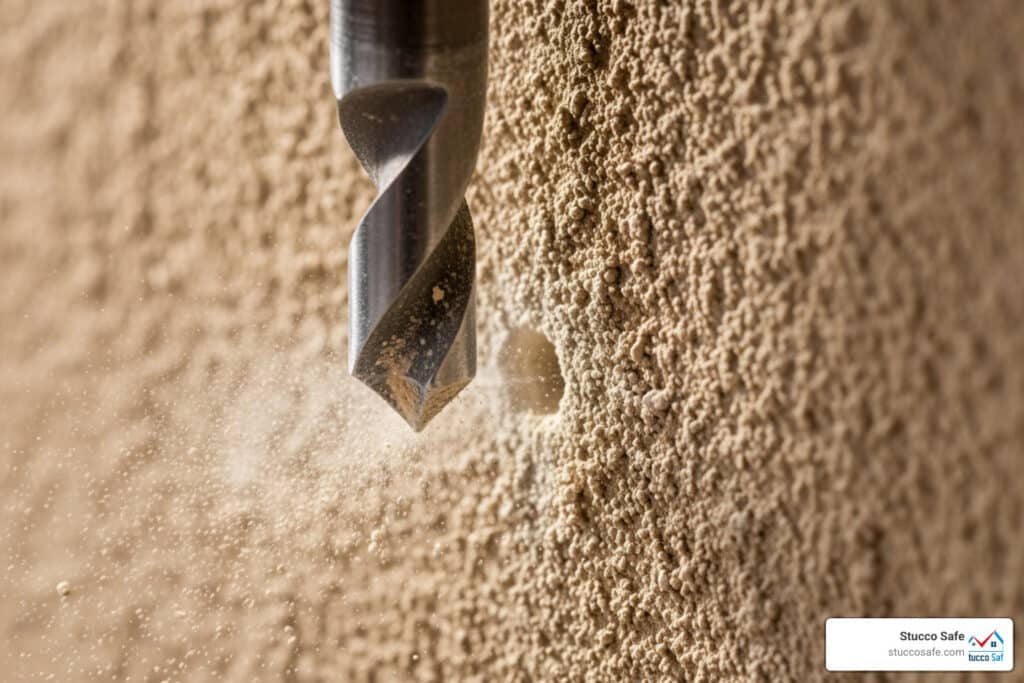
Step 3: How to Choose the Perfect Drill Bit for Stucco
Your drill bit stucco choice is critical. You must use masonry drill bits, which are designed to penetrate hard, brittle materials like stucco by withstanding high friction and percussive force. A sharp, new masonry bit is always best for clean holes.
Key Features of a Good Drill Bit for Stucco

When selecting a bit, look for these features:
- Carbide tips: The most common and reliable choice. The tungsten carbide tip is extremely hard and withstands the abrasive nature of stucco.
- Diamond tips: A premium option for the toughest jobs or extremely hard stucco. They are highly effective and durable but more expensive.
- Wide Flutes: The spiral grooves on a bit are called flutes. Wide flutes efficiently remove dust and debris, preventing the bit from clogging and overheating.
- Shank Type: Match the shank to your drill. SDS-Plus shanks are for rotary hammers and provide superior power transfer. Hex or straight shanks are for standard drill chucks.
- Common Sizes: For most household tasks, 3/16″, 1/4″, and 5/16″ masonry bits will cover your needs.
For a deeper dive, see our guide: More info on the best drill bit for stucco.
Why a Standard Drill Bit for Stucco Won’t Work
Never use a standard wood or metal bit on stucco. They are not designed for abrasive, mineral-based materials and will fail spectacularly. They will overheat, dull instantly, and are likely to warp or snap. Instead of a clean hole, you’ll get slow, grinding progress that puts immense stress on the stucco, leading to chipping and cracking. Always use a proper masonry bit.
Step 4: Preparing Your Tools and Workspace
With your hammer drill and carbide-tipped drill bit stucco combo ready, proper preparation is key to a smooth, safe project. Taking a few moments to gather your tools and prepare the workspace will prevent mistakes.
Essential Tools and Materials Checklist
- Power Drill: A hammer drill is strongly recommended.
- Bits & Hardware: Masonry drill bits, wall anchors, and matching screws.
- Marking & Measuring: Measuring tape, a level, and a pencil or chalk.
- Sealing & Finishing: Exterior-grade caulk/sealant, a hammer, a screwdriver/wrench, and compressed air or a brush for cleaning holes.
Safety First!
Safety is paramount. Stucco drilling creates sharp fragments and fine dust. Always wear your Personal Protective Equipment (PPE).
- Eye and Lung Protection: Always wear safety glasses to protect from flying debris and a dust mask to avoid inhaling irritating stucco particles.

-
Mark Your Spot: Use your measuring tape and level to precisely mark where you will drill. A piece of painter’s tape over the mark can help prevent the bit from chipping the surface as you start.
-
Check for Utilities: This is a critical safety step. Before drilling, check for hidden electrical wires, water pipes, or gas lines. Drilling into a utility line can cause serious injury and costly repairs. Use a stud finder that detects electrical current or consult building plans. Know what’s behind the wall before you drill.
Step 5: The Safe Drilling and Sealing Process
Patience and precision are key to drilling into stucco. A careful approach ensures a clean hole, a secure mount, and a waterproof seal that protects your home. Every hole is a potential entry point for water if not sealed correctly.
A Step-by-Step Guide to Drilling and Sealing

Follow these steps for a secure, professional result:
-
Mark the Spot: Use a level and pencil to precisely mark your drilling location.
-
Drill a Pilot Hole (Optional): For larger holes (1/2″+) or very hard stucco, start with a smaller masonry bit (e.g., 3/16″). This guides the main bit and makes drilling easier.
-
Drill the Main Hole: Position your bit on the mark, holding the drill perpendicular to the wall to prevent chipping. Start at a slow speed with gentle, consistent pressure, letting the hammer action do the work. Gradually increase speed as the bit bites. Periodically pull the bit out to clear debris and let it cool.
-
Reverse to Remove: Once at the desired depth, slowly reverse the drill to back the bit out, preventing chipping around the edge.
-
Clean the Hole: Use compressed air or a brush to completely clear dust and debris from the hole. This is essential for the anchor and caulk to adhere properly.
-
Inject Caulk: This is the most critical step. Fill the hole with exterior-grade caulk to create an internal waterproof seal. This prevents leaks and protects your home.
-
Insert Wall Anchor: Gently tap the wall anchor into the caulk-filled hole with a hammer until it’s flush with the surface.
-
Drive the Screw: Tighten the screw into the anchor until it’s snug. Do not overtighten, as this can strip the anchor or crack the stucco.
-
Seal the Fixture: Apply a final bead of caulk around the perimeter where the mounted item meets the stucco. Smooth it for a clean, waterproof finish.
Following these steps ensures a secure, weatherproof installation. For more details, see our guide: More info on how to drill into stucco.
Frequently Asked Questions About Drilling Into Stucco
Even with the perfect drill bit stucco combination, questions can arise. Here are answers to some common concerns.
What happens if I hit the metal lath in the stucco?
Many stucco systems have a metal mesh (lath) for reinforcement. If you hit it, drilling will become harder. Don’t panic. Use a sharp, high-quality carbide-tipped masonry bit and apply firm, steady pressure, letting the hammer drill work. The bit can often push through. Hitting the lath may cause minor cracking around the hole; if so, be sure to seal these cracks thoroughly with exterior-grade caulk to maintain a watertight seal.
Do I need to use a wall anchor in stucco?
Yes, almost always. Stucco is brittle and won’t hold a screw’s threads on its own; it will likely crumble. A plastic or metal wall anchor is designed for masonry. When you drive a screw into it, the anchor expands, creating a strong grip behind the stucco to securely hold weight. Without an anchor, your mounted item will eventually pull loose.
How do I repair a hole in stucco if I make a mistake?
Repairing small holes or cracks is straightforward. First, clean all loose debris and dust from the area. Then, fill the hole using one of these options:
- Exterior Stucco Caulk: For small holes, inject a high-quality, paintable exterior caulk and smooth it flush. This is the easiest method.
- Pre-mixed Stucco Patch: For larger holes or to match texture, apply a pre-mixed stucco patch compound with a putty knife. You can dab it to mimic the surrounding stucco finish.
Ensuring the repair is weather-tight is the most important part of the fix.
Conclusion
Drilling into stucco is a manageable DIY project when you have the right knowledge and tools. By following the five essential steps—understanding the material, selecting the right drill and drill bit stucco combination, preparing your workspace, and executing a safe drilling and sealing process—you can tackle the job with confidence.
The keys to success are using a hammer drill with carbide-tipped masonry bits, applying proper technique (slow start, steady pressure, perpendicular angle), and never skipping the final sealing step. A thorough application of exterior-grade caulk is your best defense against moisture intrusion and costly future repairs.
However, if a project feels beyond your comfort zone, or if you see red flags like dark staining, damp drywall, mold, or crumbling stucco, stop. These are signs of potential moisture damage that require a professional assessment before you proceed.
This is where Stucco Safe can help. We provide professional stucco inspection and testing services for homeowners, specializing in detecting moisture and structural issues using forensic methods and certified inspectors. We serve Southeastern Pennsylvania, New Jersey, and Delaware, including areas like Philadelphia, West Chester, Bayonne, and Cherry Hill. Inspection costs typically range from $495 to $1595 or more for very large homes.
If you have any concerns about your stucco’s condition, don’t risk expensive repairs. Let us provide a thorough assessment to ensure your home stays safe and dry.