
Masonry Drill Bit for Concrete: Ultimate Guide 2025
Why the Right Masonry Drill Bit for Concrete Matters
Drilling into concrete for projects like mounting a TV or installing shelves requires a specialized masonry drill bit for concrete. Using a standard wood or metal bit is a recipe for frustration; it will quickly dull, overheat, or break, potentially damaging your drill and wasting time.
When looking for the best masonry drill bit for concrete, here’s what to consider:
- For Durability and Performance: Prioritize bits with carbide tips, a material known for its hardness and wear resistance.
- For Hammer Drills: If you’re using a hammer drill or rotary hammer, ensure the bit has an SDS-Plus or SDS-Max shank. These shanks are designed for efficient power transfer and bit retention in these powerful tools.
- Top-Rated Brands: Reputable brands that consistently receive high marks include Bosch (especially their Bulldog series), Hilti (known for their TE-CX and TE-Y lines), Milwaukee (with SHOCKWAVE Carbide bits), and Diablo (like their SPEEDemon Red Granite series).
- Crucial Tool: The hammer drill or rotary hammer itself is often more important than the specific bit for effectively penetrating concrete. The percussive action of these drills chips away at the material, making the process much faster and easier.
This guide covers the key features of these bits, how to choose the right one, and how to use them safely. With the right bit and technique, you can confidently tackle any concrete drilling project.
As Gabe Kesslick, with over two decades of experience in construction and forensic inspections, I’ve seen how the right masonry drill bit for concrete impacts a structure’s integrity. Let’s explore the specifics.

Masonry drill bit for concrete terms made easy:
Understanding the Anatomy of a Masonry Drill Bit
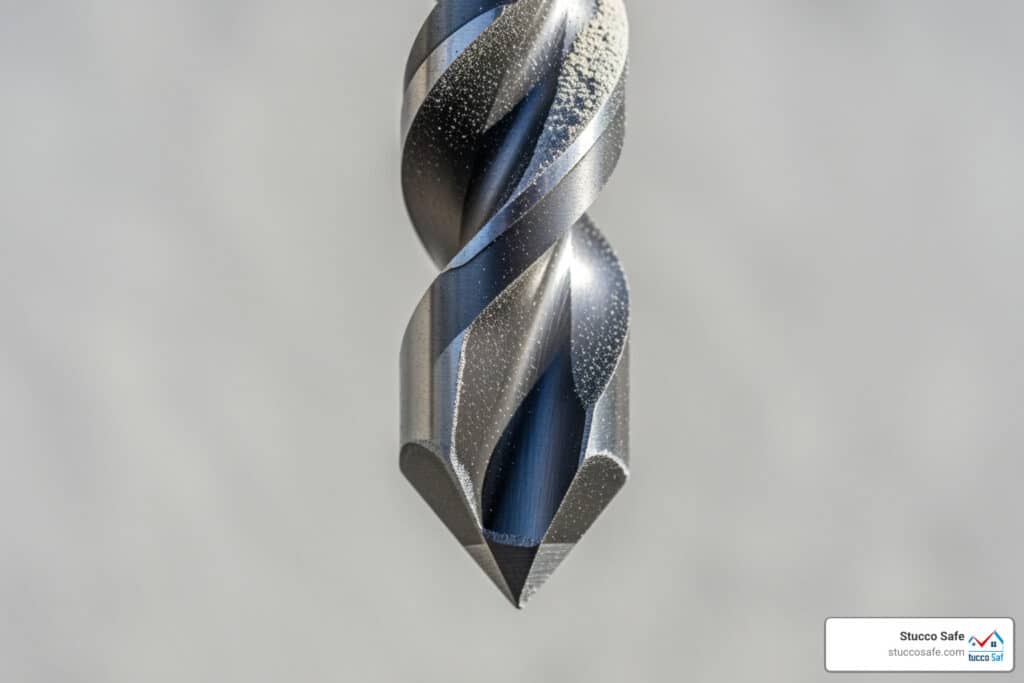
A masonry drill bit for concrete is engineered to drill through tough materials like concrete, brick, and stone. Unlike standard bits, they are built with specific materials and designs to handle the abrasive nature of masonry. Each part, from the tip to the flutes, is designed for efficiency and durability.
Core Materials: The Foundation of Durability
The cutting edge of a quality masonry drill bit for concrete is a tungsten carbide tip. This material is harder than concrete, providing excellent wear resistance where standard steel would dull instantly. The body of the bit is made from a high-carbon steel shank, offering the strength to prevent snapping under pressure. This combination also provides crucial heat resistance, as drilling concrete generates significant friction and heat.
Tip Design: The Key to Efficient Drilling
The tip of a masonry bit is a small chisel head, designed to chip away material. There are two main designs:
2-cutter heads are the traditional workhorses. They are reliable and affordable for most general concrete drilling tasks.
4-cutter heads are an upgrade, offering faster drilling, better durability, and a significant advantage when encountering embedded rebar. The extra cutting edges help power through steel without binding.
Many bits also feature a multi-grind centering tip to prevent the bit from “walking” on the surface, ensuring an accurate start. The tip angle is also specifically engineered for chipping, not slicing.

Flute Design: Clearing Debris for Cooler, Faster Work
The spiral flutes along the bit’s body are essential for debris extraction. They act as a conveyor, removing dust from the hole. Without efficient dust removal, the hole would clog, increasing friction and heat, and stopping progress. This process also aids in heat reduction, which keeps the bit sharp longer and reduces stress on the drill. Deeper spiral flutes are more effective at this, leading to cooler operation and faster work.
For projects involving different masonry materials, you might also want to check out more info about the best drill bit for stucco to ensure you’re using the right tool for each specific application.
Choosing the Right Masonry Drill Bit for Concrete
Selecting the right masonry drill bit for concrete is not a one-size-fits-all task. To choose correctly, you must consider your drill’s compatibility, the material you’re drilling, and the required hole size. Getting this right ensures a clean, efficient result.
Matching the Shank to Your Drill
The shank is the end of the bit that fits into your drill. A mismatch means the bit won’t fit or perform correctly.

- Straight Shank: Fits standard three-jaw chucks on regular or basic hammer drills. Can slip under heavy load.
- Hex Shank: A hexagonal shape prevents slipping and is common for impact drivers. Impact-rated hex shanks are built to handle the force of these tools, best for smaller holes.
- SDS-Plus (Slotted Drive System Plus): Designed for rotary hammer drills. Its slotted design locks into the chuck, allowing for back-and-forth movement that efficiently transfers the hammer action. Ideal for most concrete drilling.
- SDS-Max (Slotted Drive System Max): A larger version of SDS-Plus for heavy-duty rotary hammers. Used for drilling large holes or light demolition.
Selecting a masonry drill bit for concrete Based on Material
Different masonry materials require different bits.
- Standard Concrete: A quality 2-cutter or 4-cutter carbide-tipped bit works well with a hammer drill.
- Reinforced Concrete: Contains steel rebar, which can stop or break a standard bit. A 4-cutter head is essential, as it’s designed to power through rebar without binding. Bits like the SDS-plus® Bulldog™ Xtreme are specifically designed for this.
- Cinder Block: Less dense than concrete. A carbide bit will work, but a hammer drill is still recommended for speed and ease.
- Brick and Natural Stone: Hardness varies. Use a quality carbide-tipped masonry drill bit for concrete, preferably a 4-cutter design with a hammer drill for tougher stone. Bits with a multi-grind centering tip, like the BlueGranite Turbo™, help start accurately on these surfaces.
Determining the Correct Bit Size and Length
The bit’s size and length must match your project’s needs.
- Hole Diameter: This is determined by the anchor screws or fasteners you’re using. Check the fastener’s packaging for the required drill bit diameter. A hole that’s too small can crack the concrete, while one that’s too large won’t provide a secure hold.
- Drilling Depth: The bit must be long enough to drill to the depth specified by your fastener. A depth stop collar can be attached to the bit for precise depth control, which is crucial for anchors.
For more insights into drilling into various hard materials, including natural stone, we invite you to explore our guide on More info about the right drill bit for stone.
The Power Behind the Bit: Technique and Safety
The best masonry drill bit for concrete is ineffective without the right drill and proper technique. Mastering your tool, prioritizing safety, and using the correct drilling method are essential for success.
Hammer Drill vs. Rotary Hammer: What’s the Difference?
The choice between these two tools is critical for drilling into concrete.
- Hammer Drill: Combines rotation with a rapid pulsating hammering action. The chuck pounds the bit as it spins, chipping away at concrete. It’s ideal for most DIY projects in concrete, brick, or block and uses straight or hex-shank masonry bits.
- Rotary Hammer (SDS-Plus or SDS-Max): A more powerful, heavy-duty tool using a piston mechanism for higher impact energy (BPM). It’s designed for professional use, large holes, or drilling in reinforced concrete. These drills require SDS-Plus or SDS-Max bits.
Key takeaway: A hammer drill or rotary hammer is often more important than the specific bit itself. Even an inexpensive hammer drill will outperform a standard drill with a premium masonry bit.
Essential Safety Precautions When Drilling
Drilling concrete is hazardous. Always wear the proper personal protective equipment (PPE).

- Eye Protection: Safety glasses or goggles are mandatory to protect from flying chips.
- Hearing Protection: Hammer drills are loud; use earplugs or earmuffs to prevent hearing damage.
- Respiratory Protection: Concrete drilling creates fine silica dust, which is dangerous to inhale. Wear a dust mask or respirator.
- Secure Grip: Use a firm, two-handed grip, utilizing the drill’s auxiliary handle for control.
- Gloves: Wear work gloves to protect from abrasions and heat.
Proper Drilling Technique for Best Results
Follow these steps for clean holes and a longer life for your masonry drill bit for concrete:
- Create a Pilot Point: Use a center punch to make a small indent on the surface to prevent the bit from “walking.”
- Start Slow: Begin drilling at a low speed with light pressure to allow the bit to bite.
- Apply Steady Pressure: Once started, apply firm, steady pressure. Let the drill’s hammer action do the work; don’t force it.
- Clear the Hole: Periodically pull the spinning bit from the hole to clear dust and debris. A shop vacuum held near the hole helps manage dust.
- Cool the Bit: For deep holes, pause frequently to let the bit cool. An overheated bit dulls quickly. A small amount of water can also help cool the bit and suppress dust (use caution around electrical tools).
For a more comprehensive guide on drilling into tough materials, check out A guide to drilling concrete and brick. And if you’re working with stucco, we have specific advice on More info on how to drill into stucco.
Performance, Lifespan, and Common Problems
Understanding what affects the performance and lifespan of a masonry drill bit for concrete and how to troubleshoot common issues will save you time and money.
What is the expected lifespan of a masonry drill bit for concrete?
The lifespan of a masonry bit depends on several factors:
- Carbide Grade: Higher-quality carbide lasts longer.
- Usage Frequency: A bit used daily on hard concrete will wear faster than one used for occasional DIY projects on cinder block.
- Material Hardness: Drilling into dense, aggregate-rich concrete is more taxing than drilling into softer brick.
- Proper Technique: Using the correct drill, applying steady pressure, clearing dust, and cooling the bit all extend its life.
A bit needs replacing when you notice slower drilling, excessive heat or smoke, a squealing noise, or when the carbide tip is visibly rounded or worn. Pushing a dull bit is inefficient and can damage your drill.
Troubleshooting: Hitting Rebar and Other Obstacles
- Hitting Rebar: The drill will stop abruptly, often with a metallic screech and sparks. Solution: Stop drilling. The best tool for this is a 4-cutter bit, like an SDS-plus® Bulldog™ Tough bit, which is designed to handle rebar. Alternatively, move the hole a few inches away.
- Bit “Walking”: The bit slides across the surface before starting. Solution: Create a pilot point with a center punch or use a bit with a centering tip.
- Overheating: The bit becomes extremely hot, possibly smoking. Solution: Pause drilling to let the bit cool. Ensure you are clearing debris from the hole regularly to reduce friction.
- Slow Progress or Not Cutting: The bit is barely cutting. Solution: First, ensure your drill is in hammer mode. Second, check if the bit is dull. Finally, confirm you are applying firm, steady pressure. If the problem persists, you may need a more powerful tool, like upgrading from a hammer drill to a rotary hammer.
Frequently Asked Questions about Masonry Drill Bits
Here are answers to common questions about using a masonry drill bit for concrete.
Can I use a masonry bit in a regular drill without hammer function?
Technically, yes, but only for very soft materials like old mortar. For actual concrete, it’s highly ineffective. A regular drill lacks the necessary hammering action, leading to:
- Extremely slow progress.
- A rapidly dulled bit due to excessive friction and heat.
- Potential damage to your drill’s motor from the strain.
For concrete, a hammer drill is essential. The tool is more important than the bit in this scenario.
How do I know if I’ve hit rebar while drilling?
You’ll know immediately. The drill will stop making progress, you’ll hear a high-pitched metallic screech, and you may see sparks. The drill might also bounce or vibrate excessively. Stop drilling right away to avoid destroying your masonry drill bit for concrete. A 4-cutter bit is better equipped to handle rebar.
Is it possible to sharpen a dull masonry drill bit?
While technically possible, it’s not practical for most users. Sharpening the hard carbide tip requires specialized diamond grinding wheels. Furthermore, the cutting angles are precisely engineered; getting them wrong will make the bit ineffective. Given the low cost of a new masonry drill bit for concrete, it’s more time- and cost-effective to simply replace a dull bit.
Conclusion
Choosing the right masonry drill bit for concrete is crucial, but as we’ve seen, it’s only part of the equation. Your success hinges on pairing that bit with the correct power tool—a hammer drill or rotary hammer—which provides the essential impact force. Even the best bit is ineffective in a standard drill when tackling concrete.
Prioritizing safety by wearing proper PPE and using the correct technique—starting slow, applying steady pressure, and keeping the bit cool—will ensure a clean result and extend the life of your tools. These details are what separate a frustrating task from a successful project.
As a professional with over 20 years of experience in construction and forensic inspections, I understand the importance of precision. This same attention to detail is the foundation of our work at Stucco Safe, where we serve Southeastern Pennsylvania, New Jersey, and Delaware.
Just as the right tool is critical for drilling, a professional inspection is critical for your home’s stucco. Our forensic testing can identify hidden moisture and structural problems before they become costly disasters. Stucco inspections can range from $495 to $1595 or more, a small price for protecting your largest investment.
Ready to ensure your property is sound? Get a professional stucco inspection for your property and gain peace of mind in your home’s integrity.