
Moisture Intrusion Stucco: 10 Warning Signs to Avoid Disaster
Why Moisture Intrusion Stucco Problems Can Destroy Your Home
Moisture intrusion stucco issues affect thousands of homeowners, especially those with homes built between 1980-2006 when building codes allowed improper installation methods. When water gets behind your stucco walls, it can cause extensive structural damage, mold growth, and repairs costing tens of thousands of dollars.
Quick Answer – Key Signs of Moisture Intrusion in Stucco:
– Cracks wider than 1/16 inch allowing direct water entry
– Dark staining or streaks that persist after rain
– Soft drywall below windows or doors
– Musty odors around exterior walls
– Efflorescence (white chalky deposits) on stucco surface
– Stucco remaining wet more than one week after rainfall
– Bubbling or peeling paint on interior walls
Stucco is naturally porous and can deflect over 95% of rainwater, but the remaining 5% that penetrates needs proper drainage to prevent problems. Without correct installation of flashing, weep screeds, and water-resistant barriers, moisture gets trapped behind your walls where it damages wood framing and creates perfect conditions for mold growth.
The challenge is that moisture intrusion stucco failures are often invisible from the outside until severe damage occurs. By then, remediation can cost hundreds of thousands of dollars and may require complete wall reconstruction.
Professional stucco inspections vary in cost from $495 to $1595 or more for very large homes – a small investment compared to the potential repair costs of undetected moisture damage.
I’m Gabe Kesslick, and I’ve been detecting and repairing moisture intrusion stucco problems since 2001 with certifications from EDI, BESI, and other industry organizations. My experience investigating thousands of stucco failures has shown me that early detection is the key to preventing catastrophic damage and protecting your home’s value.

Moisture Intrusion Stucco 101: What Happens Behind the Walls
Think of your stucco walls like a sponge – they’re designed to handle some water, but when too much gets in without a way out, that’s when serious problems begin. Understanding how water moves through your walls is the first step to protecting your home from costly damage.
Water finds its way into stucco systems through three pathways. Bulk water intrusion happens when rainwater pours directly through cracks, gaps around windows, or missing flashing. Capillary wicking occurs when your stucco’s porous cement acts like a straw, slowly drawing moisture up from wet ground or sideways from constantly damp areas. Vapor drive occurs when humid air seeps into your walls and hits cooler surfaces inside, creating condensation.
The secret to preventing moisture intrusion stucco disasters lies in understanding your wall system. Stucco over masonry blocks works as a barrier system – the cement coating does all the heavy lifting to keep water out. But stucco over wood framing needs backup protection.
That’s where the water-resistant barrier (WRB) comes in. This concealed barrier acts like a raincoat behind your stucco, catching any moisture that sneaks through and directing it safely out through weep screeds and drainage mats. Without this system working properly, water gets trapped and starts rotting your home’s wooden bones.
Here’s something many homeowners don’t know: research from Building Science Corporation shows that OSB sheathing holds onto 2.5 times more moisture than plywood. OSB also has 12 to 20 times lower vapor permeability, making it much more vulnerable to swelling and damage when moisture gets trapped behind stucco.
How Stucco Absorbs & Releases Moisture
Your stucco walls are constantly “breathing” – absorbing moisture when it’s humid and releasing it when conditions are dry. This natural process happens because cement is hygroscopic, meaning it naturally pulls moisture from the air around it.
Under normal conditions, this breathing action actually helps your walls stay healthy. When stucco gets wet from rain, moisture gradually moves from the saturated areas toward drier spots, eventually evaporating from the surface through a permeability gradient.
But traditional lime-based stucco has excellent permeability – over 20 perms – allowing moisture to escape easily. Many modern polymer-modified stucco systems have permeability ratings below 1 perm, which significantly reduces your wall’s ability to dry naturally. When you add vapor-impermeable paint or coatings on top, you’ve essentially wrapped your walls in plastic.
Main Causes of Moisture Intrusion Stucco Failures
Most moisture intrusion stucco problems don’t happen overnight – they develop gradually due to installation shortcuts or neglected maintenance.
Cracking tops the list of moisture entry points. These cracks form from thermal movement as your walls expand and contract with temperature changes, foundation settlement, or improper stucco mix ratios.
Missing or improperly installed flashing around windows, doors, and roof connections causes more hidden damage than any other single factor. Flashing must overlap in a shingle-style pattern to effectively shed water away from vulnerable openings.
Window and door penetrations create natural weak spots because they require perfect coordination between different materials – stucco, flashing, sealants, and trim. When caulking fails or wasn’t applied properly from the start, these openings become like funnels directing water into your walls.
Don’t overlook clogged weep screeds at the bottom of your walls. These small openings are designed to let trapped moisture drain out safely. When they get blocked by dirt, paint, or landscaping materials, water builds up pressure behind your walls.
Finally, landscaping and sprinkler problems create constant moisture exposure that overwhelms your stucco’s natural drying ability. Soil piled against walls, automatic sprinklers hitting your facade, and planters placed too close to the building all contribute to persistent dampness that eventually finds its way inside.
Top 10 Red Flags You Can’t Ignore

After inspecting thousands of homes, I’ve learned that moisture intrusion stucco problems rarely announce themselves with dramatic failures. Instead, they whisper through subtle warning signs that many homeowners dismiss as normal wear and tear.
Think of these red flags as your home’s way of asking for help. Some are obvious, like spider-crack networks spreading across your walls. Others are sneaky, like that faint musty odor you notice when walking past certain rooms. Each sign tells part of a larger story about what’s happening behind your walls.
The challenge is that by the time you see bubbling paint or feel soft drywall, moisture has often been causing damage for months or even years. That’s why understanding these warning signs can literally save you tens of thousands of dollars in repair costs. Moisture problems with stucco can escalate quickly once they take hold.
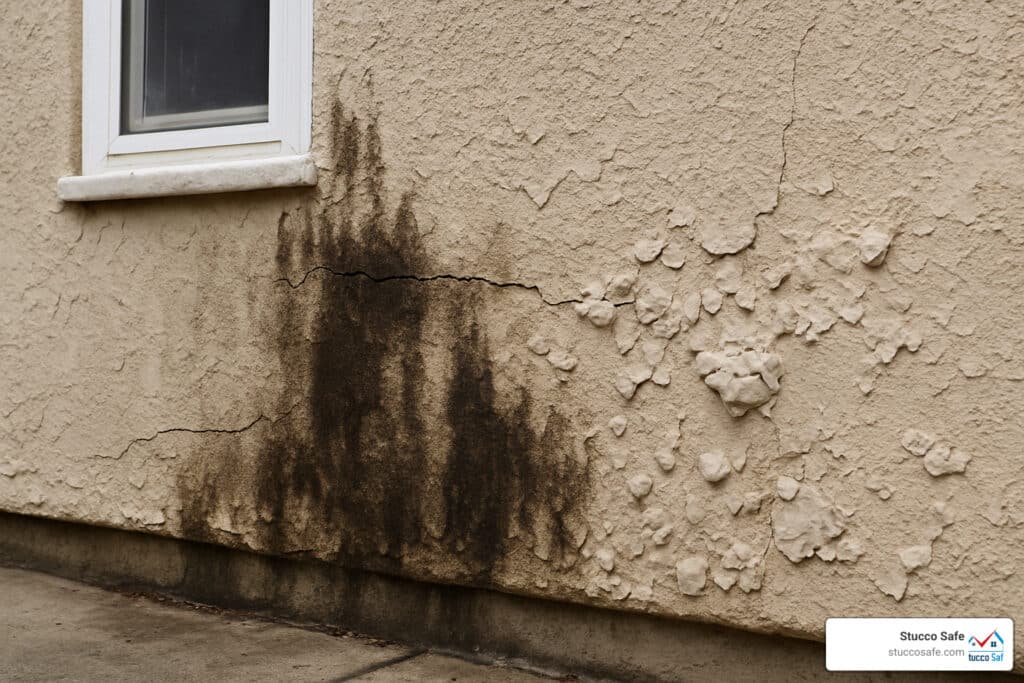
#1 Hairline Cracks or Missing Chunks
Don’t let the word “hairline” fool you into thinking these cracks are harmless. Any crack wider than 1/16 inch becomes a highway for water infiltration. I’ve seen homeowners ignore these thinking they’re just cosmetic, only to find extensive rot behind their walls years later.
Thermal movement causes most of these cracks as your stucco expands and contracts with temperature changes. Settlement cracks tell a different story – they indicate your foundation or framing is shifting, which requires immediate attention.
Missing chunks or spalling stucco are even more serious red flags. When pieces start falling off, it usually means moisture has already penetrated deep enough to cause freeze-thaw damage.
#2 Staining & Efflorescence Around Windows
Windows are like magnets for moisture intrusion stucco problems. When I see dark streaks or brown staining below windows, I know we’re dealing with flashing failure almost every time. Water enters around the window frame and exits at the bottom, leaving its calling card on your stucco.
Those white, chalky deposits you might notice are called efflorescence – basically alkali salts left behind when water evaporates. The salts themselves won’t hurt anything, but they’re proof that water is going where it shouldn’t.
Kick-out diverters are one of those unsexy building details that can save you a fortune. When rooflines meet walls without proper flashing, water runs down your stucco instead of being directed away from the building.
#3 Lingering Wet Areas = Moisture Intrusion Stucco Alarm
Here’s a simple test that can reveal major problems: after a good rain, check how long different areas of your stucco stay wet. Normal stucco should dry within a day or two, depending on sun exposure and ventilation. If areas remain damp for more than a week, you’ve got a problem.
I use this dry-time benchmark during my inspections because it reveals so much about what’s happening beneath the surface. Shading effects from trees or overhangs can slow drying, but persistent dampness still warrants investigation.
North-facing walls naturally stay wet longer, but they shouldn’t stay soggy indefinitely. When moisture can’t escape, it creates perfect conditions for mold growth and wood rot.
#4 Interior Clues: Soft Drywall & Musty Odors
Sometimes your home’s interior tells the moisture story more clearly than the exterior. Soft drywall below windows or along exterior walls is like finding smoke – it means there’s fire somewhere, even if you can’t see the flames yet.
Musty odors around exterior walls are your nose’s way of detecting hidden rot and mold growth. Once wood framing reaches 30% moisture content, rot begins, creating the perfect environment for mold to flourish. The health concerns here go beyond property damage – some molds can cause serious respiratory problems.
Bubbling paint, warped baseboards, and unexplained humidity in rooms adjacent to exterior walls all point to the same problem: water is getting where it doesn’t belong.
#5 Basement or Foundation Dampness
Foundation moisture problems and stucco issues often go hand in hand. Poor grade slope around your home can cause water to pool against the foundation, creating hydrostatic pressure that forces moisture up into your wall assembly through capillary rise.
Building codes require at least a 2% slope away from your foundation for good reason. When landscaping or faulty irrigation keeps soil saturated near your building, it’s like having a constant moisture source feeding your walls from below.
Pinpointing the Leak: DIY Checks vs Professional Testing

Once you’ve spotted warning signs, the next step is figuring out exactly where water is getting in. While you can do some detective work yourself, accurately diagnosing moisture intrusion stucco problems is like trying to find a leak in a wall that’s designed to hide it from you.
The challenge is that moisture can enter at one location and show up somewhere completely different. Water is sneaky – it can travel along framing members, drip down inside walls, and pop up feet away from the actual entry point. This is why even experienced contractors sometimes struggle to pinpoint leak sources without proper testing equipment.
Quick DIY Moisture Intrusion Stucco Checklist
Start with a methodical visual walk-around of your home’s exterior during different lighting conditions. Early morning or late afternoon light can reveal subtle shadows and irregularities that disappear in bright midday sun. Use a bright flashlight to examine areas under overhangs and in perpetual shadow.
The garden-hose test can help identify obvious problems around windows and doors. Have someone spray water against suspect areas while you check inside for immediate leaks. But here’s the catch – this only finds the big, obvious problems. Slow moisture intrusion that happens over months or years won’t show up in a 10-minute hose test.
Basic moisture meters from hardware stores can give you a general idea if interior walls feel abnormally damp, but they’re not designed for the precision needed to assess what’s happening behind stucco. Think of them as a thermometer when you need an MRI.
A probe thermometer can help identify temperature differences that might indicate moisture, but again, this is more art than science without proper calibration and experience interpreting the readings.
Why Certified Probe Testing Outperforms Thermal Cameras
Professional testing gets to the heart of the matter – literally. Our Certified Moisture Testing uses invasive probe methods that drill small 3/16-inch holes at strategic locations to measure actual moisture content inside your wall assembly.
This isn’t guesswork or surface-level detection. We’re getting quantitative readings from the substrate materials themselves – the OSB, plywood, or framing that’s actually at risk of rot and damage. After testing, we seal each hole with color-matched caulk that makes the test points virtually invisible.
Thermal cameras have their place, but they’re often oversold as the ultimate moisture detection tool. They show temperature variations, not moisture content. A wall can be wet and still show normal temperatures, especially if the moisture has been there long enough to reach equilibrium with surrounding materials.
Our testing follows ASTM E1105 and AAMA 502 standards, which means the results hold up with insurance companies and in legal situations if needed. We’ve seen too many homeowners rely on infrared scans that missed serious problems, only to find extensive damage later.
The key is knowing where to test. Our Stucco Moisture Probe: Selecting Test Location methodology targets the most vulnerable areas where moisture intrusion stucco failures typically occur. We’re not randomly poking holes – we’re strategically investigating based on building science and years of forensic experience.
Professional inspections range from $495 to $1595 for larger homes, but consider this: we regularly find hidden damage that would have cost homeowners tens of thousands more if left undetected. Sometimes the peace of mind alone is worth the investment.
Stopping the Damage: Immediate Actions & Long-Term Prevention

When you’ve found moisture intrusion stucco problems, time is your enemy. Every day you wait gives water more opportunity to damage your home’s structure and create expensive repair bills. The good news? You can take immediate action to stop further damage while planning comprehensive long-term solutions.
Your first priority is sealing visible cracks with high-quality elastomeric sealants that can flex with temperature changes. Don’t use cheap caulk from the hardware store – it’ll fail within months. Next, re-caulk all window and door penetrations where old sealant has cracked or pulled away from the surfaces.
Clear debris from weep screeds at the base of your walls. These small openings are designed to let trapped moisture escape, but they get clogged with dirt, leaves, and spider webs. A simple cleaning can restore proper drainage and prevent water from backing up behind your walls.
Redirect sprinkler systems so they’re not constantly soaking your stucco walls. Also maintain at least 6 inches of clearance between soil, mulch, or plants and your stucco base. This prevents constant moisture contact and allows air circulation for drying.
Long-term prevention requires addressing the root causes, not just the symptoms. Installing kick-out flashing where roof lines meet walls directs water away from the building. Double water-resistant barriers and drainage cavities behind the stucco create multiple lines of defense against moisture intrusion.
Elastomeric recoating every 7-10 years helps maintain your stucco’s water resistance, but only when applied over sound, dry substrates. Scientific research on drainage mats shows they’re particularly effective in our climate, creating air gaps that allow both drainage and evaporation behind the stucco system.
Modern Moisture Barrier Stucco systems can dramatically improve your wall’s performance when properly designed and installed by qualified contractors who understand building science principles.
Emergency Steps if Moisture Intrusion Stucco Is Confirmed
If professional testing confirms you have significant moisture intrusion stucco problems, don’t panic – but don’t delay either. Your first step is documenting all damage with clear photographs and detailed written notes. This documentation becomes crucial for insurance claims and contractor negotiations.
Install temporary protection like tarps over the most vulnerable areas to prevent additional water from entering while you arrange comprehensive repairs. Be careful not to completely seal areas with plastic sheeting – you could trap existing moisture and create worse problems.
Contact your homeowner’s insurance company within days of finding the problem. Many policies have strict notification requirements, and delays can jeopardize your coverage.
Schedule a comprehensive professional inspection to identify all affected areas and develop a complete remediation plan. Trying to fix moisture intrusion piecemeal usually fails because the underlying causes remain unaddressed.
Long-Term Maintenance Schedule
Preventing moisture intrusion stucco failures is much cheaper than fixing them. Smart homeowners follow a regular maintenance schedule that catches problems early when repairs are still manageable.
Annual visual inspections should focus on the high-risk areas we’ve discussed – around windows and doors, at roof intersections, and anywhere you see cracks or staining. Take photos so you can track changes over time.
Every four years, schedule comprehensive professional inspection that includes moisture testing of vulnerable areas. This interval allows early detection of developing problems before they cause structural damage. Professional inspections cost $495 to $1595 depending on home size – a small investment compared to major remediation expenses.
Plan for elastomeric recoating every 7-10 years to maintain your stucco’s protective qualities. Quality coatings applied over sound, dry substrates can significantly extend your system’s life and improve its moisture resistance.
Regular maintenance of caulking, flashing, and drainage components prevents small issues from becoming big problems. A tube of quality sealant costs under $20 and takes minutes to apply. Compare that to the thousands of dollars needed to repair moisture damage, and the choice becomes obvious.
Frequently Asked Questions about Moisture Intrusion Stucco
After investigating thousands of stucco systems over the past two decades, I’ve heard the same concerns from homeowners again and again. Let me share straightforward answers to the questions that keep people up at night when they’re worried about their stucco walls.
How can I tell if wet stucco is normal or a problem?
This is probably the most common question I get, and for good reason. Every homeowner has stood outside after a rainstorm wondering if their wet stucco walls are behaving normally or signaling trouble ahead.
Normal stucco dampness should disappear within a few hours to a day under typical conditions. Think of it like a sponge that gets wet but then releases that moisture back into the air through evaporation.
Several factors affect how quickly your walls dry. Sunlight exposure is the biggest helper – south-facing walls in direct sun dry much faster than shaded areas. Air circulation also plays a huge role, which is why walls tucked under deep overhangs or surrounded by dense landscaping take longer to dry.
Here’s when to worry: if you notice the same spots staying wet for more than a week, especially if they develop dark staining that persists long after everything else has dried. This pattern suggests moisture intrusion stucco problems that need professional attention.
Will painting stucco stop future leaks?
I wish I had a dollar for every time someone asked me this question right after finding moisture problems. The short answer is that painting can help, but it’s not a magic fix for serious moisture intrusion stucco issues.
Quality elastomeric coatings can provide valuable benefits. They add an extra layer of water resistance and can help bridge small hairline cracks that might otherwise allow water entry.
But here’s the critical point: painting won’t fix the underlying problems that cause moisture intrusion. If you have missing flashing around windows, clogged drainage systems, or structural cracks, paint simply covers these issues without solving them.
Even worse, the wrong type of paint can actually make moisture problems more serious. Vapor-impermeable paints act like plastic wrap, preventing your walls from breathing naturally. If moisture is already trapped behind your stucco, sealing it in with the wrong coating can accelerate wood rot and mold growth.
When should I call a professional inspector vs DIY?
This question usually comes from homeowners who’ve noticed some warning signs but aren’t sure if they’re serious enough to warrant professional help.
Call a professional immediately if you’re seeing multiple red flags we’ve discussed – things like persistent wet areas, interior soft drywall, musty odors, or obvious staining around windows. These symptoms often indicate serious problems that require expert diagnosis.
You should also get professional inspection before buying or selling a stucco home. Standard home inspections don’t include the specialized moisture testing needed to detect hidden moisture intrusion stucco problems. Given that remediation can cost tens of thousands of dollars, spending $495 to $1595 for professional stucco inspection is excellent insurance.
DIY monitoring works well for routine maintenance and keeping an eye on known trouble spots. You can certainly do regular visual inspections, take photos to track changes over time, and use basic moisture meters to spot-check interior walls.
But here’s what DIY can’t do: accurately measure moisture content inside your wall assembly. Professional testing uses calibrated probes inserted directly into the wall assembly, following established industry standards that provide legally defensible results.
Conclusion
When it comes to moisture intrusion stucco problems, knowledge truly is power. The difference between a minor repair and a catastrophic failure often comes down to catching issues early and understanding how your stucco system actually works.
Think of your stucco as part of a team – the cement surface, flashing, drainage components, and installation details all need to work together perfectly. When one player drops the ball, water finds a way in, and that’s when your troubles begin.
The good news? Most moisture problems develop slowly, giving you time to spot the warning signs we’ve covered. That persistent damp spot after rain, those hairline cracks around windows, or that musty smell in your living room – these aren’t just minor annoyances. They’re your home’s way of asking for help.
Don’t play the waiting game with moisture issues. We’ve seen too many homeowners hope that small problems will just go away on their own. Unfortunately, water is incredibly persistent and patient. What starts as a tiny leak can turn into tens of thousands of dollars in structural damage.
Professional Stucco inspections & testing provide the accurate answers you need to protect your investment. At Stucco Safe, we’ve spent over two decades helping homeowners across Southeastern Pennsylvania, New Jersey, and Delaware understand exactly what’s happening behind their walls.
Our forensic testing methods don’t guess – they measure actual moisture levels in your wall assembly. When you’re dealing with your family’s safety and your largest financial investment, you deserve facts, not assumptions.
Your peace of mind is worth protecting. The cost of professional inspection – ranging from $495 to $1595 for even very large homes – is a small price to pay compared to the potential cost of hidden moisture damage. More importantly, it’s a small price for the confidence that comes from knowing your home is structurally sound and your family is safe.
Take the next step today. Your future self will thank you for addressing moisture concerns now, rather than waiting until they become emergency repairs.