

How to Repair Stucco Cracks Like a Pro
Why Knowing How to Repair Stucco Cracks Can Save You Thousands
Knowing how to repair stucco cracks the right way is one of the most important things you can do to protect your home’s exterior — and your wallet.
Here’s the quick answer:
- Identify the crack type — hairline, stress, stair-step, or structural
- Clean the area with a wire brush and remove all loose material
- Widen hairline cracks to about 1/4 inch with a cold chisel for better filler adhesion
- Choose the right filler — elastomeric caulk for cracks under 1/16 inch; stucco patching compound for wider gaps
- Fill and tool the crack, pressing material firmly into the void
- Match the texture using a damp sponge or stiff brush while the filler is still wet
- Cure fully — at least 24 hours for caulk, 7 days for patching compound — before painting
Stucco is one of the most durable exterior finishes available. But its rigidity is also its weakness. Because it can’t flex with a home’s natural movement — from seasonal temperature swings, soil shifts, or settling — it cracks.
Those cracks might look like a minor cosmetic issue. They rarely are.
Even a hairline crack is an open door for water. Once moisture gets behind the stucco, it can cause wood rot, mold, and paint failure that costs far more to fix than the original crack. A failed repaint on an average home can run $4,500 to $9,000 to redo — compared to $5–$15 in materials to fix a hairline crack before painting.
And if you’re planning to sell your home, visible or worsening cracks can raise red flags for buyers and inspectors alike.
I’m Gabe Kesslick, founder of Stucco Safe and an EDI Level 2 Certified Stucco Inspector with over two decades of experience in leak detection and forensic building envelope investigation — including hundreds of cases where small, ignored cracks turned into serious moisture damage behind the stucco. In this guide, I’ll walk you through exactly how to repair stucco cracks correctly, so your repair actually holds.
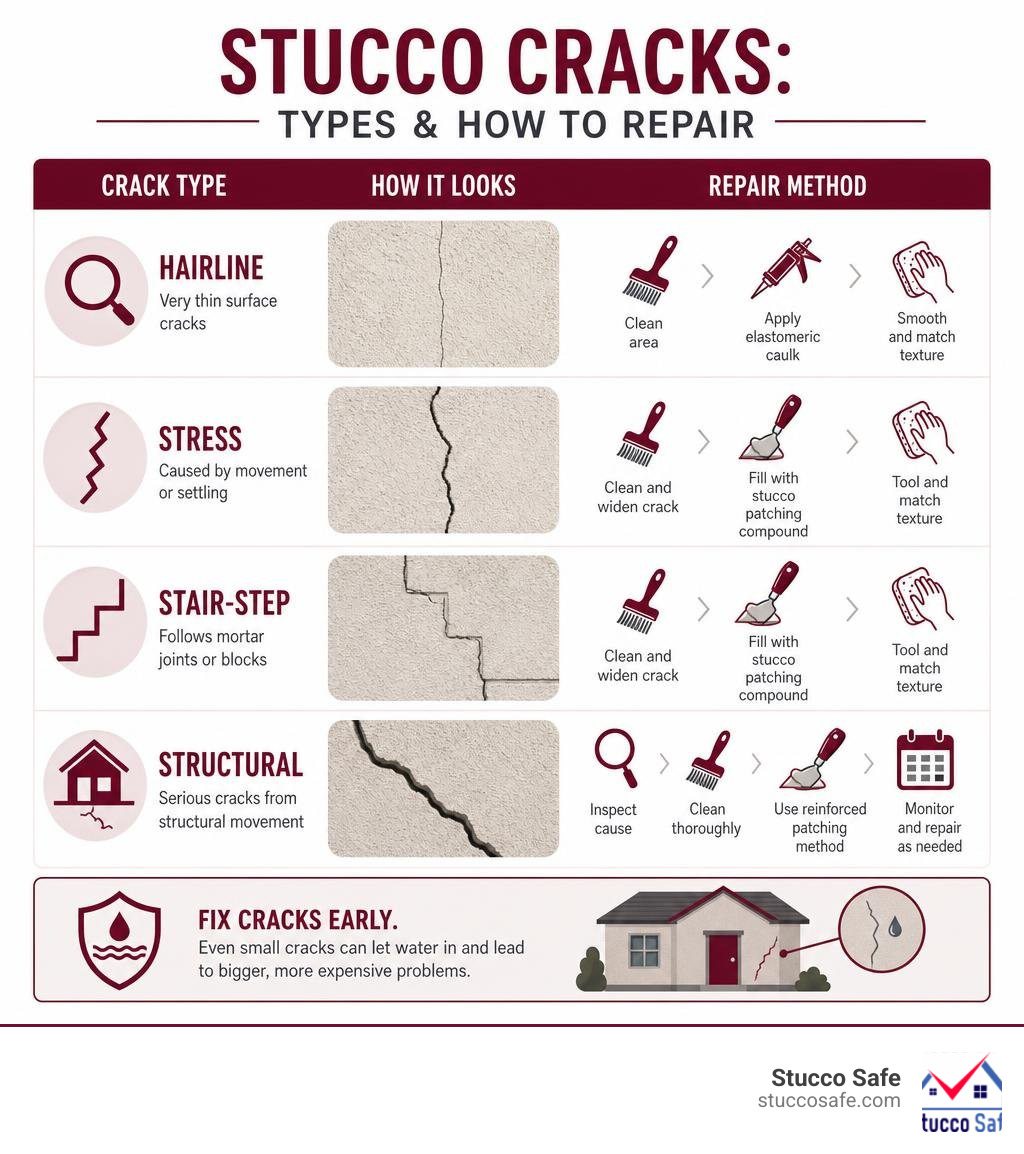
Quick how to repair stucco cracks terms:
Understanding Stucco Cracks: Types and Severity
Before you grab a putty knife and start patching, you need to know what kind of crack you are dealing with. Stucco cracks are not all created equal. Some are simple cosmetic blemishes caused by the natural drying and shrinking of the plaster, while others are warning signs of serious structural movement or water damage.
To choose the right repair method, you must first learn how to read the cracks in your walls.
- Hairline Cracks (Under 1/16 Inch Wide): These are the most common cracks you will find on a stucco home. They often resemble a fine spiderweb across the surface. Hairline cracks are typically cosmetic, caused by minor thermal expansion, seasonal temperature swings, or slight shrinkage when the stucco was originally applied. While they are small, they still need to be sealed to prevent wind-driven rain from finding its way behind the cladding.
- Stress Cracks (1/16 to 1/4 Inch Wide): These cracks are slightly wider and often run diagonally from the corners of windows, doors, or where different wall sections meet. They occur because of the normal settling of your home or localized stress on the framing. These require mechanical widening and a flexible sealant to ensure the repair doesn’t pop back out when the house shifts.
- Stair-Step Cracks: If your stucco is applied over concrete block or brick, you might notice cracks that follow the mortar lines in a stair-step pattern. These cracks indicate movement in the masonry substrate underneath. While some stair-step cracking is due to minor settling, it can also point to larger foundation issues.
- Structural Cracks (Over 1/4 Inch Wide or Actively Growing): These are the red flags. If a crack is wider than a pencil, runs continuously in a straight vertical or horizontal line, or keeps widening after you patch it, you are dealing with structural movement. These cracks often indicate a lack of proper control joints, foundation settlement, or framing failure.
Our local climate in Southeastern Pennsylvania, New Jersey, and Delaware plays a massive role in how these cracks behave. In our region, we experience extreme seasonal shifts — from freezing, snowy winters to hot, humid summers.
During the winter, water enters unrepaired cracks. When that water freezes, it expands by about 9%, acting like a tiny wedge that forces the crack wider. When summer arrives, the intense sun heats the stucco surface, causing the rigid material to expand. This constant freeze-thaw and thermal expansion-contraction cycle will quickly turn a simple hairline crack into a major failure point if it isn’t addressed.
If you want to dive deeper into why these fractures appear and what they mean for your home, you can Learn when to worry about stucco cracks.
DIY vs. Professional: When to Call an Expert
It is tempting to treat every stucco crack as a quick weekend DIY project. However, simply covering up a crack without addressing the root cause is a waste of time and money. In fact, a “cover-up” repair job using cheap, inflexible materials often fails within six months, whereas a proper, professional repair can last 10 to 20 years.
So, how do you know when to roll up your sleeves and when to call in a professional?
When DIY Makes Sense
If your home has localized, stable hairline cracks (under 1/16 inch wide) and the surrounding stucco is rock-solid with no signs of bubbling, staining, or soft spots, this is a perfectly reasonable DIY project. With about $40 to $60 in high-quality materials and a weekend of patience, you can successfully seal these cracks and protect your home.
When You Must Call a Professional
You should put down the caulk gun and consult a professional stucco contractor or a structural engineer if you notice any of the following warning signs:
- Cracks wider than 1/4 inch.
- Stair-step cracks in masonry-backed stucco.
- Active cracks that continue to grow (you can test this by marking the ends of the crack with a pencil and checking if it extends past the mark after 30 days).
- Stucco that feels soft, spongy, or crumbles when touched.
- Dark water stains, bubbling paint, or a musty, moldy smell near the cracked areas.
If you suspect water has already penetrated the wall system, a simple cosmetic patch will actually trap the moisture inside, accelerating wood rot and mold growth on your home’s wooden framing.
This is where professional testing becomes invaluable. At Stucco Safe, we perform forensic stucco testing using specialized, penetrating moisture meters to map the moisture levels behind your walls.
Unlike thermal imaging — which is largely useless on stucco because the plaster is nearly an inch thick and masks underlying temperature differences — our certified inspectors take physical readings.
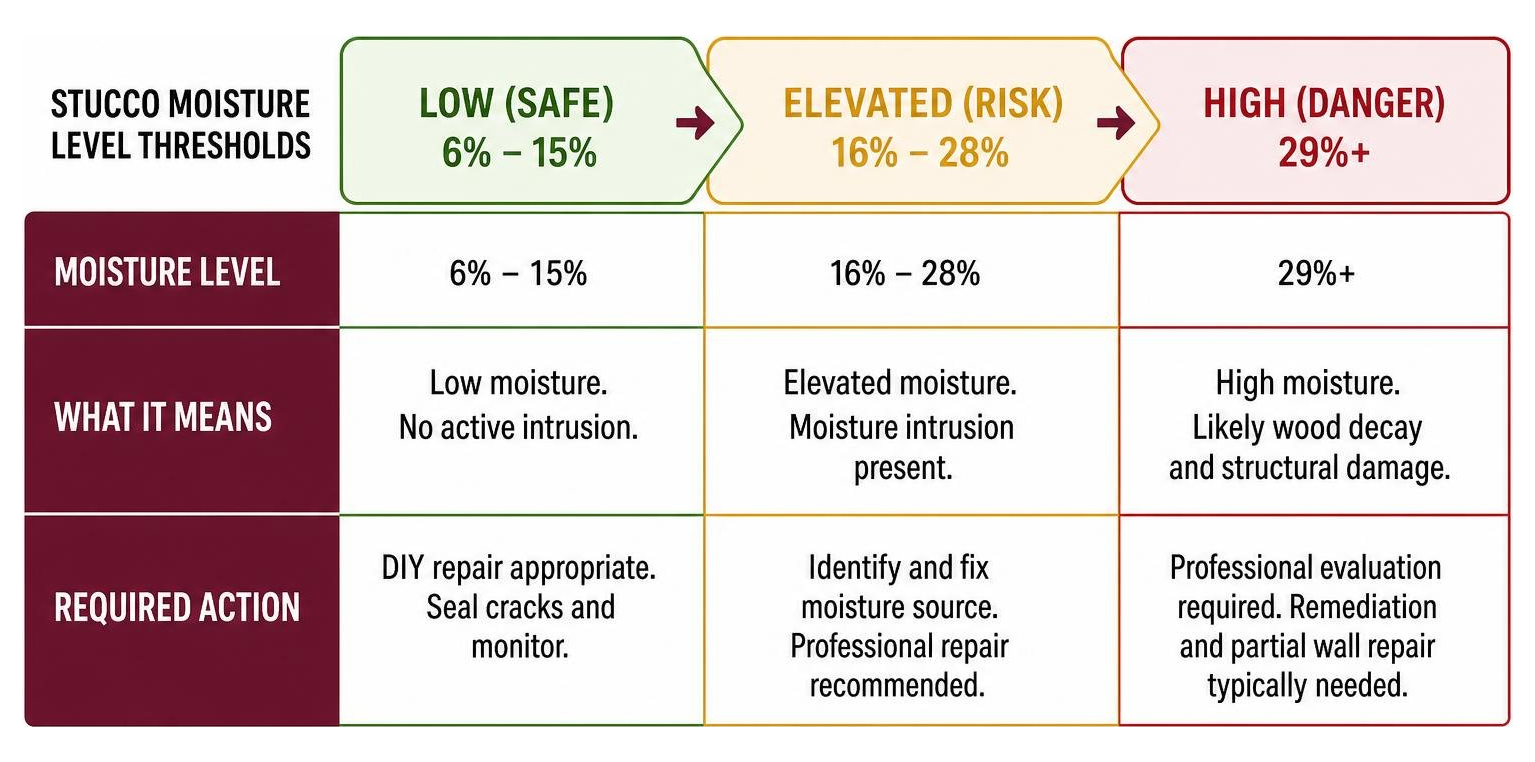
Moisture levels between 6% and 15% are considered low and safe. Readings between 16% and 28% are elevated, indicating a moisture intrusion issue that must be corrected. If readings exceed 29%, it typically indicates active wood decay and structural damage, meaning a simple patch will not suffice and partial wall remediation is required.
The Cost Reality
A typical DIY hairline crack repair will cost you less than $60 in tools and sealant. If you hire a professional painter to handle minor crack repairs as part of an exterior paint job, it typically adds $200 to $500 to the overall quote.
However, if structural cracks require a professional engineering assessment, expect to pay between $300 and $1,500 for the inspection before any cosmetic repairs even begin. If you need a comprehensive moisture test to ensure your home’s sheathing is dry, professional Stucco Inspections vary in cost from $495 to $1595 or more for very large homes.
Spending a few hundred dollars on an inspection now can save you from a failed repaint or a massive $50,000 remediation project down the road. For more details on making this decision, check out our Guide to fixing cracked exterior stucco.
How to Repair Stucco Cracks: Tools and Materials
If you have assessed your walls and confirmed that your cracks are non-structural and suitable for DIY repair, it is time to gather your gear. Using the wrong materials — like cheap silicone caulk — is the number one reason DIY repairs fail. Stucco is highly alkaline and expands and contracts constantly. Cement will not stick to silicone, and standard caulk will tear within a year of seasonal movement.

Your Shopping List:
- Stiff-bristle wire brush: To clean out loose debris.
- Cold chisel and hammer (or a 5-in-1 tool): To widen and prep the crack.
- Caulking gun: To apply tube-based sealants.
- Rubber grout float or margin trowel: For spreading and leveling patching compound.
- Damp sponge or stippling brush: To match the existing stucco texture.
- High-quality exterior primer and paint: To seal and finish the repair.
Choosing the Right Filler
Choosing your repair material depends entirely on the width of the crack:
| Crack Width | Recommended Material | Why It Works |
|---|---|---|
| Under 1/16 inch (Hairline) | Brush-grade elastomeric sealant or paintable, flexible acrylic caulk | Flows easily into tiny voids and remains flexible enough to stretch with thermal movement. |
| 1/16 inch to 1/4 inch (Stress) | 100% elastomeric stucco sealant (like QUIKRETE Stucco Repair) | Designed to bridge larger gaps, containing fine sand particles to mimic the look of real stucco. |
| Over 1/4 inch (Large gaps) | Pre-mixed acrylic stucco patching compound (applied in layers) | Provides structural body to fill deep voids without sagging, while maintaining some flexibility. |
For a great visual guide on how these products behave during application, you can refer to the QUIKRETE stucco repair guide. If you are focusing strictly on minor blemishes, read our specific tips on How to repair small stucco cracks.
Step-by-Step Guide to Repairing Stucco Cracks
Now that you have your tools ready, let’s walk through the actual repair process. To make sure your repair blends in seamlessly and lasts for years, follow this step-by-step sequence.
Preparing the Surface: How to Repair Stucco Cracks at the Hairline Level
The most common mistake homeowners make is applying caulk directly over a hairline crack. Because the crack is so narrow, the sealant only sits on the surface like a thin skin. As soon as the wall expands or contracts, that thin layer tears right open.
To prevent this, you must use the “V-Groove” Protocol:
- Widen the Crack: Take your cold chisel and hammer (or a sturdy 5-in-1 tool) and gently run it along the length of the crack. You want to widen the crack to a minimum of 1/8 to 1/4 inch, creating a clean, V-shaped or inverted-V channel. This gives the patching material a deep, wide profile to grab onto, creating a strong mechanical bond.
- Remove Loose Debris: Use a stiff-bristle wire brush to scrub inside and around the newly widened crack. Break away any loose, crumbling stucco or old, failing caulk.
- Clean the Area: Vacuum out the dust using a shop vac, or blow it clear with compressed air. Finally, wipe down the area with a damp sponge. Any leftover dust will act as a bond-breaker, preventing your sealant from sticking to the stucco.
For a detailed look at conquering these tiny, frustrating lines, check out our guide on How to fix hairline stucco cracks.
Applying Filler: How to Repair Stucco Cracks with Texture Matching
Once your crack is prepped and clean, you can apply your chosen filler.
- Apply the Sealant: Cut the nozzle of your elastomeric sealant tube at a 45-degree angle to match the width of your prepped crack. Load it into your caulking gun, hold it at a 45-degree angle, and slowly draw the gun down the crack. Force the bead deep into the V-groove to eliminate any air pockets.
- Level the Patch: For wider cracks using patching compound, use a putty knife or margin trowel to press the compound firmly into the gap. Apply the patch in layers no thicker than 1/4 inch at a time, allowing each layer to dry before applying the next. Wetting your trowel slightly will help you achieve a smooth, flat finish.
- Match the Texture: This is where the magic happens. Untextured patches look like smooth, ugly scars on your home’s exterior. While the sealant or patch is still wet, use a damp sponge, a stiff-bristle brush, or even a crumpled plastic bag to stipple and stipple-tap the surface. Feather the edges of the patch outward by several inches into the surrounding wall to blend the new texture with the old (whether it is a sand finish, dash, or smooth coat).
- Let it Cure: Do not rush this step! Keep the repair protected from direct, hot sunlight and heavy rain. If you are using a cement-based patch, mist it lightly with water once or twice a day for 48 hours to ensure a slow, strong cure.
For professional-grade tips on choosing the perfect elastomeric products, read the Elastomeric stucco crack repair guide. If you want a deeper look at patching like a seasoned craftsman, see The DIY guide to patching stucco.
Painting Prep and the Risks of Elastomeric Paint
Once your stucco repairs are cured, you are ready to paint. However, you must follow the correct sequence to ensure your new paint job doesn’t peel off in sheets.
The Full Exterior Painting Prep Sequence:
- Pressure Wash: Wash the entire wall to remove dirt, chalking paint, and mold. Allow the walls to dry completely for at least 24 to 48 hours.
- Repair and Patch: Perform all your crack repairs as outlined above.
- Respect the Cure Times: This is non-negotiable. Standard elastomeric caulk needs at least 24 hours to cure. Traditional cement-based stucco patches require a minimum of 6 to 7 days to cure before painting. Painting over uncured, highly alkaline concrete will burn right through your paint, causing immediate discoloration and peeling.
- Prime: Apply a high-quality, alkali-resistant exterior masonry primer. This seals the porous stucco and ensures your topcoat adheres uniformly.
- Paint: Apply two coats of high-quality exterior acrylic latex paint using a thick-nap roller (at least 1-inch nap) to get deep into the stucco texture.
The Myth of Elastomeric Paint
Many homeowners ask: Can I just skip the crack repairs and use a thick elastomeric paint to cover everything up?
The short answer is no. While elastomeric paint is an excellent, flexible coating that can stretch up to 800% to bridge future hairline cracks, it has strict limits. Standard acrylic paint forms a dry film thickness of only 1.5 to 3 mils, which cannot bridge cracks wider than 1/64 inch. High-build elastomeric coatings can bridge cracks up to 1/16 inch, but only if applied at a massive 10 to 15 mil thickness.
If you paint over unrepaired cracks wider than 1/16 inch, the paint will “telegraph” the crack through the new finish within months, or the paint film will tear along the crack line within a year.
Furthermore, painting over unrepaired cracks voids almost all major manufacturer warranties. Companies like Sherwin-Williams, Benjamin Moore, and Dunn-Edwards explicitly require all cracks to be mechanically repaired and cured as a condition of their product warranties.
To make sure your painting project goes off without a hitch, read our Ultimate exterior stucco repair guide.
Frequently Asked Questions about Stucco Crack Repair
Can you paint over stucco cracks without repairing them first?
No. Standard paint cannot bridge cracks wider than 1/64 inch. If you paint over unrepaired cracks, they will quickly reappear through the new paint film. Even worse, painting over cracks traps moisture inside your walls, which can lead to hidden wood rot and mold.
Why do repaired stucco cracks keep coming back?
If a patched crack reopens, it is usually because of one of three reasons: the crack is active (structural movement is still occurring), the surface wasn’t cleaned properly (causing a bond-breaker failure), or you used a rigid, cheap filler instead of a highly flexible, 100% elastomeric sealant.
How long does stucco patch need to cure before painting?
Elastomeric caulk typically needs 24 hours to cure, while cement-based stucco patching compounds require 6 to 7 days. Always check the manufacturer’s instructions on your specific product, as rushing this step will cause your paint to fail.
Conclusion
Repairing minor stucco cracks is an essential part of home maintenance that keeps your property beautiful and watertight. By identifying the crack type, prepping the surface with a clean V-groove, choosing a high-quality elastomeric sealant, and matching your wall’s texture, you can achieve a professional-grade DIY repair.
However, cosmetic patches only work on a sound wall system. If you live in Southeastern Pennsylvania, New Jersey, or Delaware, and you are noticing wide, recurring cracks, diagonal stress fractures, or signs of water damage, don’t leave it to chance.
At Stucco Safe, our certified, forensic inspectors specialize in locating hidden moisture and structural issues before they turn into catastrophic failures. We provide clear, objective testing to give you complete peace of mind.
Ready to protect your home’s exterior? Schedule a professional stucco inspection with us today!